PART 1: Backend Infrastructure & Pre-Installation Guide
Document Version 1
This document serves as the mandatory technical prerequisite manual for the Rollup Summary application. The core purpose of this application is to deliver a suite of unified screens that centralize configuration of cross-object rollup calculations, including across Lookup relationships. The steps detailed below must be executed by a Salesforce System Administrator to install the managed package, verify its supporting automation, and configure org-level foundations before front-end teams begin building rollups through the Configuration Wizard described in the companion Functional Guide.
Section 1: Package Installation & Security Model
1.1 Pre-Installation System Prerequisites
Before starting the deployment, the executing Salesforce System Administrator must verify that the target environment meets the following conditions:
- Administrative Privileges: The executing user profile must have explicit Download Packages and Modify All Data system permissions active inside the target organization.
- Environment Verification: Identify conclusively whether the target Salesforce instance is a Production org or a Sandbox test environment before launching the package deployment link.
- Session Security: Ensure the installing administrator's user profile has API Enabled checked, and that the active session satisfies the organization's Multi-Factor Authentication (MFA) requirements to prevent deployment blockages.
- Namespace Awareness: This package installs under the managed namespace prefix
arbiRollup__. Confirm no conflicting custom fields or objects already use this prefix in the target org.
1.2 Step-by-Step Installation Procedure
Step 1: Package Access and Authentication
- AppExchange Redirection: Navigate to the Salesforce AppExchange directory, locate the Rollup Summary application (listed under the asset name "Rollup+ by Arbisoft"), and click the installation link.
- Credential Entry & Identity Verification: Input your environment credentials on the secure Salesforce login page and complete the mandatory MFA challenge on your registered device to authorize access.
Step 2: Security Model and Access Level Assignment
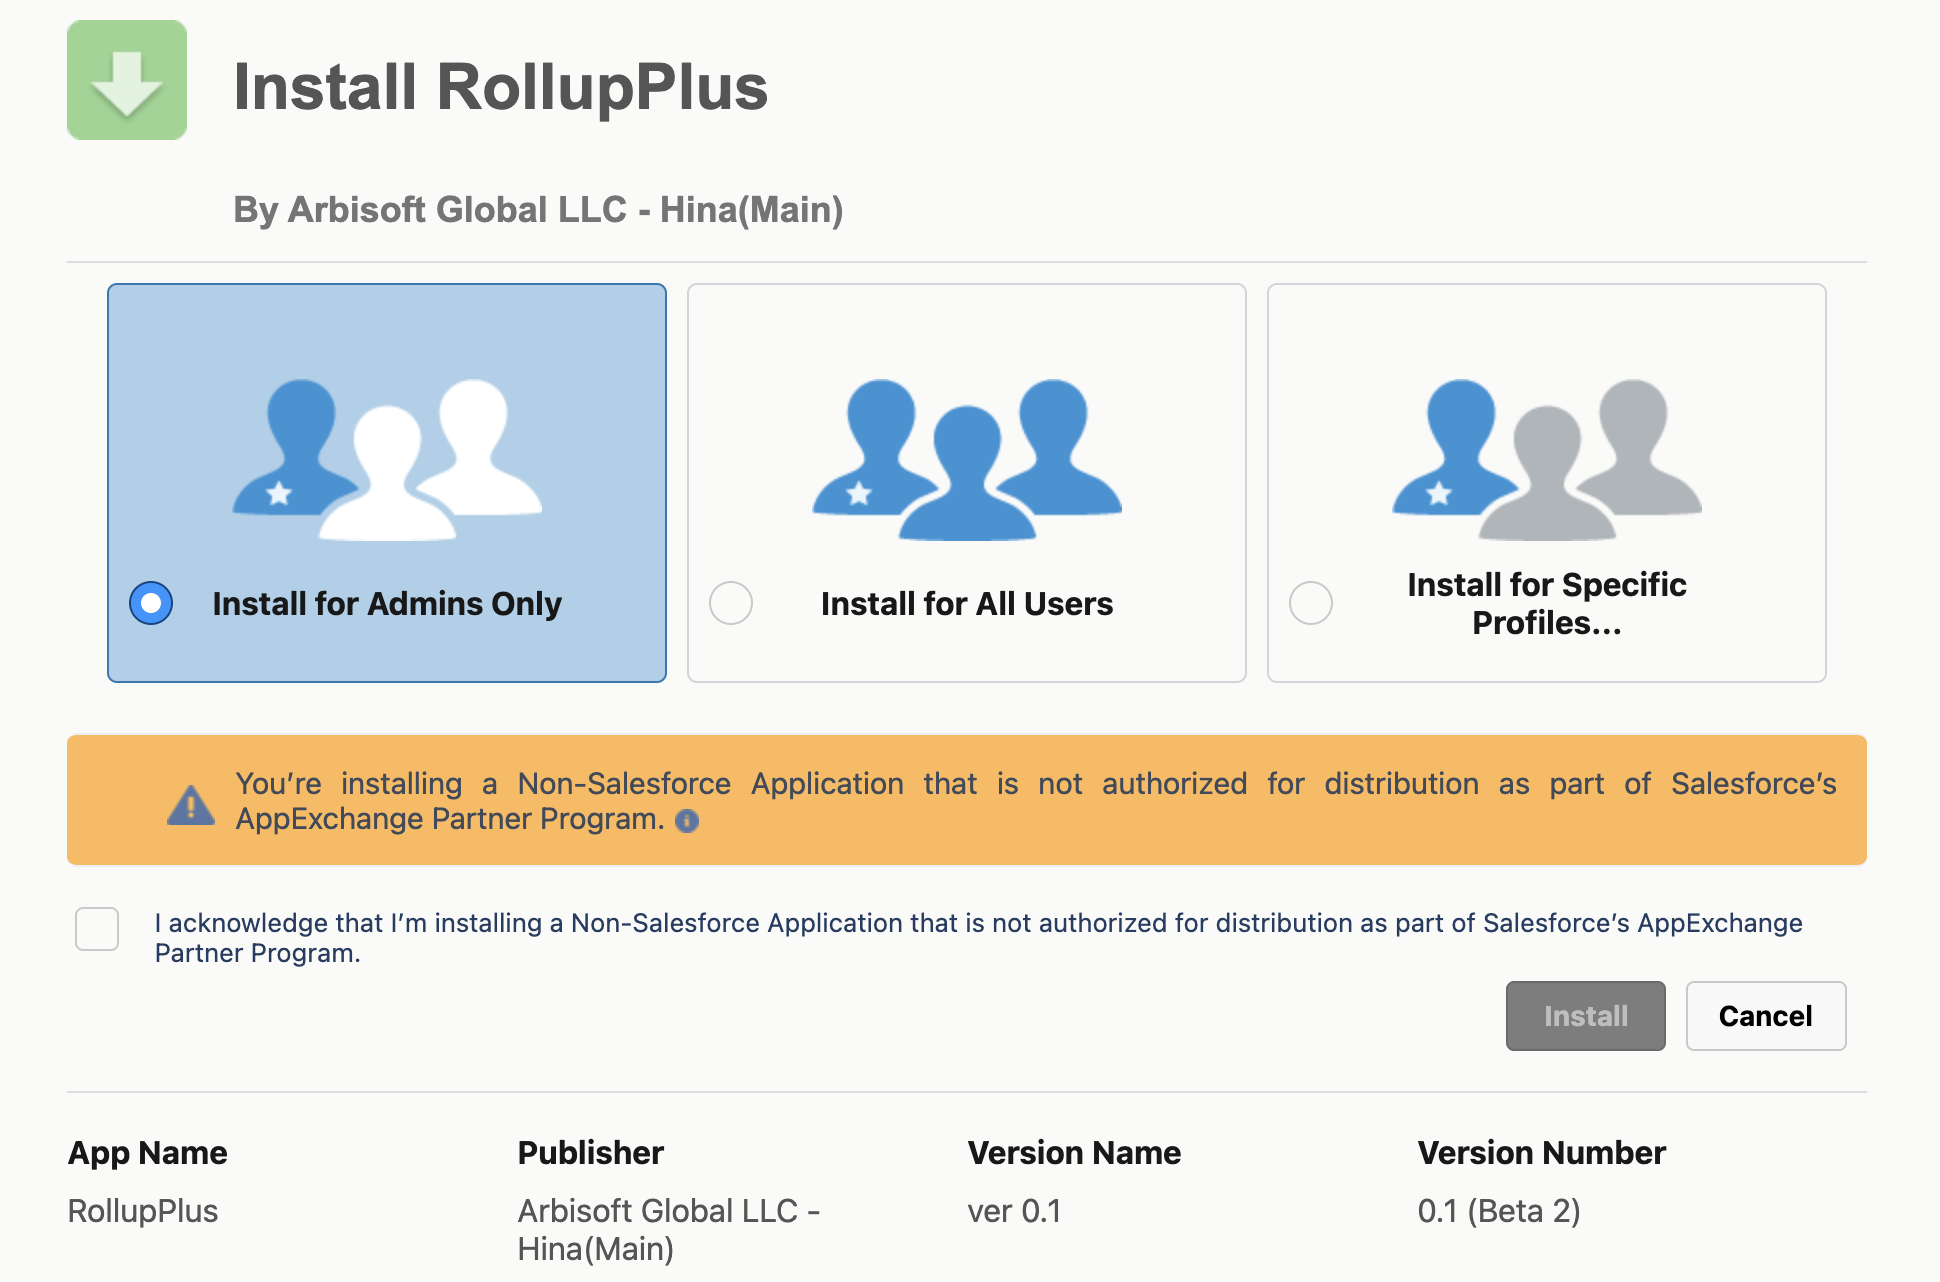
Upon successful authentication, the package installation interface will load. Explicitly select a security deployment model based on your company's internal data governance policies:
- Install for Admins Only (Default Recommended): Limits package component access exclusively to users with the System Administrator profile. Use this option to validate the backend custom objects and Flow automation before rolling the wizard out to business units.
- Install for All Users: Grants immediate visibility, tab access, and underlying object permissions to all internal users in the org.
- Install for Specific Profiles: Opens an interactive profile mapping matrix allowing tailored security level assignments, page layout controls, and object CRUD permission settings per profile prior to deployment.
Step 3: Execution of Package Deployment
- Trigger Installation: Click the blue Install confirmation button within the primary frame interface.
- Execution Processing: Lightweight assets complete processing within seconds, routing directly to a green validation screen. In large metadata enterprise environments, the platform may present: "This app is taking a long time to install. You will receive an email notification once complete." Click Done safely - deployment finishes asynchronously.
1.2.1 Verify Application Access After Installation
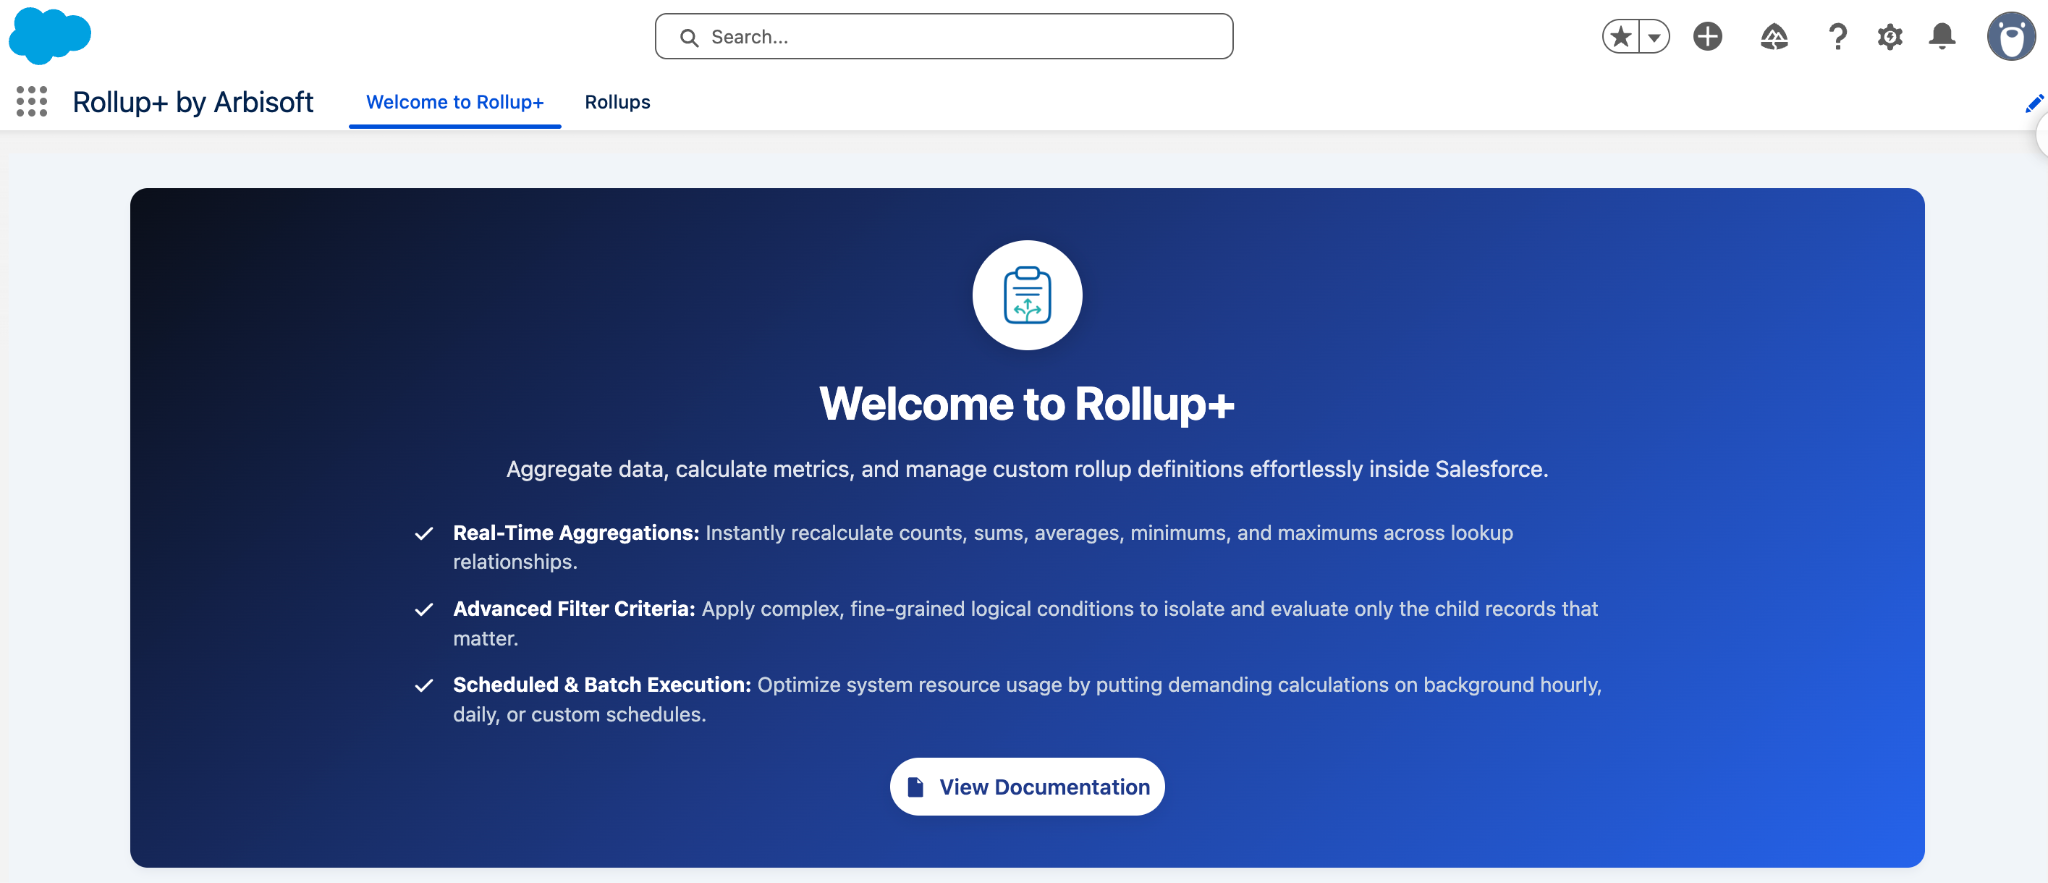
After the package installation is complete, users can access the Rollup Summary application from Salesforce and verify that the installation was successful.
- Lightning Experience: Open the App Launcher, search for Rollup+, and select the Rollup+ by Arbisoft application. The navigation bar exposes the Welcome to Rollup+ and Rollups tabs.
Section 2: Database Schema & Core Infrastructure
2.1 Create the Target Field on the Parent Object
PREREQUISITE - REQUIRED BEFORE WIZARD USE
This step must be completed before a rollup is built in the Configuration Wizard. The Activate step of the wizard only lists existing fields on the parent object - it does not create fields for you. If no suitable field exists, the wizard blocks activation until one is created.
For every planned rollup operation, a System Administrator must manually create the corresponding custom field on the parent object first.
- Access Object Manager: Setup → Object Manager → select the parent object (e.g., Account).
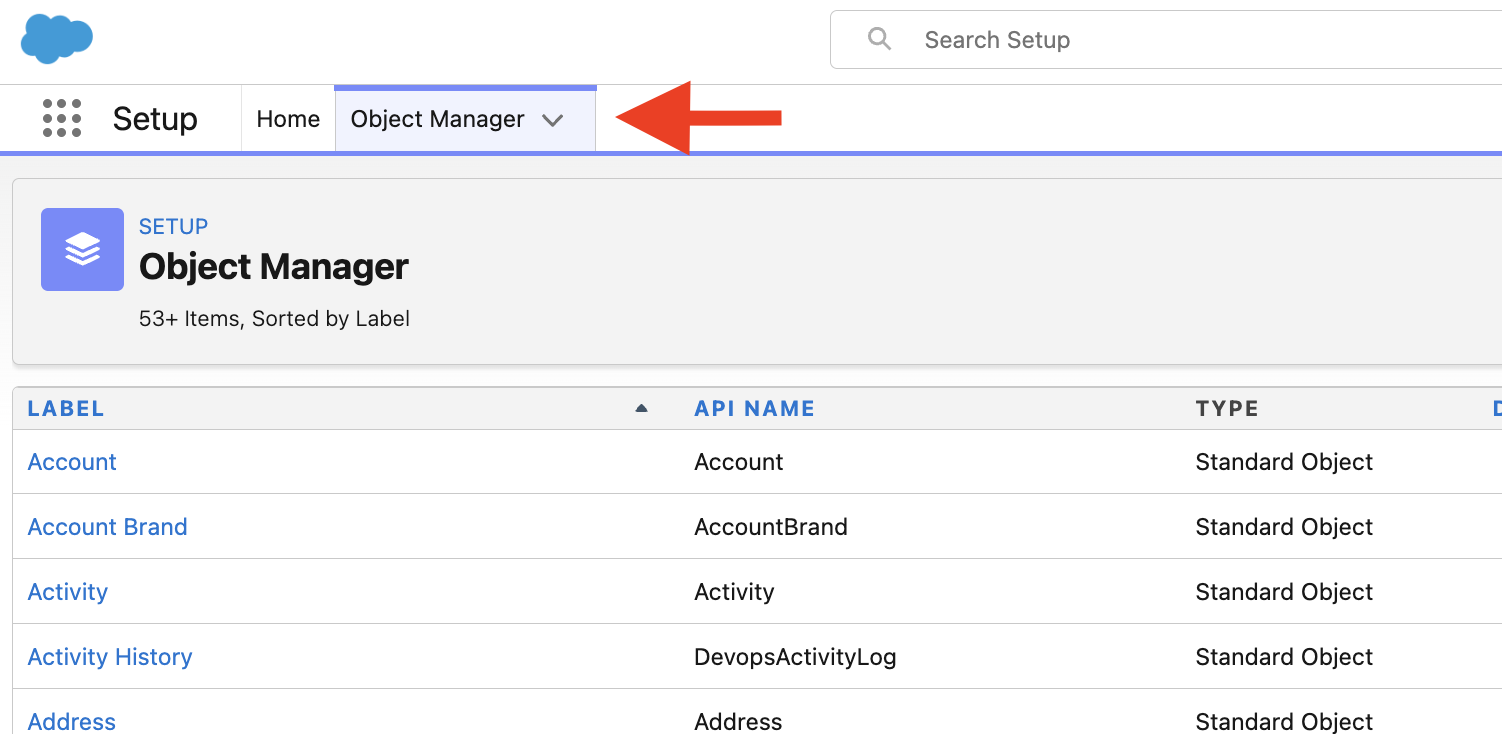
- Create the Field: Go to Fields & Relationships → New, and choose a data type that matches the operation: Number, Currency, or Percent for SUM, COUNT, and AVG, and for MIN/MAX over a numeric field; Date or Date/Time for MIN/MAX over a Date or Date/Time field, matching the Source Field exactly.
- Name It Clearly: Use a descriptive Field Label (e.g., "Roll up Min") so it is easy to identify inside the wizard's Target Field (on parent) dropdown later. Note the generated Field API Name (e.g.,
Roll_up_Min__c). - Set Field-Level Security: Grant Read access to any profile that needs to see the calculated value, and leave the field read-only for standard users - the wizard's automation is the only process that should write to it.
REQUIRED FIELD TYPE
The Target Field's data type must be compatible with the result of the operation, and the wizard will not list a field that is not. For SUM, COUNT, and AVG, and for MIN/MAX over a numeric Source Field, the Target Field must be a numeric type - Number, Currency, and Percent are all accepted, and the Target Field does not have to match the Source Field's type; a Currency source may be summed into a plain Number target. The one exception is date extrema: when MIN or MAX is applied to a Date or Date/Time Source Field, the Target Field must be created as exactly that same type - Date for a Date source and Date/Time for a Date/Time source. The wizard signals this by relabelling the picker to read Target Field (on parent) - Date required. Set decimal places on numeric fields to match the expected precision of the source data (e.g., 2 decimal places for currency-style sums). Text, Checkbox, Picklist, and Formula fields are never valid Target Fields, and a field that is not updateable is excluded as well.
2.2 Build and Activate the Record-Triggered Flow
PREREQUISITE - REQUIRED BEFORE REAL-TIME MODE WORKS
A Record-Triggered Flow must be built manually for every child object that will feed a Real-time rollup. The Flow is what actually invokes the calculation engine when a child record changes - the Configuration Wizard does not create this Flow for you. Build and activate it before or immediately after configuring the corresponding rollup in the wizard.
Phase A: Initialize a New Flow
- Navigate to the Flow Dashboard: From Setup, enter Flows in the Quick Find box and open Flows.
- Create New: Click New Flow and select Record-Triggered Flow so the automation runs when a child record is modified.
Phase B: Configure Start Node Parameters
- Select Object: Set the Object to your targeted child object (e.g., Opportunity).
- Configure Trigger: Set "Trigger the Flow When:" to A record is created or updated.
- Set Entry Conditions: Leave Condition Requirements set to None so every relevant save is evaluated.
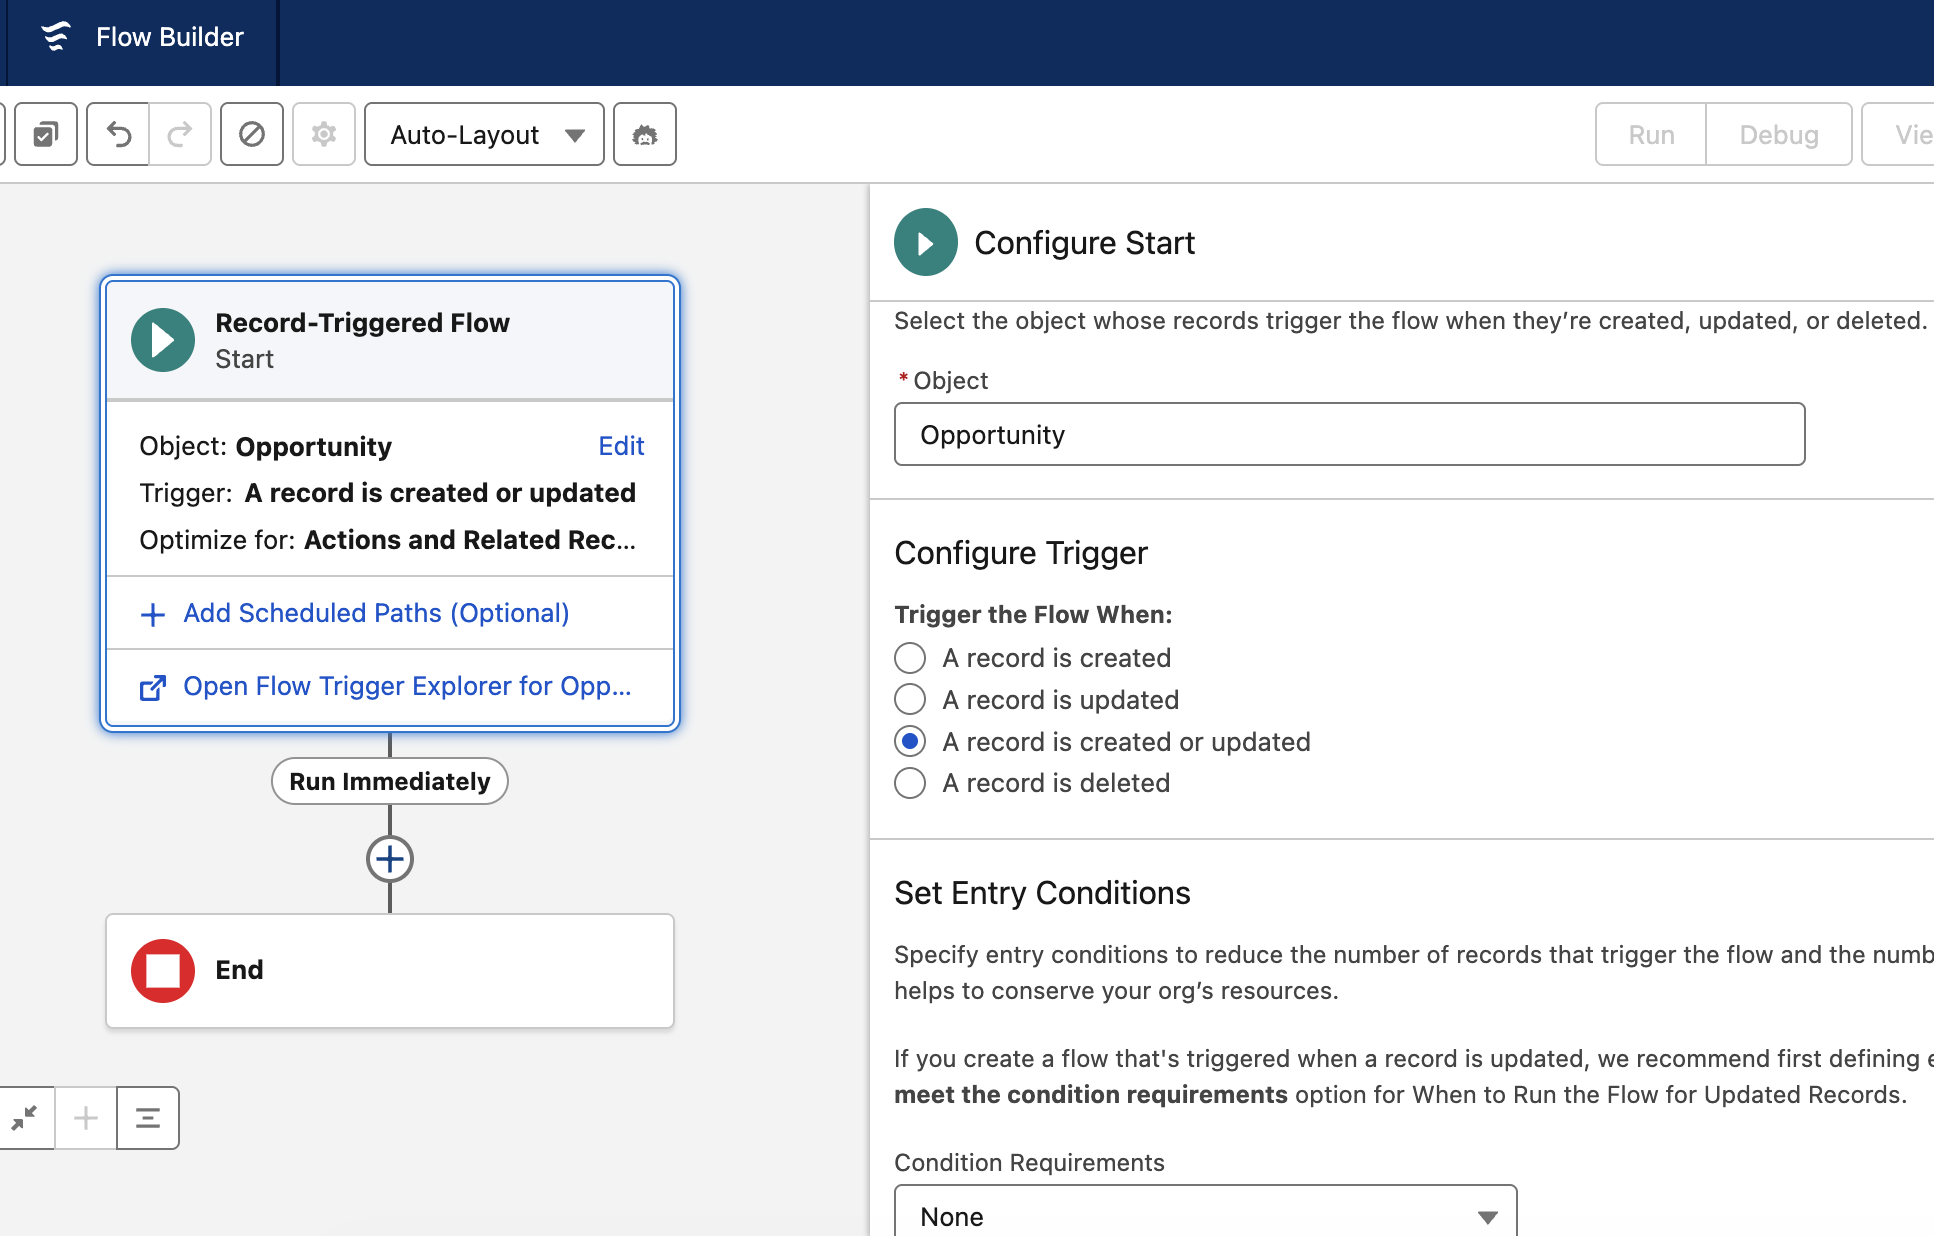
- Optimize Flow: Select Actions and Related Records so the Flow runs after the record is saved and can safely update the related parent record.
- Commit Start Node: Click Done to lock in the trigger parameters.
Phase C: Add the Rollup Apex Action
- Insert a Node: Click the + button under Run Immediately on the canvas.
- Choose Action: Select Action, then search for and choose the Execute Rollup Summary Apex action.
- Label the Node: Give it a clear Label (e.g., "Rollup on Opp"); confirm the API Name auto-fills (e.g., Rollup_on_Opp).
- Set Input Values: Bind Child Object API Name to the triggering object (e.g., Opportunity), and bind Triggered Record ID to the current record's ID (e.g., via the triggering Opportunity's Opportunity ID field).
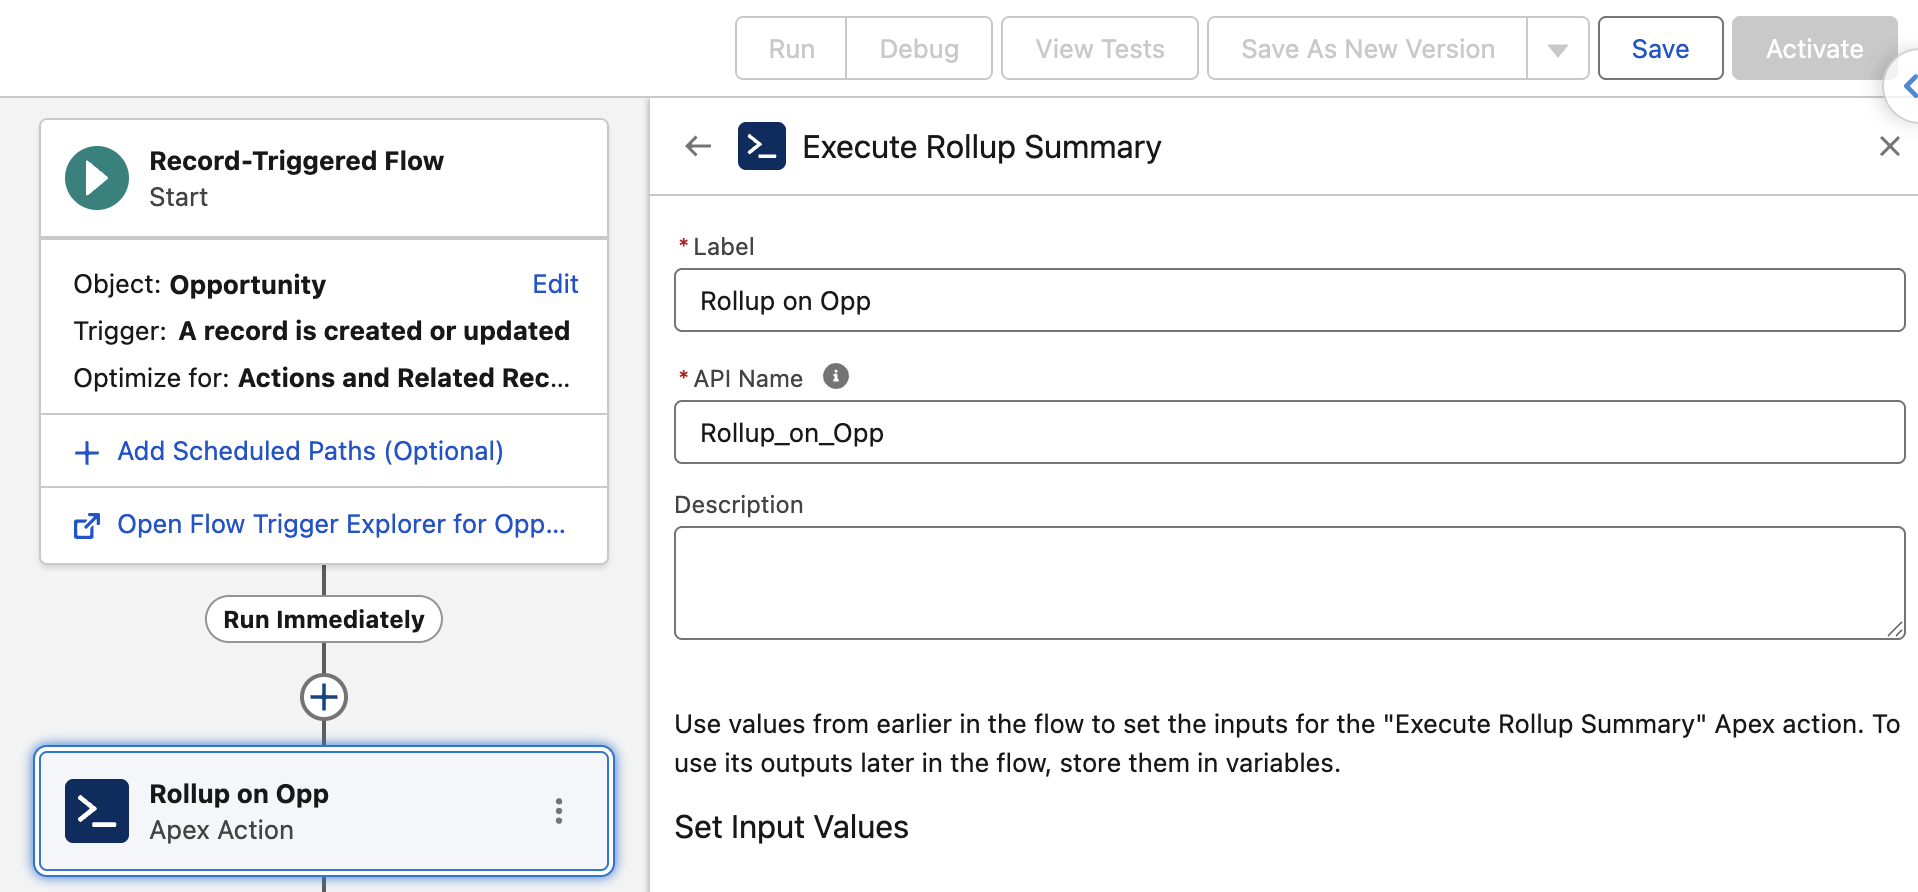
- Commit Element Configuration: Click Done to close the action configuration panel. The canvas now shows Start → Run Immediately → your Apex action node → End.
Phase D: Save and Activate Your Automation
- Save the Flow: Click Save in the top-right toolbar.
- Define Taxonomy: Give the Flow a clear, descriptive name (e.g., "Opp Flow") and confirm the API name auto-populates.
- Test (Recommended): Use Debug or View Tests to confirm the action fires and the Target Field updates as expected before relying on it in production.
- Go Live: Click Activate in the top-right toolbar. The status badge must read Active - an inactive Flow means the Target Field will never update in real time, regardless of how the rollup is configured in the wizard.
SCALING NOTE
Repeat Phases A–D once per child object. If a single parent (e.g., Account) receives rollups from two different child objects (e.g., Opportunity and Contact), two separate Record-Triggered Flows are required - one per child object - each invoking Execute Rollup Summary with its own Child Object API Name.
Section 3: Scheduled Jobs and Uninstalling the Package
3.1 Automated Background Processing (Scheduled Job)
Rollup+ uses a small set of managed scheduled Apex jobs to drive Scheduled-mode recalculation and routine log maintenance. These jobs are not created when the package is installed. Instead, the application registers them automatically the first time they are needed: the daily log-retention job is created when the first rollup is saved, and the shared recalculation jobs are created when the first Scheduled-mode rollup is saved or recalculated. Until a rollup is configured, no Rollup+ scheduled jobs exist in the org.
- Managed Job Names in Salesforce Setup: Rollup OverStart 0, Rollup OverStart 15, Rollup OverStart 30, and Rollup OverStart 45; Rollup OverView Hourly; and Rollup Log Retention Daily.
- Function: Automatically re-evaluate and re-write Target Field values for rollup operations whose Calculation Mode is Scheduled. The four Rollup OverStart jobs are offset by 15 minutes so that together they give a quarter-hour cadence, and they run full recalculations; Rollup OverView Hourly applies incremental updates when a setup's child records have changed; and Rollup Log Retention Daily prunes old Rollup Log records overnight. Realtime is the only other Calculation Mode - there is no separate "batch" mode, as batches are simply the internal execution mechanism these jobs use.
IMPORTANT ADMINISTRATIVE WARNING
To keep Scheduled-mode processing running, do not manually delete, abort, or alter the managed Rollup+ jobs (the Rollup OverStart entries, Rollup OverView Hourly, and Rollup Log Retention Daily) in the Salesforce Scheduled Jobs queue. Removing them pauses Scheduled-mode rollups and nightly log cleanup until the jobs are re-created. Realtime (Flow trigger) operations are unaffected, as they run independently of these scheduled jobs. The application re-registers most missing jobs automatically (see Section 3.2), so most accidental deletions are self-correcting. The exception is deleting all four Rollup OverStart jobs at once, which removes the very thing that performs the repair - in that case the jobs return only when a Scheduled-mode rollup is next saved or recalculated. If you intend to remove a job deliberately rather than by accident, follow Section 3.3 instead.
3.2 What Happens If a Scheduled Job Is Deleted (Recovery Procedure)
ADMIN NOTE
If a managed Rollup+ job is accidentally deleted from the Salesforce Setup menu, there is no cause for alarm. The application re-registers missing jobs on its own: the recalculation engine verifies its schedules on every run, and saving or recalculating any Scheduled-mode rollup re-creates any jobs that are missing.
If the recalculation job has been removed, follow these steps to safely reschedule it:
- Navigate to the app's Rollups tab.
- Select a Rollup Object that contains at least one Scheduled-mode rollup, and click Recalculate, then confirm the warning dialog that appears. A setup with no Scheduled-mode rollup will not re-register anything.
- Automatic Re-registration: The application backend detects any missing managed jobs, re-registers them with the Salesforce platform scheduler, and restores normal operations - no manual Apex entry or configuration steps are required.
What Happens When a Scheduled Job Is Deleted
Deleting a Rollup+ job is not permanent. What you see until the job returns depends on which job was removed and whether any recalculation jobs remain to heal it:
- One to three Rollup OverStart jobs deleted: the OverStart jobs verify the full set every time they fire, so any surviving OverStart job re-creates the missing ones - and re-creates Rollup OverView Hourly if it is also gone - within 15 minutes. No action is needed.
- Rollup OverView Hourly deleted: it is re-created automatically the next time any Rollup OverStart job fires (within 15 minutes).
- All four Rollup OverStart jobs deleted: automatic healing cannot run, because no OverStart job is left to fire. Re-create them with either configuration action described below.
- Rollup Log Retention Daily deleted: the recalculation schedule does not restore this job; it is re-created the next time any rollup is saved. Because its only role is the nightly cleanup of Rollup Log records, a temporary gap does not affect any rollup values.
Guaranteed re-creation. Whichever job was removed, either of these actions re-registers every missing job immediately and on demand:
- Saving a rollup in the Configuration Wizard - every save re-creates Rollup Log Retention Daily, and saving a Scheduled-mode rollup additionally re-creates the four Rollup OverStart jobs and Rollup OverView Hourly.
- Clicking Recalculate on a Rollup Object that contains at least one Scheduled-mode rollup re-creates all of the shared recalculation jobs (this is the recovery in the steps above).
Re-creation is idempotent: the application looks up each job by name and creates only the ones that are missing, so these actions never leave duplicate jobs behind. While a recalculation job is missing, Scheduled-mode Target Fields simply stop updating until it returns; Realtime rollups keep working the whole time, because they run through their Record-Triggered Flows and do not depend on any scheduled job.
3.3 Removing a Scheduled Job
Rollup+ repairs its own schedules, so deleting a job from Setup is, on its own, temporary (see Section 3.2). Removing a job so that it stays removed means first removing the conditions that re-create it, and only then deleting the job. Use this procedure when you deliberately want to stop the corresponding background processing while keeping the package installed. It is not a prerequisite for uninstalling Rollup+; the uninstall in Section 3.4 removes these jobs on its own.
BEFORE YOU REMOVE A JOB
The Rollup+ scheduled jobs are shared, org-wide infrastructure, not per-rollup slots. There is no scheduled job for an individual rollup or Rollup Object, so removing one stops the corresponding background processing for every Scheduled-mode rollup in the org. Realtime (Flow-triggered) rollups are unaffected, as they run through their Record-Triggered Flows and do not depend on any scheduled job. If your goal is to stop a single rollup, deactivate that rollup in the Configuration Wizard instead of deleting a job.
What Each Job Does, and What Stops If You Remove It
| Managed Job | Purpose | What Stops When It Is Removed |
|---|---|---|
| Rollup OverStart 0, 15, 30, and 45 (treat the four as one job) | Full recalculation of Scheduled-mode rollups, on a quarter-hour cadence. | Scheduled-mode rollups stop computing: first-time (cold start) calculations, routine scheduled recomputes, and manually queued full rebuilds all cease. Removing all four also ends the automatic repair described in Section 3.2, because no job is left to perform it. |
| Rollup OverView Hourly | Incremental updates for completed Scheduled-mode setups whose child records have changed. | Scheduled-mode Target Fields no longer pick up child-record changes between full runs. Full runs continue on the OverStart cadence, so values still refresh, just less often. |
| Rollup Log Retention Daily | Overnight purge of Rollup Log records older than 30 days. | No rollup value is affected. Rollup Log records are simply never purged, and the log grows without limit until the job is restored. |
Step 1: Stop the Actions That Re-create the Job
Three things re-create a missing Rollup+ job. Each one must be inactive before a deletion will hold:
- A surviving Rollup OverStart job: every OverStart job verifies the full set of recalculation jobs each time it fires, so any one of the four re-creates the other three, and re-creates Rollup OverView Hourly. Each of the four is an hourly trigger offset by 15 minutes from the next, so with all four present the repair lands within 15 minutes, and with a single survivor it can take up to an hour. This is why the four OverStart jobs must always be deleted together, in the same sitting.
- Saving a rollup in the Configuration Wizard: every save re-creates Rollup Log Retention Daily, and saving a Scheduled-mode rollup additionally re-creates the four OverStart jobs and Rollup OverView Hourly.
- Clicking Recalculate on a Rollup Object that contains at least one Scheduled-mode rollup: re-creates every managed job, including Rollup Log Retention Daily.
Consequently, before removing any recalculation job, take the org out of Scheduled mode. Open each affected rollup in the Configuration Wizard and either set its Calculation Mode to Realtime or deactivate the rollup. While even one Scheduled-mode rollup remains configured, the next save or Recalculate performed on it will bring the deleted jobs straight back.
Step 2: Delete the Jobs in Salesforce Setup
- Navigate: From Setup, enter Scheduled Jobs in the Quick Find box and open Scheduled Jobs.
- Identify the Rollup+ entries: Locate them by name: Rollup OverStart 0, Rollup OverStart 15, Rollup OverStart 30, Rollup OverStart 45, Rollup OverView Hourly, and Rollup Log Retention Daily. Managed-package jobs are listed here and can be deleted like any other scheduled job. Any entry not beginning with "Rollup " belongs to another package or to your own automation - leave it alone.
- Delete the OverStart jobs first, all four together: Click Del beside Rollup OverStart 0, 15, 30, and 45 without pausing between them. They must go before the other two, because a surviving OverStart job re-creates anything else you have already removed.
- Delete the remaining jobs: Click Del beside Rollup OverView Hourly and Rollup Log Retention Daily, if you intend to remove those as well. To keep the nightly log cleanup running, leave Rollup Log Retention Daily in place - it performs no schedule repair and will not bring the OverStart jobs back.
- Check for work already in flight: From Setup, open Apex Jobs. Deleting a schedule does not abort a batch that has already started, so allow any running Rollup+ batch to finish rather than aborting it mid-run.
Step 3: Verify That the Removal Held
- Wait one full cycle: Allow at least one hour, so that every OverStart trigger has had a chance to fire even if only one was left behind, then reload Setup → Scheduled Jobs. A 15-minute check catches most mistakes, but only a full hour is conclusive.
- Confirm the list is clear: No entry beginning with "Rollup " should remain. If one has reappeared, either an OverStart job survived Step 2 or a Scheduled-mode rollup was saved or recalculated in the meantime. Repeat from Step 1.
- Confirm the expected effect: Scheduled-mode Target Fields stop receiving new values from this point. Realtime rollups keep updating normally on every child-record save, and the values already written to Target Fields remain on the parent records unchanged.
DO NOT REMOVE JOBS THROUGH APEX OR BY EDITING THEM
Deletion from Setup → Scheduled Jobs, as described above, is the supported method. The package's internal scheduling classes are not exposed to subscriber organizations, so calling them from the Developer Console (for example, arbiRollup.RollupScheduleManager.uninstallAll();) will not compile. Equally, do not rename a Rollup+ job or re-point it at a different Apex class: the application identifies its jobs by name, so a renamed job is treated as missing and a fresh copy is scheduled alongside it, leaving the org with duplicate processing.
Restoring the Jobs Later
Removal is fully reversible and needs no manual scheduling or Apex. Set any rollup back to Scheduled Calculation Mode and save it, or click Recalculate on a Rollup Object that contains a Scheduled-mode rollup. The application looks up each managed job by name and creates only the ones that are missing, so restoring is idempotent and never leaves duplicate jobs behind. Section 3.2 describes the same recovery in the context of an accidental deletion.
3.4 Uninstalling the Package
IMPORTANT - READ BEFORE UNINSTALLING
Uninstalling removes the managed package Rollup+ (namespace prefix arbiRollup) in its entirety, including its custom objects, fields, and permission sets. This is a destructive action. Confirm all rollup Target Field values currently in use by reports, list views, or downstream automation are accounted for before proceeding. Once the package is removed, the calculated values already written to Target Fields remain on the parent records, but nothing will update them further.
Follow these steps in order. Uninstalling the package before removing its dependent automation and permission assignments will fail or leave orphaned components behind.
- Step 1: Delete Every Record-Triggered Flow: From Setup, enter Flows in the Quick Find box. Locate every Record-Triggered Flow built against a child object for this package (see Section 2.2), open each one, Deactivate it, and then Delete it. Repeat for every child object that has a Flow calling the Execute Rollup Summary Apex action. Salesforce will block package uninstallation while any of these Flows still reference the package's Apex action.
- Step 2: Unassign the Permission Sets: Go to Setup → Permission Sets. Open the "Rollup Plus App" permission set, and remove every assigned user (Manage Assignments → Remove). The package cannot be uninstalled while it is still assigned to active users.
- Step 3: Uninstall the Package: Go to Setup → search "installed" in the Quick Find box → select Installed Packages. Locate RollupPlus (Publisher: Arbisoft Global LLC, Namespace Prefix: arbiRollup) in the list and click Uninstall.
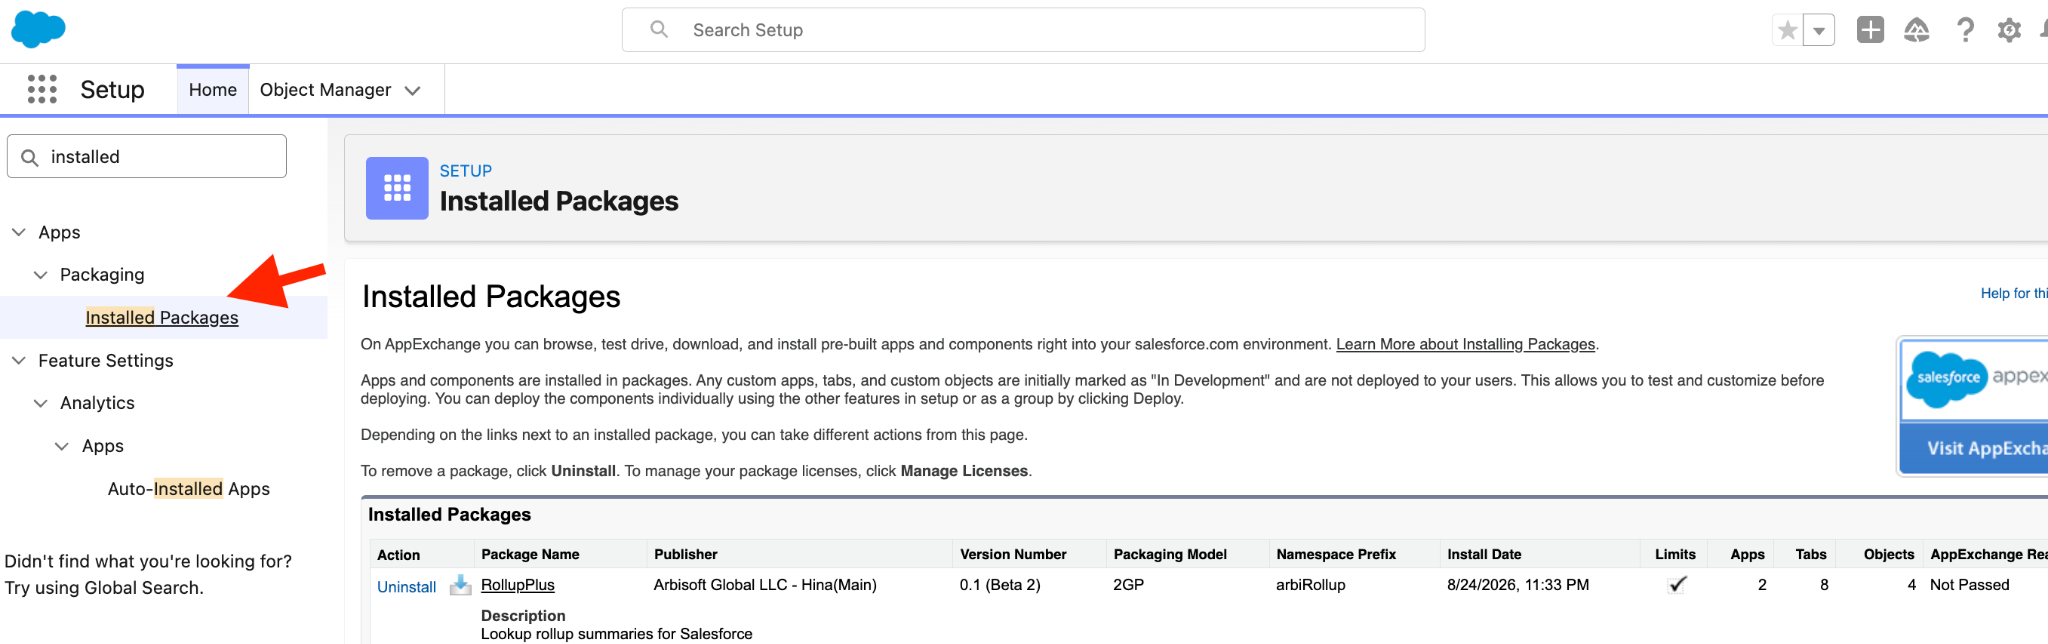
- Confirm the Uninstall: Review the list of components Salesforce identifies for removal (custom objects, fields, tabs, permission sets), check the confirmation box, and click Uninstall again to submit the request. Salesforce processes package removal asynchronously and emails a confirmation once complete.
TROUBLESHOOTING A BLOCKED UNINSTALL
If the Uninstall button is disabled or the confirmation screen lists blocking dependencies, return to Step 1 or Step 2 - the most common causes are an active Flow still referencing the package's Apex action, or a user still holding one of the package's permission sets. Custom report types, list views, or formula fields elsewhere in the org that reference a Target Field can also block removal and must be updated or removed first.
PART 2: Administrative Wizard Setup & Operational Auditing Guide
Document Version 1
The core purpose of this application is to deliver a centralized suite of Unified Screens designed explicitly to configure cross-object rollup summary calculations - including across standard Lookup relationships, not just Master-Detail - natively within Salesforce. By consolidating relationship mapping, calculation logic, activation controls, and operational health logs into single-point interfaces, this tool eliminates the fragmentation typical of native Salesforce rollup configuration, which is otherwise restricted strictly to Master-Detail architectures.
KEY USER BENEFITS & PLATFORM ADVANTAGES
- Platform Standard Limitations Bypassed: Configure rollups across standard Lookup relationships, in addition to Master-Detail, removing the native platform's architectural constraint. No relationship conversion is required, so child records keep their own ownership, sharing, and delete behavior.
- High-Volume Calculation Engine: Supports up to 10 rollup operations simultaneously per relationship setup, compared to competitor caps of 3–4.
- Operational Audit Readiness: Dedicated Rollup Objects, Rollup Fields, Rollup Filters, and Rollup Logs tabs give administrators full visibility into every operation's health, record volume, and error state.
Section 1: Operating the Rollup Manager Configuration Wizard Workspace
1.1 Step 1: Relate - Parent & Child Object Selection
- Launch the App Workspace: Click the Salesforce App Launcher (the nine-dot grid icon in the top-left corner), type "Rollup+ by Arbisoft" into the search bar, and select it to open the primary All Rollups dashboard.
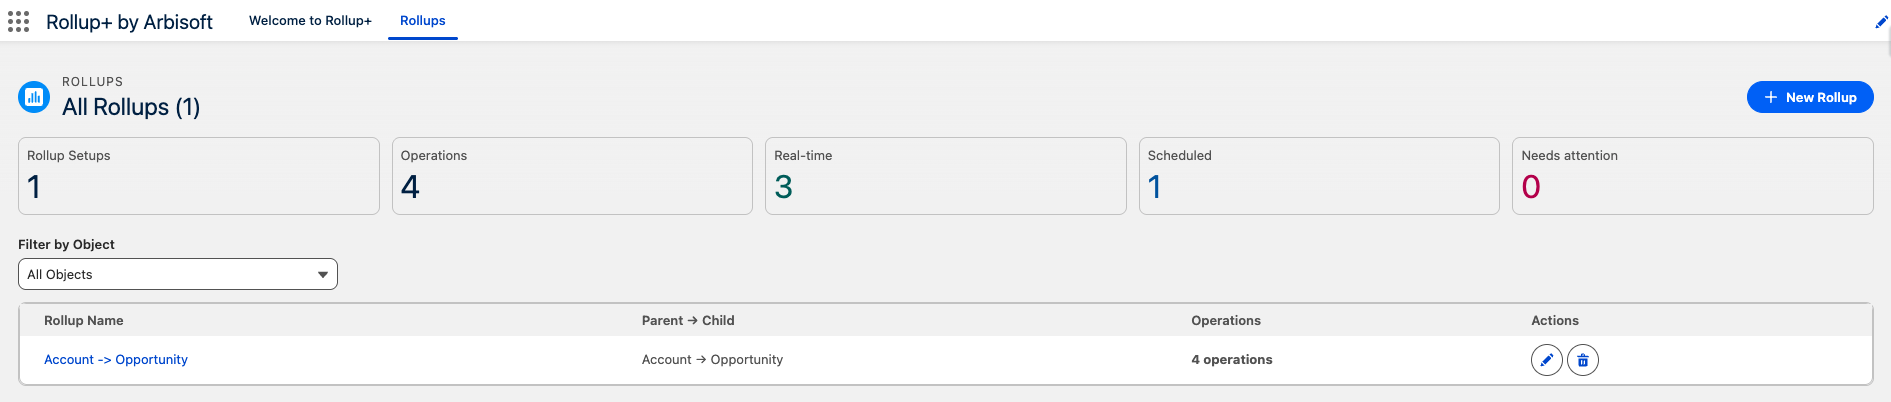
- Review Portfolio Health at a Glance: The dashboard heads the page with a row of summary tiles - Rollup Setups (how many Parent → Child relationships exist), Operations (the total Calculate operations across all of them), Real-time and Scheduled (how many operations run in each Calculation Mode), and Needs attention (how many currently require review). Below them, Filter by Object narrows the list, and each row shows the rollup name, its Parent → Child pair, and its operation count.
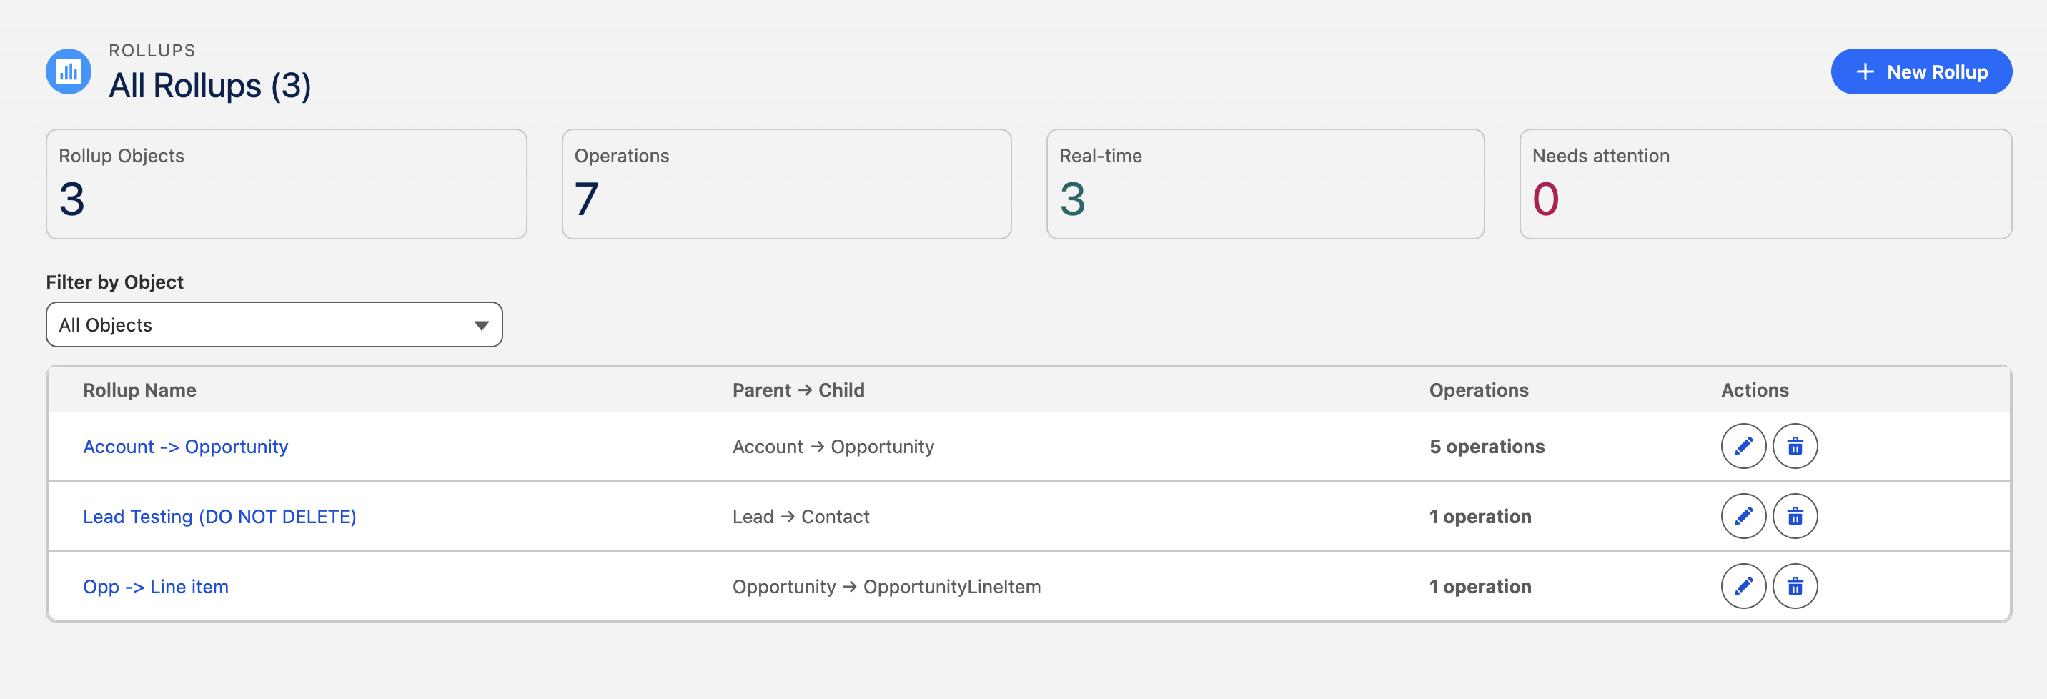
- Initialize a New Configuration Setup: Click the blue New Rollup button in the top-right toolbar to launch the Create Rollup Summary wizard canvas.
- Name Your Rollup: Enter a descriptive Rollup Name (e.g., "Account → Opportunity") that clearly identifies the relationship being summarized.
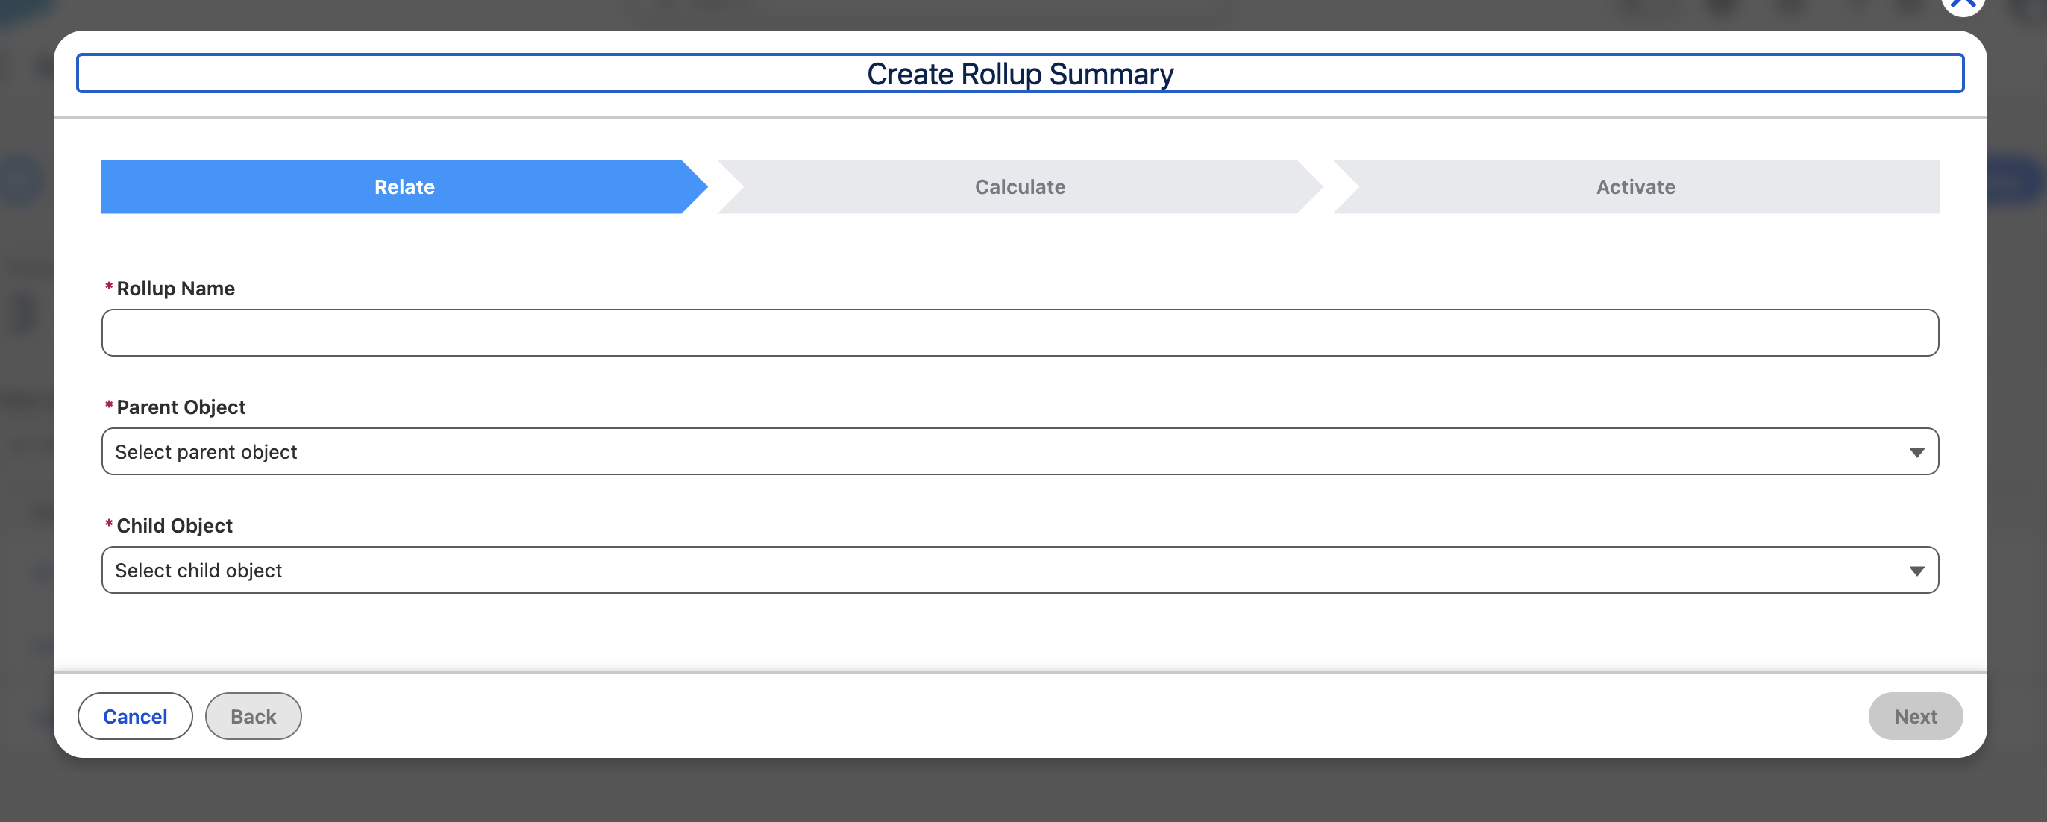
- Target Your Parent and Child Objects: Use the Parent Object and Child Object dropdowns to select the two objects to be related (e.g., Account and Opportunity). The wizard automatically resolves the underlying relationship (child → parent) lookup field - shown here as Account ID (AccountId) - and confirms it with a green check indicator.
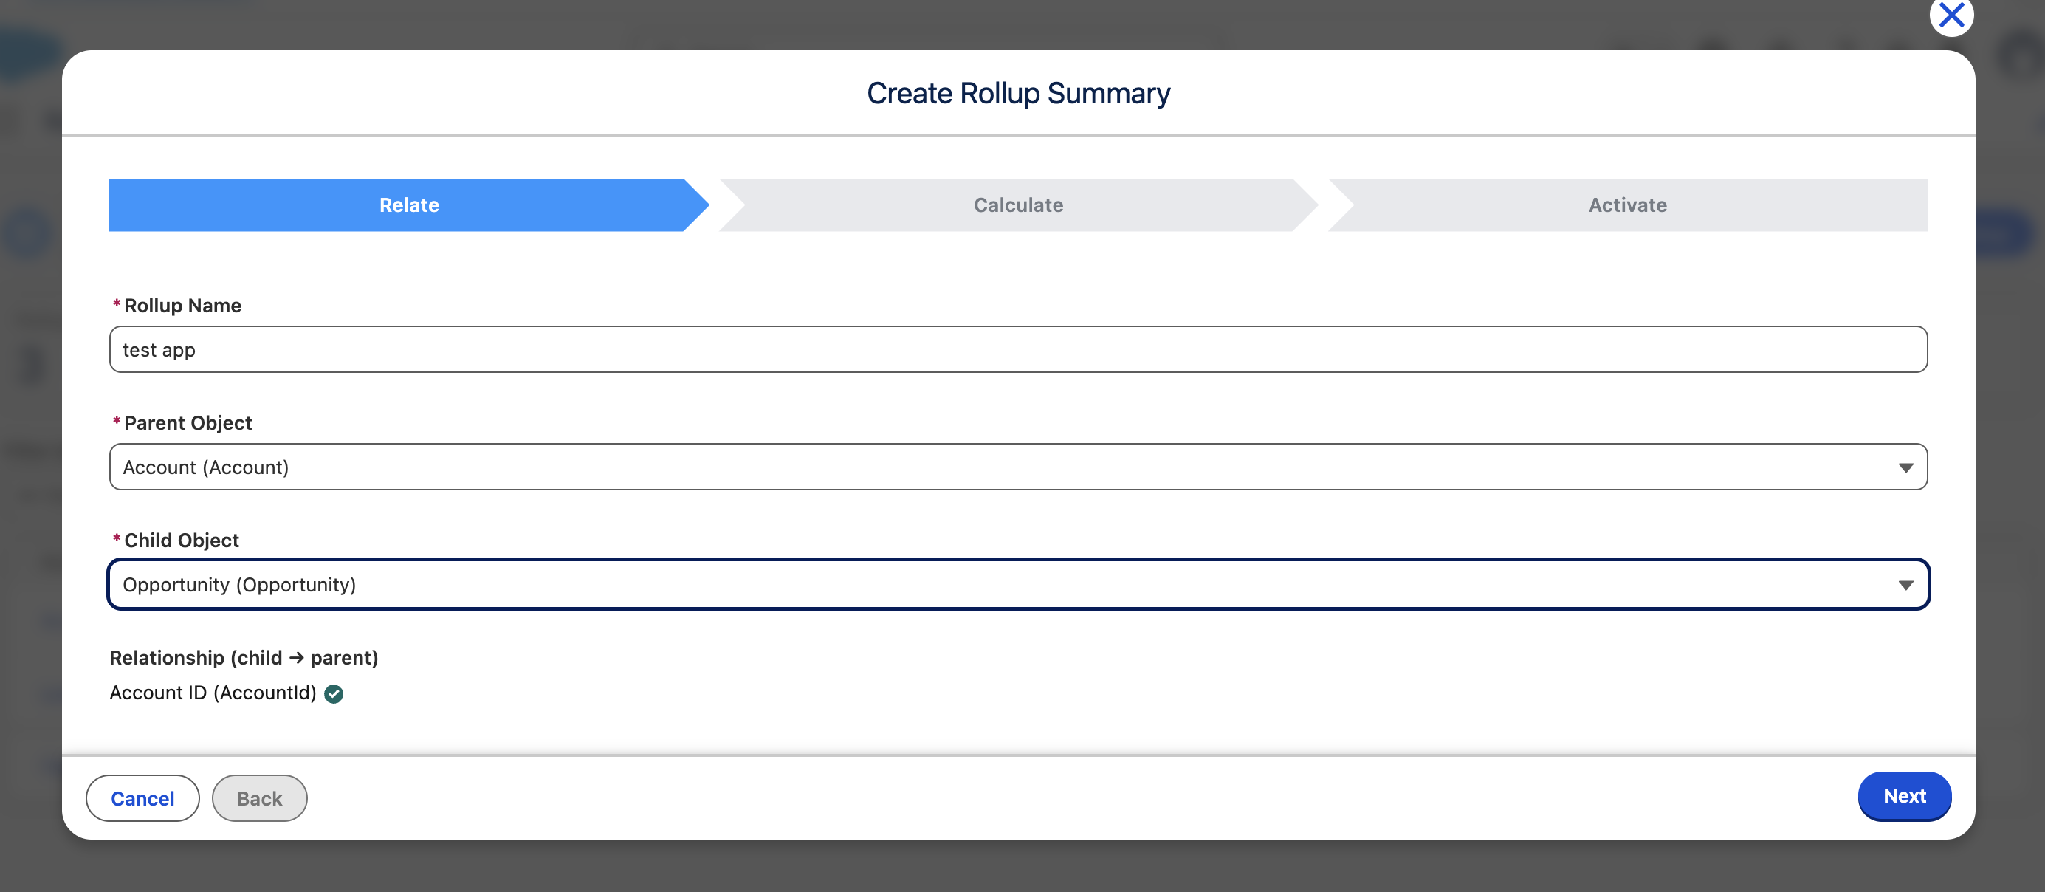
- Progress to Calculation Logic: Once the relationship is confirmed, click Next to advance to the Calculate step.
1.2 Step 2: Calculate - Define the Aggregation Logic
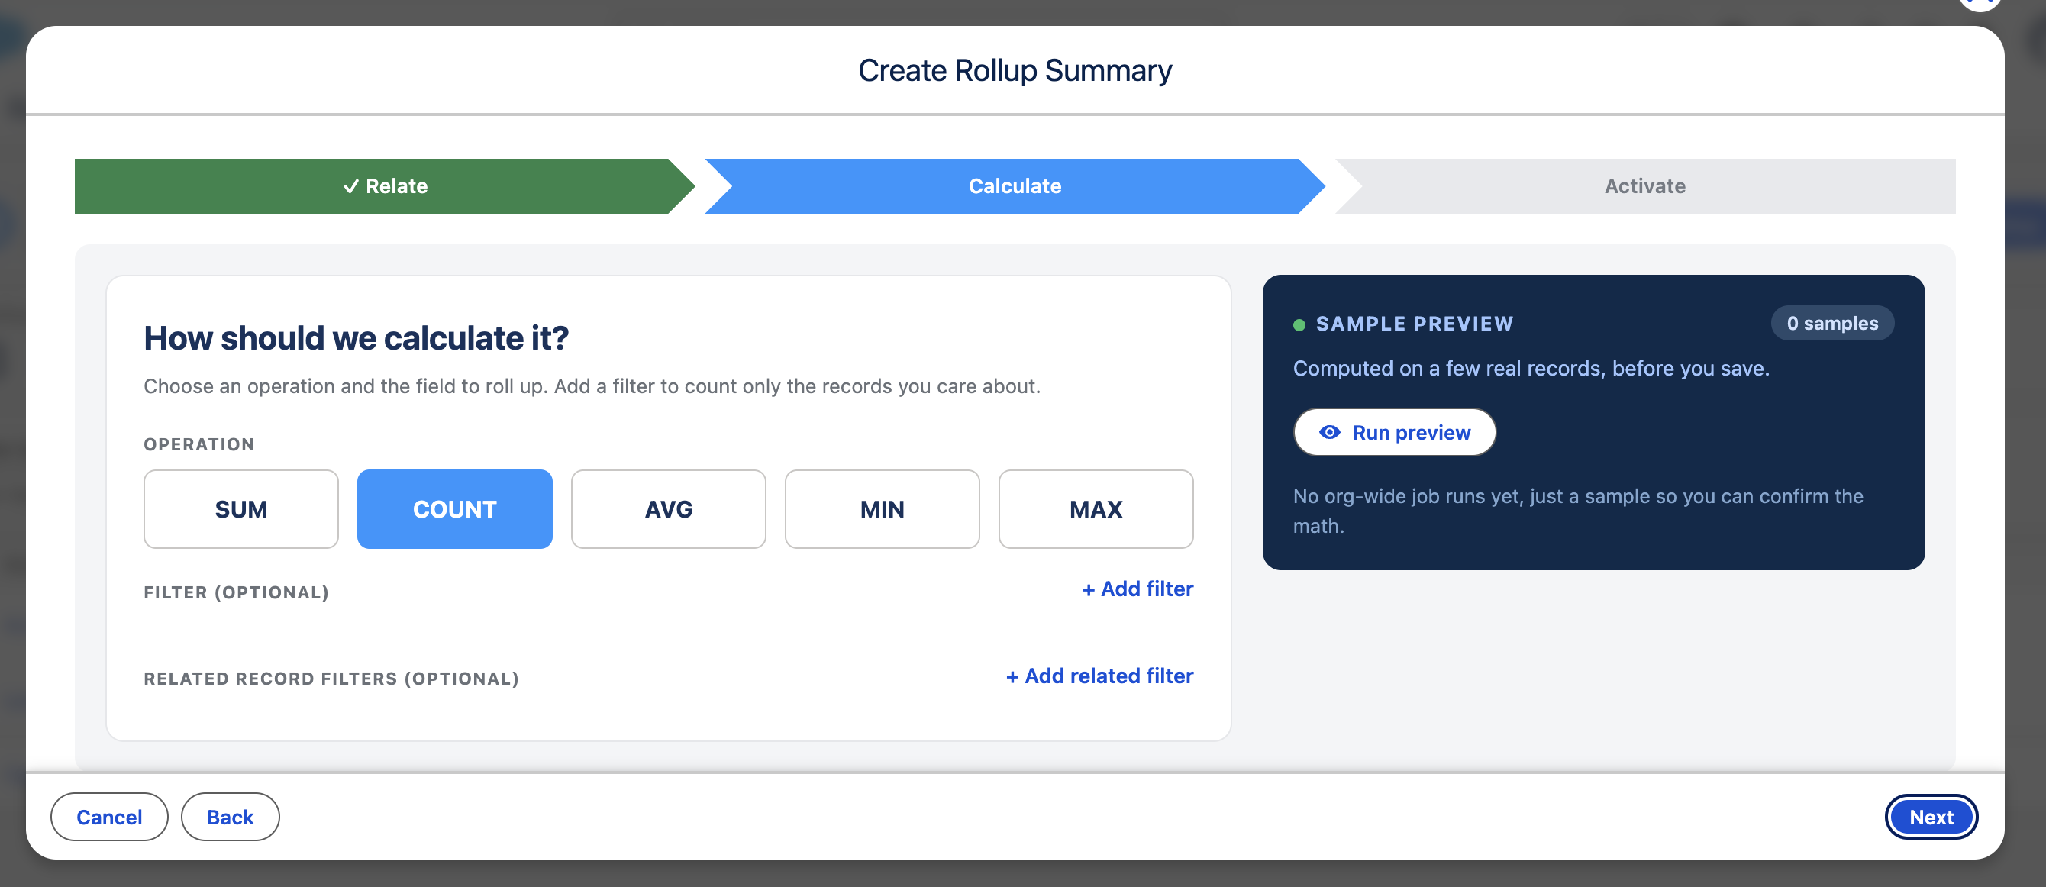
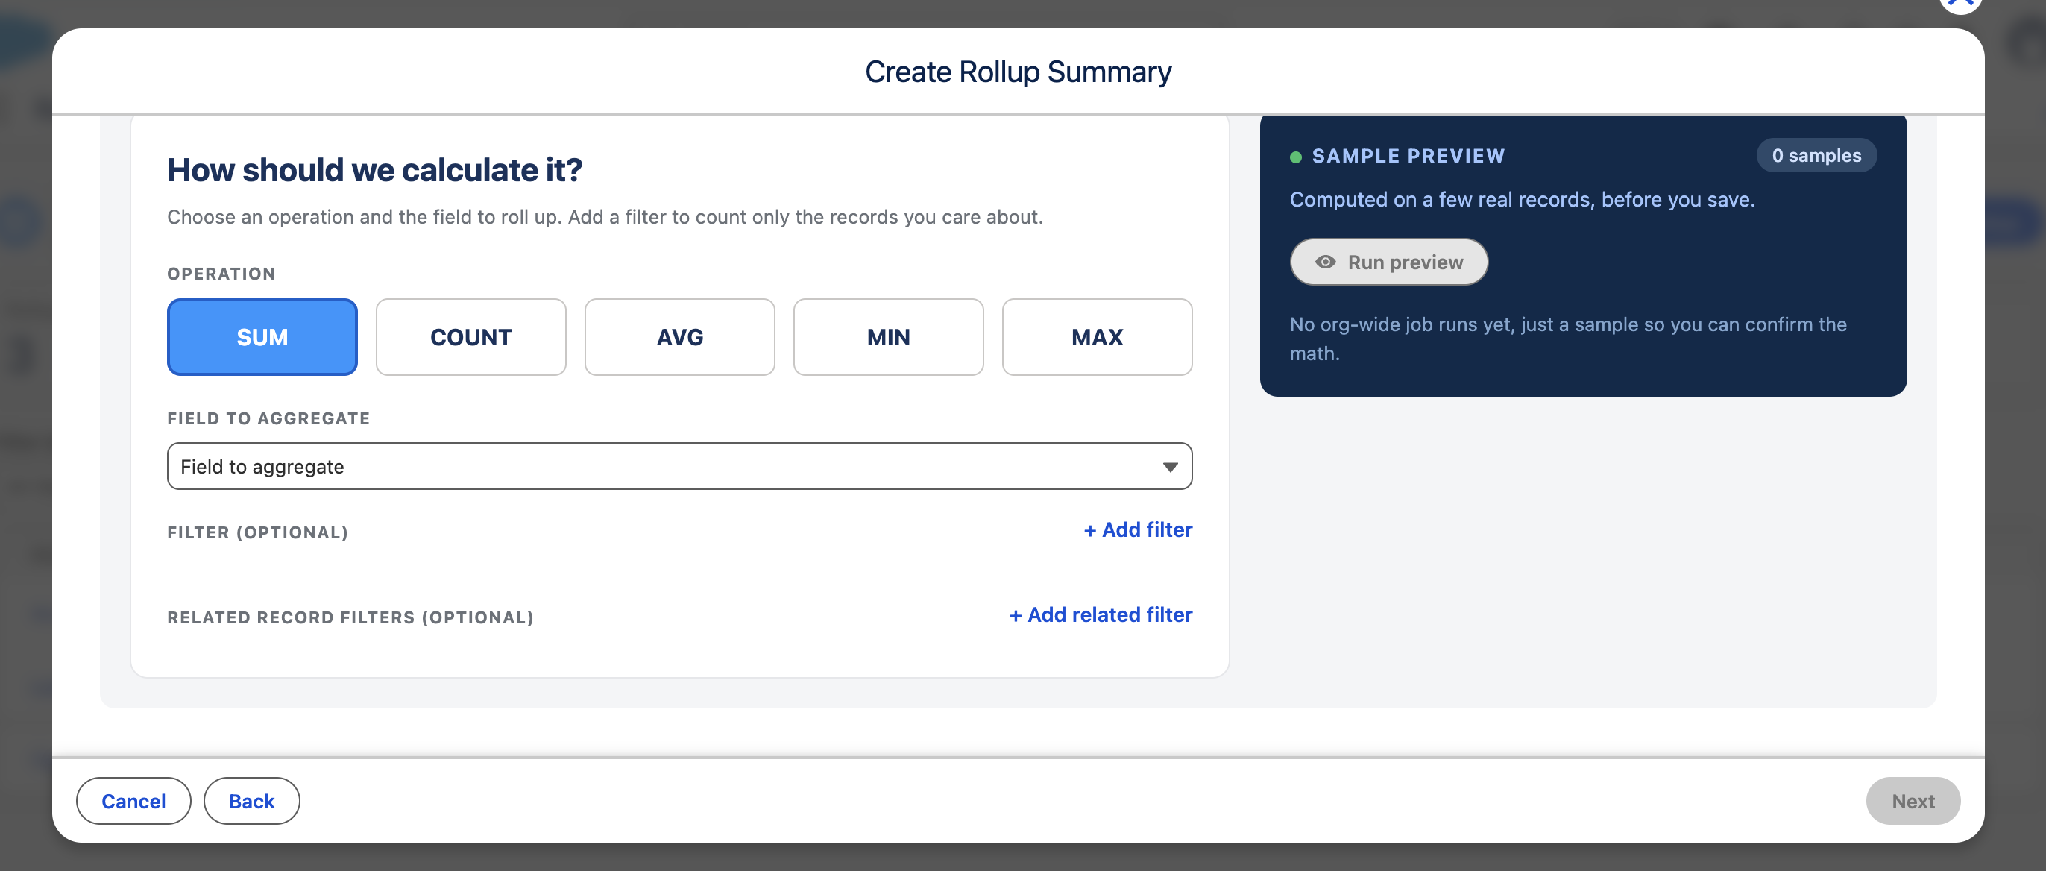
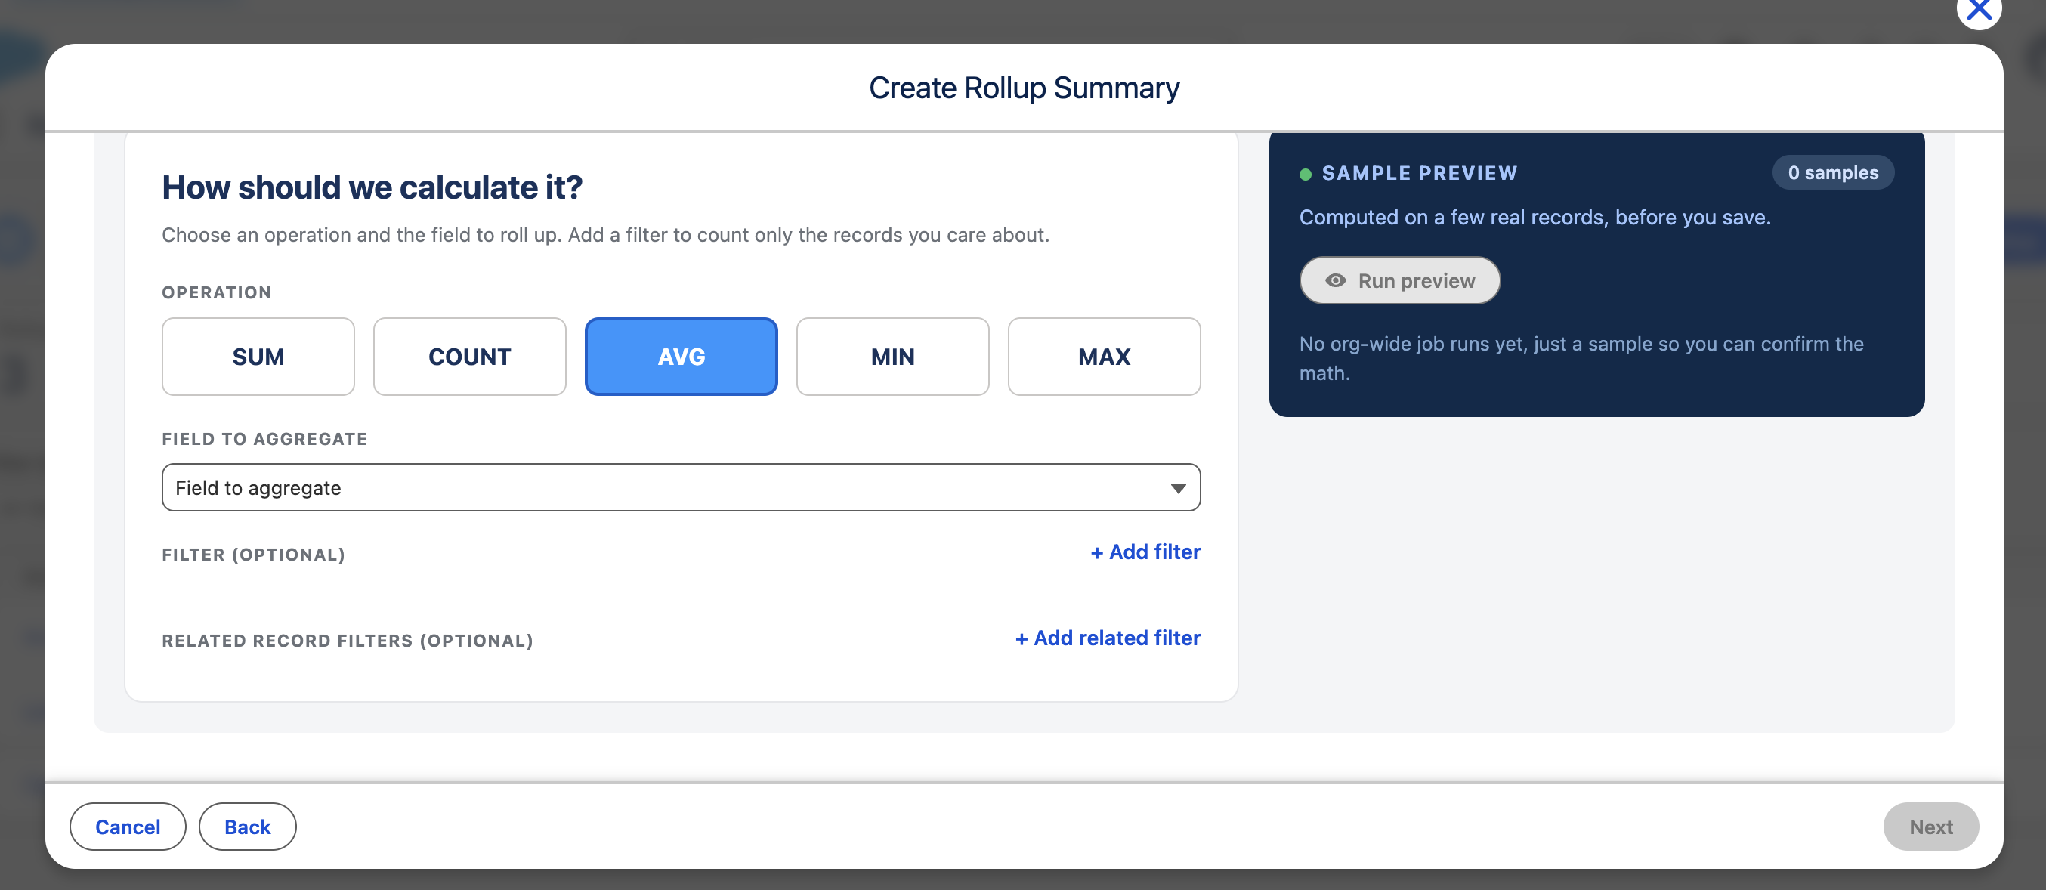
Each rollup relationship can host up to ten independent Calculate operations. Configure the Operation, the Field to Aggregate (where applicable), and any optional filters within the same unified screen.
COUNT
Select COUNT to calculate the total cardinality of related child records. No Field to Aggregate is required - only an optional Filter and/or Related Record Filter to scope which child records qualify.
SUM
Select SUM and choose the Field to Aggregate (must be Number, Currency, or Percent) to compute the cumulative arithmetic total across all qualifying child records.
AVG
Select AVG to compute the mathematical mean (μ = Σx / N) of the selected numeric field across qualifying child records.
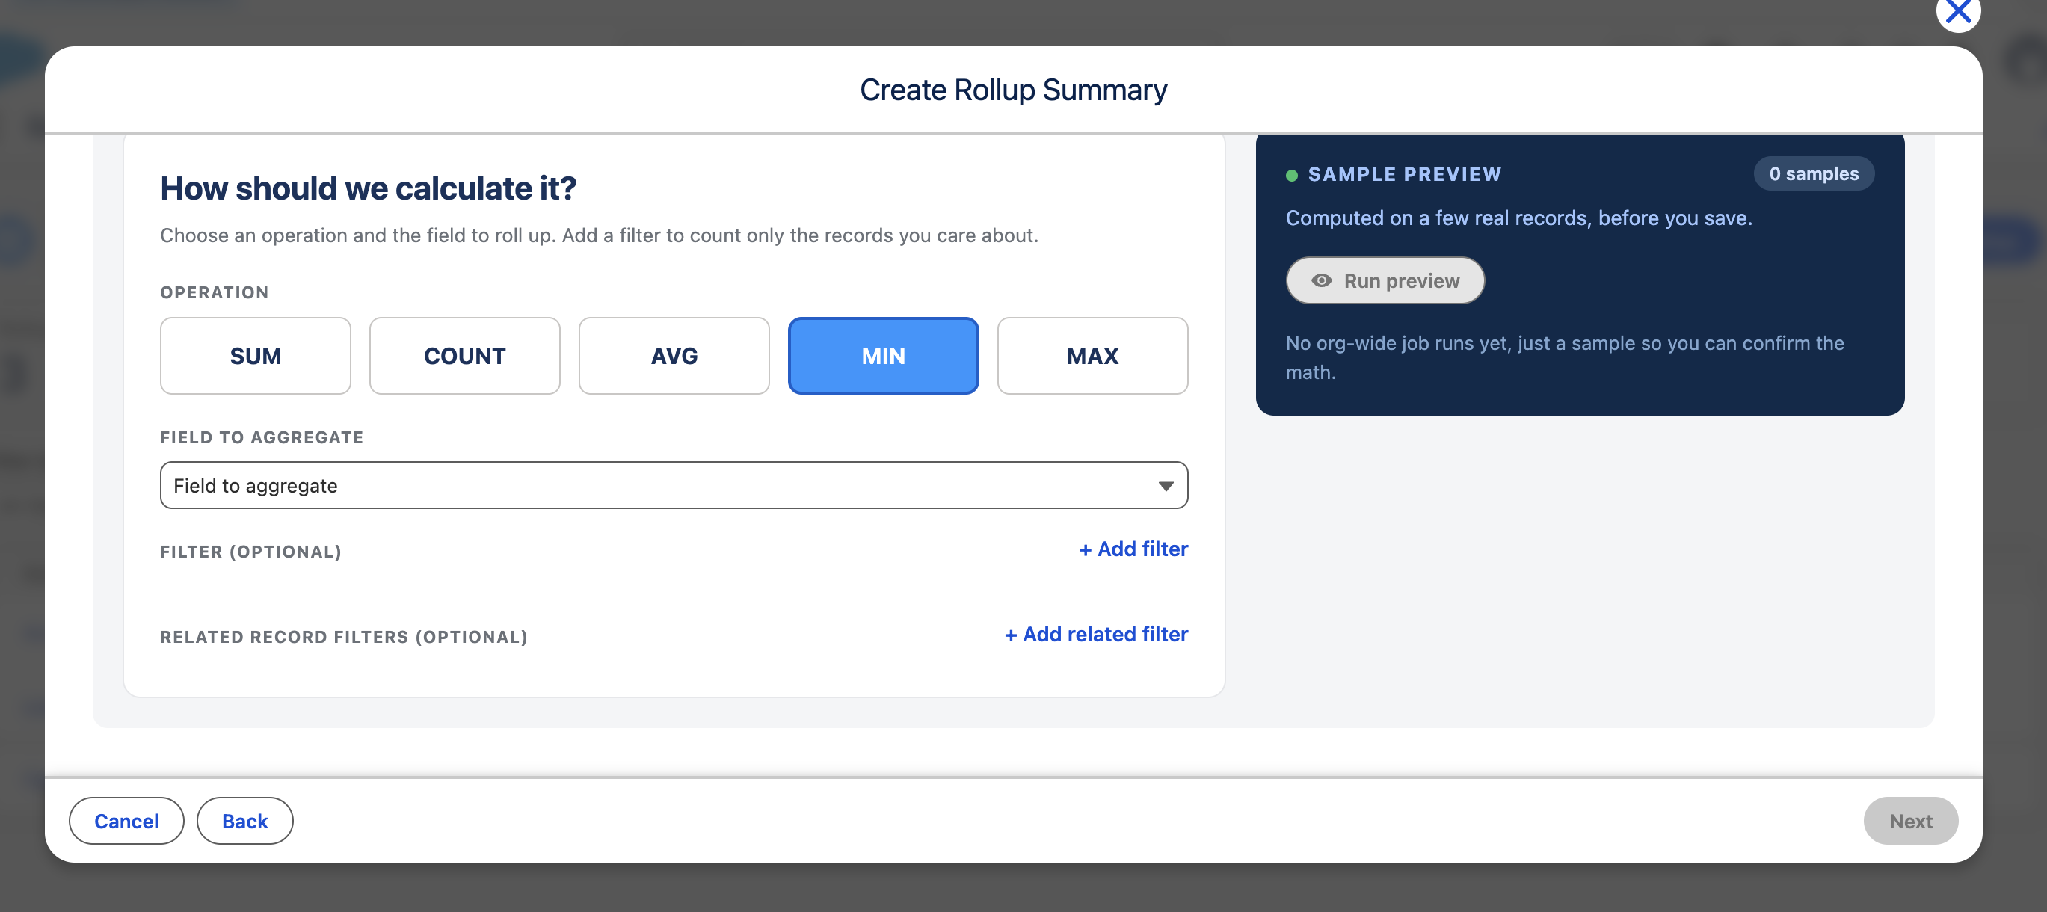
MIN / MAX
Select MIN or MAX to identify the mathematically lowest or highest - or chronologically earliest or latest - value of the selected field. MIN and MAX are the only operations that accept a Date or Date/Time Source Field as well as a numeric one, and the Target Field rule follows from that: over a numeric Source Field, any numeric Target Field will do (Number, Currency, or Percent), and it need not match the source type; over a Date or Date/Time Source Field, the Target Field must be exactly that same type. Where that applies, the wizard makes it explicit by relabelling the picker to read Target Field (on parent) - Date required.
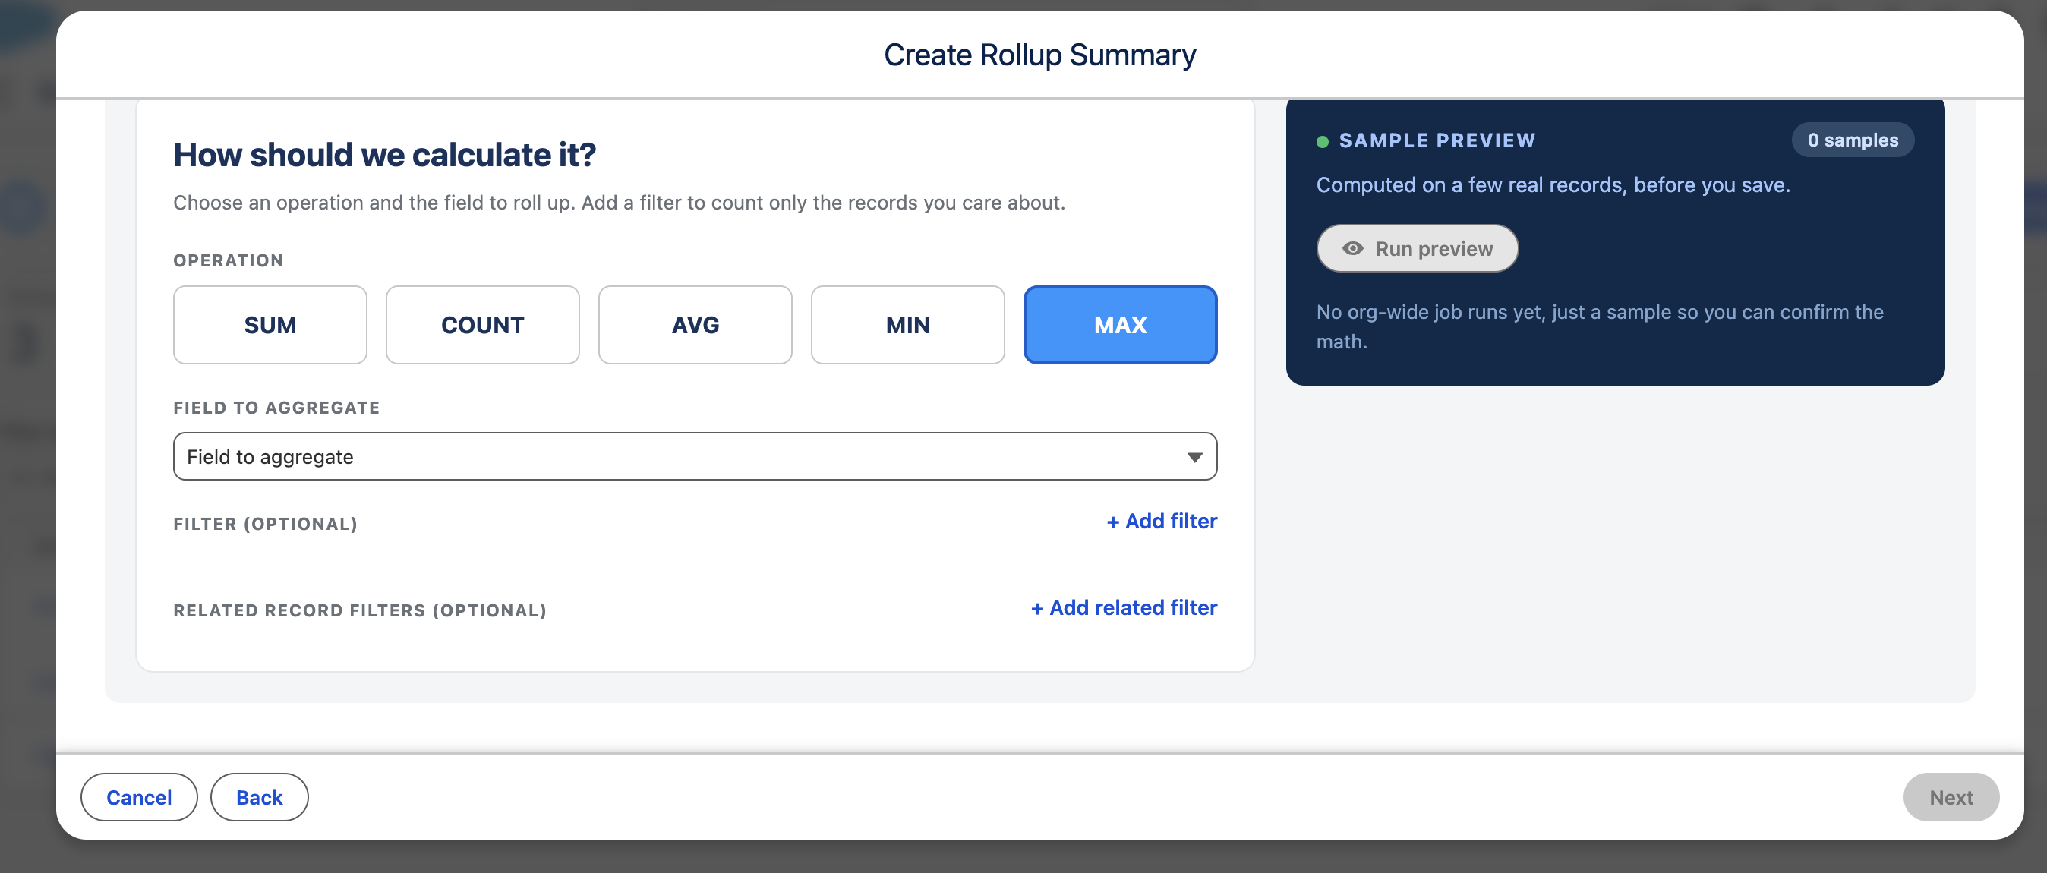
Administrators must monitor the operation count for each Rollup relationship. A single Rollup Relationship record (Parent → Child) supports a hard maximum of exactly 10 Calculate operations. Attempting to add an eleventh operation is blocked at the Relate/Calculate layer until an existing operation is removed.
- Confirm Your Math with Sample Preview: Before saving, click Run preview inside the Sample Preview panel to compute the operation against a small sample of real records - no org-wide batch job runs until the rollup is activated.
- Advance to Activation: Click Next to move to the Activate step.
1.3 Step 3: Activate - Target Field & Calculation Mode
BEFORE YOU BEGIN THIS STEP
The Target Field (on parent) dropdown only lists custom fields that already exist on the parent object - the wizard does not create fields for you, and Activate is blocked until a matching field is selected. If you have not yet created a field to hold this calculation, do so first in Object Manager (Setup Guide, Section 2.1) before continuing. Likewise, if the Calculation Mode below will be set to Real-time, confirm the supporting Record-Triggered Flow on the Child Object has already been built and Activated (Setup Guide, Section 2.2) - otherwise the Target Field will never update automatically.
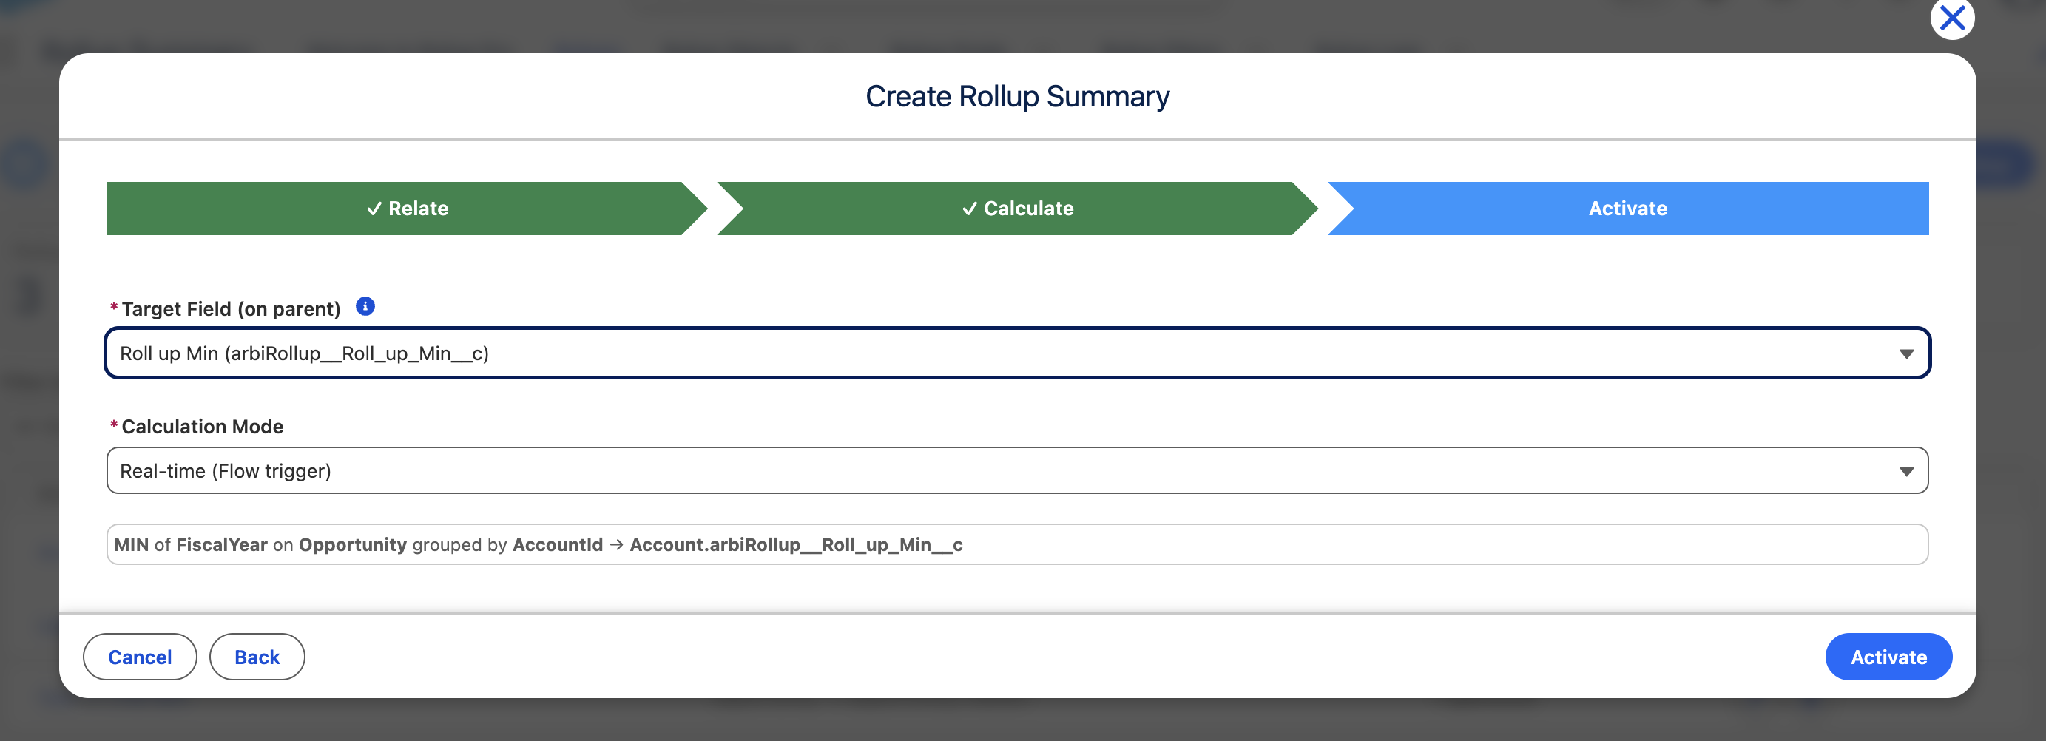
- Select the Target Field: Choose the Target Field (on parent) that will store the calculated result. The dropdown lists only fields whose type is compatible with the operation and that you have permission to update, so a field missing from this list is usually the wrong data type - see the Setup Guide, Section 2.1. For example: Roll up Min (arbiRollup__Roll_up_Min__c).
- Choose the Calculation Mode: Set Calculation Mode to Real-time (Flow trigger) for immediate recalculation on every qualifying child DML transaction, or Scheduled for high-volume objects where a short delay is acceptable. These are the only two modes; there is no separate batch option, as batches are simply the internal mechanism the Scheduled mode uses.
CHOOSING A CALCULATION MODE
Real-time (Flow trigger) recomputes the parent Target Field inside the same transaction that saves the child record, so the value is correct the moment the user saves. It depends entirely on the Record-Triggered Flow for that child object being built and Active. Scheduled hands the work to a small set of background jobs that Rollup+ runs org-wide: a full recalculation pass on a quarter-hour cadence, and an incremental pass each hour that picks up setups whose child records have changed. Scheduled needs no Flow and suits high-volume child objects, but the Target Field is updated on the next run rather than immediately. Because those jobs are shared by every rollup in the org rather than created per rollup, a Scheduled operation's timing also depends on what else is queued. See the companion Setup Guide, Section 3.1.
- Review the Generated Logic Summary: The wizard displays a plain-language confirmation of the compiled logic — for example: "MIN of FiscalYear on Opportunity grouped by AccountId → Account.arbiRollup__Roll_up_Min__c" — so the configuration can be verified before it goes live.
- Go Live: Click the blue Activate button to commit the operation and enable automatic tracking. When you reopen an existing rollup to change it, the same button reads Save instead.
Section 2: Managing and Monitoring Rollup Setups
Administrators and solution architects can review setup profiles, inspect relationship schemas, and audit individual calculate operations using the standard Salesforce record layout screens exposed by the app's custom tabs.
2.1 Step 1: Reviewing the Rollup Objects List
- Open the Rollup Tab: From the Rollup+ app navigation bar, click Rollups to load the list of configured Parent → Child relationships.
2.2 Step 2: Auditing a Rollup Object and Its Operations
- Select a Target Relationship Record: Click into a row (e.g., Account → Opportunity) to open its detail workspace.
- Confirm Core Relationship Settings: Review Parent Object, Child Object, Lookup Field, the Active toggle, the count of currently Active operations, and the Last Successful Batch Start timestamp.
- Read the Setup Progress Bar: The bar across the top of the operations panel reports the state of the whole setup together with a completion percentage. Its wording tells you what is happening: Completed after a clean run, Processing while a batch is in flight, Waiting for scheduler while a Scheduled setup is queued for a shared job (see Section 3.3), Pending first run before anything has been calculated, and Needs attention when the last run recorded an error. Only that last state calls for action.
- Review Individual Operations: Each operation card (e.g., RC-00078, RC-00081, RC-00082) lists its operation code, aggregate type, target field API name, and a Healthy / attention-needed status badge, with quick Edit and Delete actions.
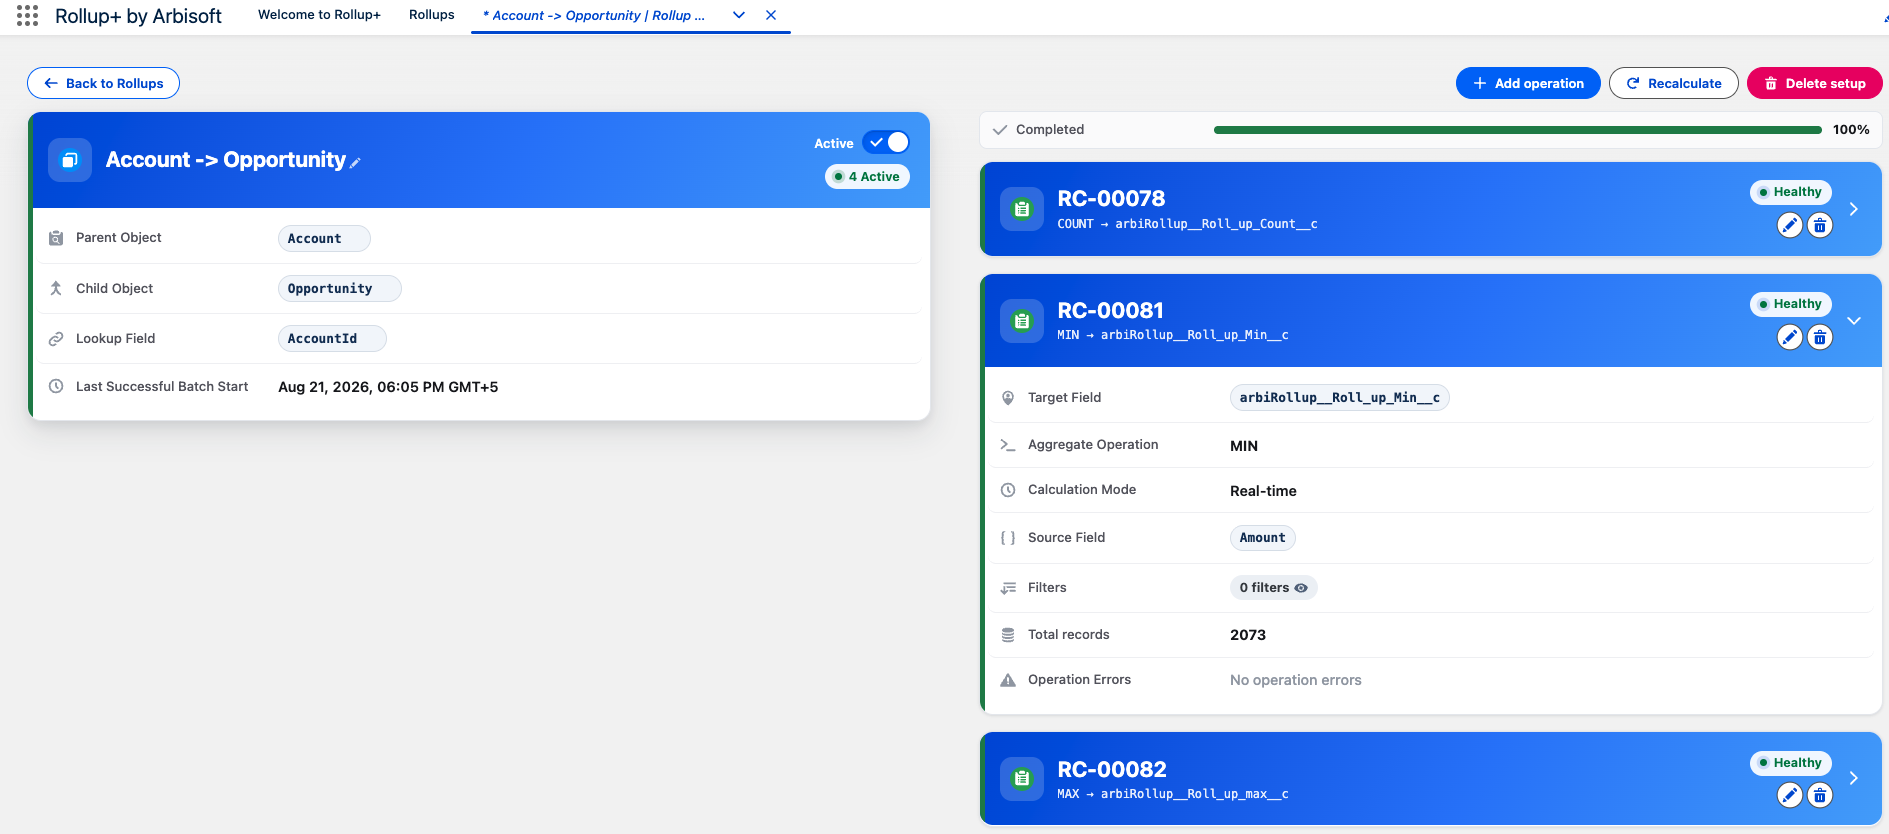
- Add or Recalculate Operations: Use Add operation to configure another Calculate/Activate pass against the same relationship (up to the 10-operation limit), or Recalculate to force an immediate org-wide batch refresh outside of the normal real-time trigger cadence. Recalculate is always scoped to the one setup you run it from, never to the whole org.
2.3 Step 3: Drilling into an Individual Operation
- Expand an Operation Row: Click the chevron on an operation card (e.g., RC-00081) to expand its full technical detail.
- Verify Technical Configuration: Confirm the Target Field, Aggregate Operation, Calculation Mode, and Source Field (e.g., Min on Amount via Real-time mode, writing to arbiRollup__Roll_up_Min__c).
- Audit Volume and Error State: Review Filters applied, Total records processed by the operation (e.g., 2,073), and the Operation Errors panel, which will read "No operation errors" when the batch/trigger executions are clean.
Section 3: Data Governance Inspection & Operational Verification
When child records are created, updated, or deleted, the affected operations are recomputed and the results written back to the parent Target Field automatically. Which engine does the work depends on the Calculation Mode: Real-time operations are recomputed by the Record-Triggered Flow built for that child object, while Scheduled operations are picked up by a small set of shared, org-wide scheduled Apex jobs described in the Setup Guide.
3.1 Routine Health Checks
- Portfolio-Level Review: Periodically revisit the All Rollups dashboard to confirm the Needs attention counter across all relationships remains at zero.
- Relationship-Level Review: On each Rollup Object detail page, confirm Last Successful Batch Start is recent and that the Active operation count matches expectations.
- Operation-Level Review: Inspect Total records and Operation Errors on each expanded operation to confirm the calculation engine is processing the expected child-record volume without exceptions.
3.2 Manual Recalculation
Use Recalculate on the Rollup Object detail page after bulk data loads, mid-migration cutovers, or whenever a Real-time trigger may have been temporarily disabled, to force a full re-sync of every active operation tied to that relationship. The refresh covers only that Rollup Object; other setups in the org are untouched.
Confirm the restart: Recalculate does not start silently. A warning dialog titled "Recalculate from the beginning?" explains that the action clears the saved checkpoint and recalculates every operation for all parent records in the setup, and the run begins only after you confirm. Because the checkpoint is discarded, a large setup restarts from the first record rather than resuming, so allow for a full run.
3.3 Scheduled-Mode Timing and the Waiting for Scheduler State
Scheduled operations do not compute the instant they are saved. They are queued and then picked up by the next run of the shared background jobs, so the app exposes a distinct set of states while that wait is in progress. Real-time operations never enter these states, as they are computed by their Record-Triggered Flow during the child record's own save.
- Read the progress state: While a Scheduled setup is queued and no batch has started, the operation's progress area reads Waiting for scheduler with a clock icon, rather than Processing. This is normal and simply means the setup is registered and waiting its turn.
- Read the timing hint: While a setup is in that state, the operations list shows one summary line of when the shared workers next run, for example: "Next full recompute 10:45 · next incremental 11:05 · shared org-wide jobs." These times are org-wide, not per rollup, as every Scheduled rollup in the org is served by the same jobs.
- Watch for "not scheduled": If either time in that line reads not scheduled, the corresponding background job is missing from the org, and the operation will stay queued indefinitely until it is restored. This is the visible symptom of a deleted scheduled job. Saving the rollup again, or clicking Recalculate, re-registers any missing job. See the Setup Guide, Sections 3.2 and 3.3.
- Force an immediate run: If you do not want to wait for the next scheduled pass, click Recalculate on the Rollup Object. After you confirm the warning dialog, it queues a full rebuild for that setup straight away, whatever the Calculation Mode.
IF A NEWLY SAVED SCHEDULED ROLLUP NEVER STARTS
Rollup+ registers its background jobs when a rollup is saved, but a failure to register them does not block the save - the rollup is still reported as saved. If a Scheduled operation stays at Waiting for scheduler and the timing hint reads not scheduled, ask a System Administrator to confirm the jobs exist under Setup → Scheduled Jobs (Setup Guide, Section 3.1) and to review the Rollup Log for warnings recorded by RollupController.ensureBackgroundSchedules. The most common causes are an org at its limit of 100 scheduled Apex jobs, or a saving user without authority to schedule Apex.
3.4 Deleting a Setup
Clicking Delete setup on a Rollup Object permanently removes every associated Calculate operation and stops all further writes to the corresponding parent Target Fields. This action does not delete the Target Fields themselves or any historical data already written to them. Confirm downstream reports, list views, and formula fields do not depend on the operation before deleting.