PART 1: Backend Infrastructure & Pre-Installation Guide
Document Version 1
This document is the mandatory technical setup manual for MailFlow by Arbisoft. It must be executed in full by a Salesforce System Administrator before marketing or sales users begin sending campaigns. MailFlow relies on a Digital Experience (Community) Site to serve tracking pixels and tracked links, and on an inbound Email Service to capture recipient replies - both of which must be provisioned and wired together via Custom Settings as described below.
Section 1: Package Installation
1.1 Pre-Installation Prerequisites
Before beginning installation, confirm that the target environment and installing user meet the following conditions:
- Administrative Privileges: The installing user profile must have "Download AppExchange Packages" and "Customize Application" permissions active.
- Environment Verification: Confirm whether the target org is a Production org, Sandbox, or Developer Edition org before installing - this determines your My Domain and Digital Experience URL patterns.
- My Domain Enabled: A My Domain must already be deployed on the org, since Digital Experience Sites and Apex-generated email addresses both depend on it.
- API Enabled: Ensure the installing administrator's profile has API Enabled checked to avoid deployment blockages.
1.2 Installing the Package
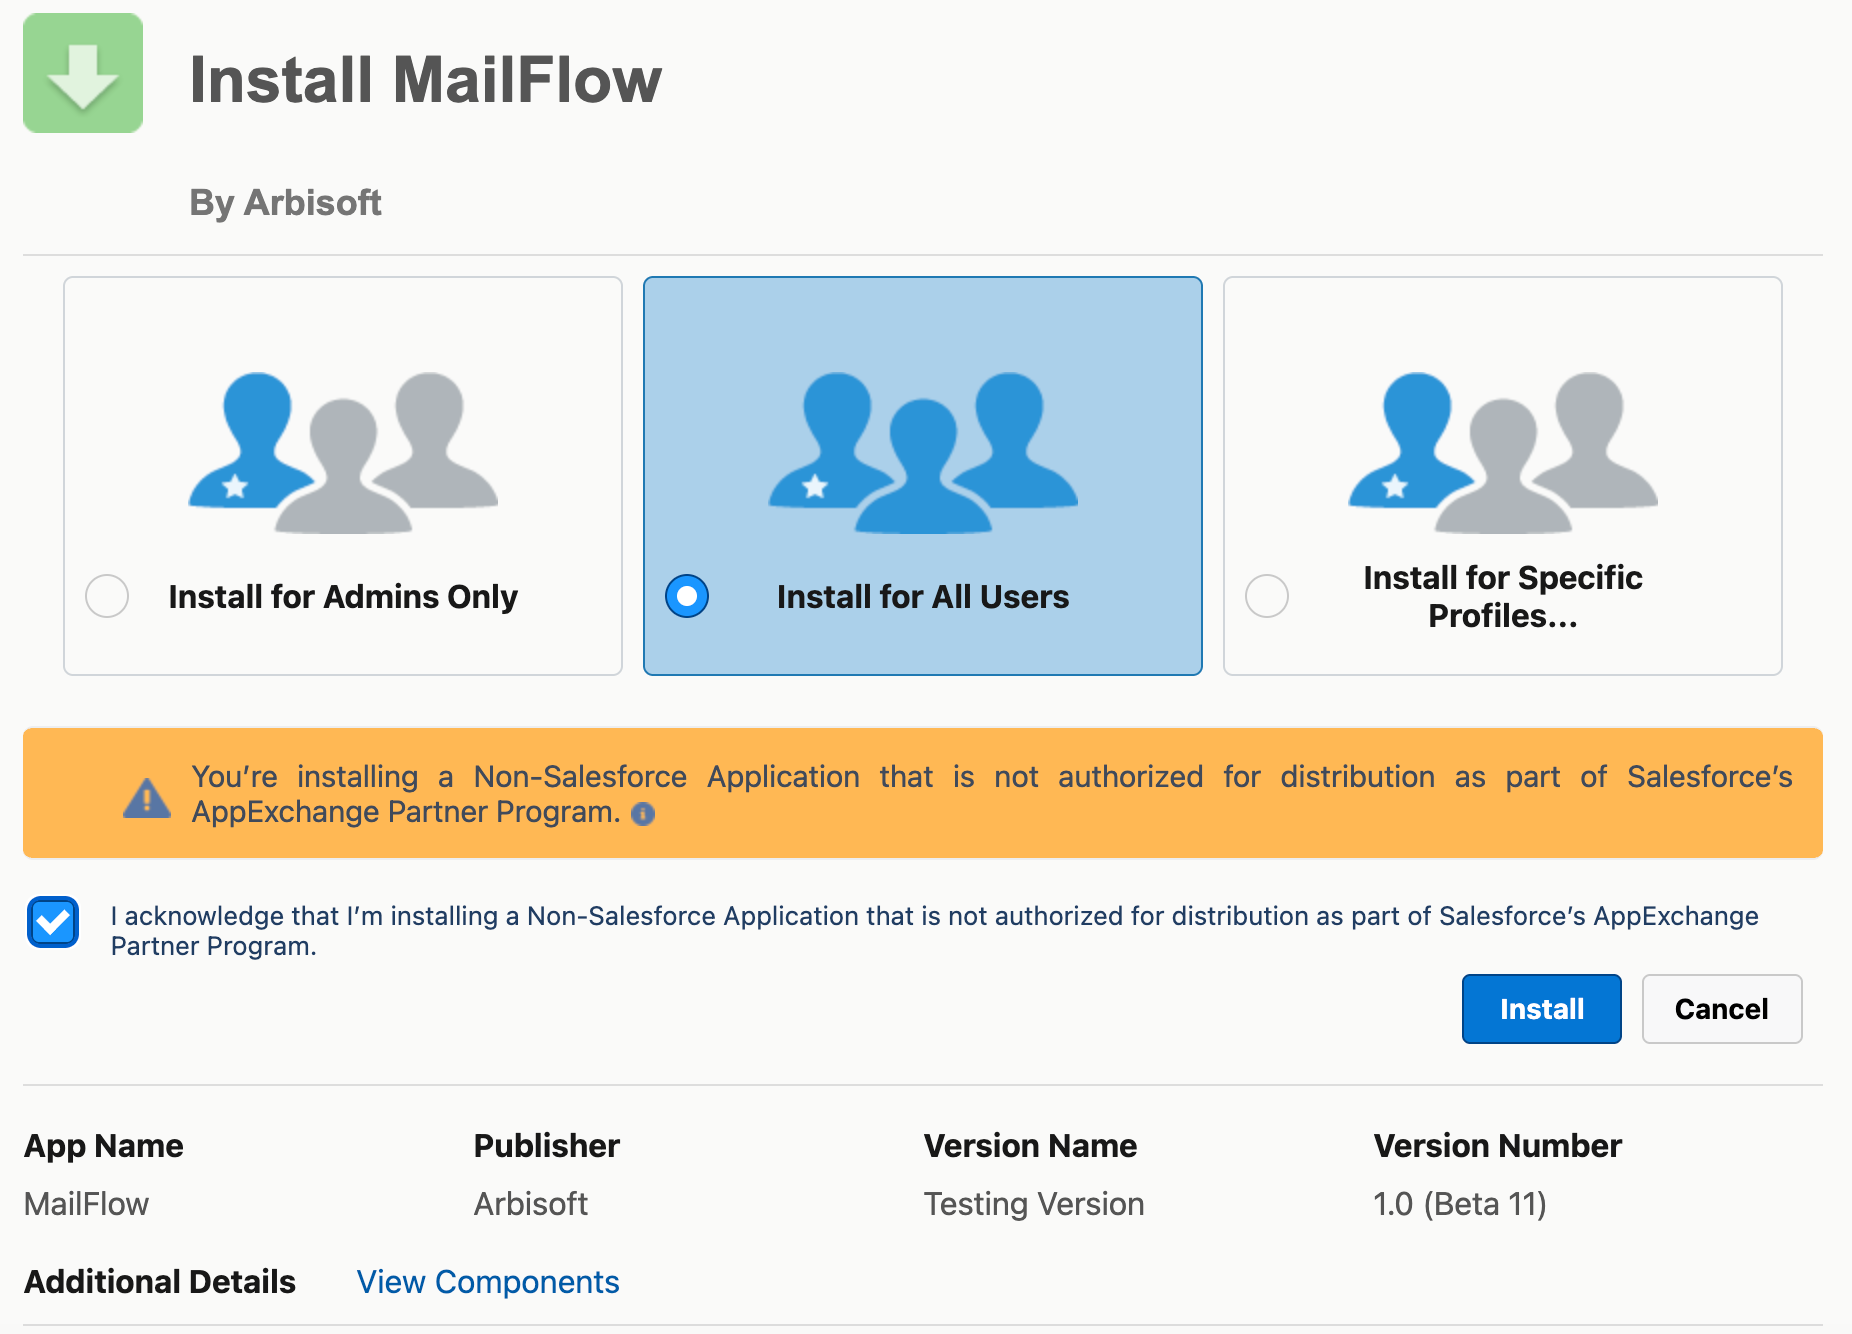
- Launch the Installer: Open the MailFlow installation link provided by Arbisoft and authenticate into the target org.
- Choose a Security Model: Select "Install for Admins Only" if you want to validate configuration before rolling the app out, or "Install for All Users" to grant immediate access.
- Confirm and Install: Click Install. The installer will display "Installing and granting access to all Users…" while package components, Custom Objects, Apex classes, Flows, and the Email Service definition are deployed.
1.3 Verifying Application Access
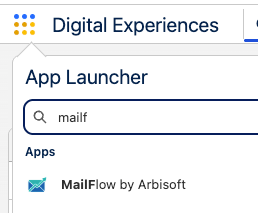
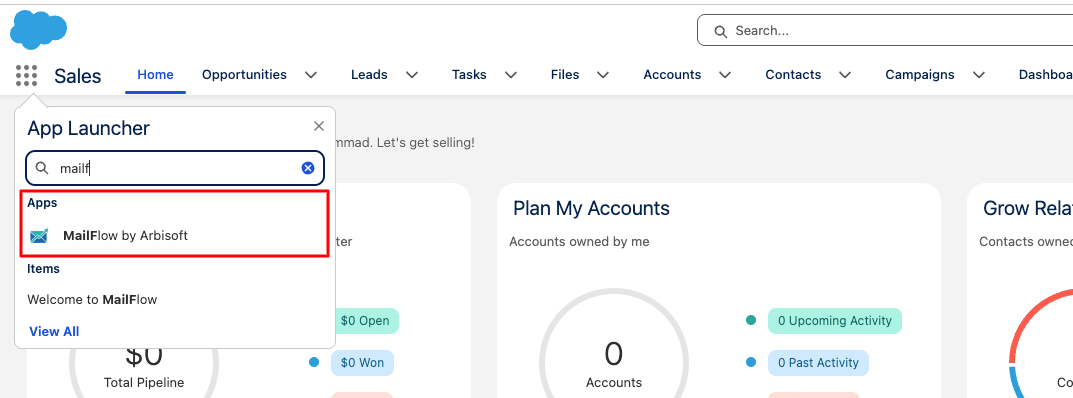
Once installation completes, open the App Launcher, search for "MailFlow" and confirm that MailFlow by Arbisoft appears in the Apps list.
Section 2: Digital Experience Site Configuration
WHY THIS STEP IS REQUIRED
MailFlow uses a public-facing Digital Experience (Community) Site to host the tracking endpoints that record opens and link clicks, and to route recipients through trackable links back to their original destination. Without a published site, open and click tracking will not function.
2.1 Enable Digital Experiences
- Open Setup: Click the Setup gear icon and select Setup.
- Locate Digital Experiences: In the Quick Find box, search for "Digital Experiences" and select Settings.
- Enable Digital Experiences: Check "Enable Digital Experiences," confirm the domain name for your org (this cannot be changed later), and click Save.
2.2 Create the MailFlow Site
- Create a New Site: From Digital Experiences > All Sites, click New Site and choose the "Build Your Own (LWR)" template.
- Name the Site: Give it a clear name (e.g., "MailFlow") - this becomes part of the published site URL.
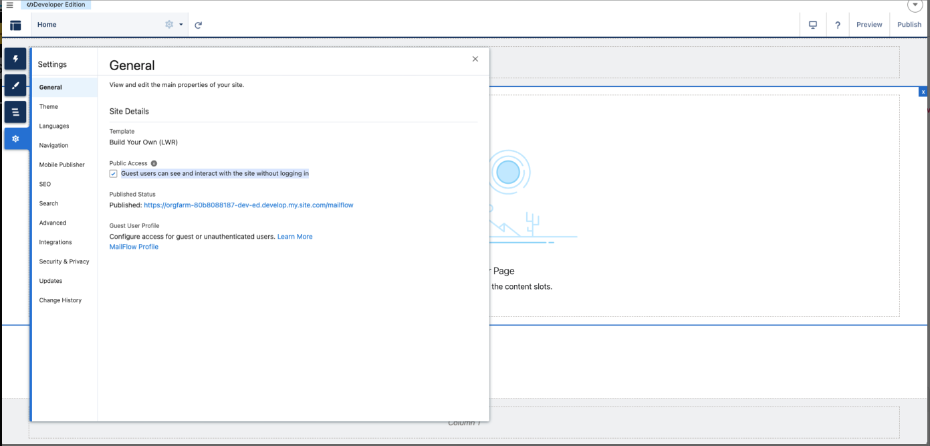
- Enable Guest Access: In Settings > General, check "Guest users can see and interact with the site without logging in." This is required so that recipients opening tracked links (who are not authenticated Salesforce users) can be routed correctly.
- Publish the Site: Click Publish in the top-right corner of the Experience Builder. Once published, note the Published site URL - you will enter this into Custom Settings in Section 5.
SECURITY NOTE
Enabling Guest User access exposes the site's tracking endpoints to unauthenticated traffic by design. This is required for tracking pixels and links to resolve for external recipients. Review the Guest User Profile permissions periodically to ensure only the components MailFlow requires (e.g., its tracking Apex classes and pages) are exposed, and that no additional object or record access has been inadvertently granted.
Section 3: Configure the Reply-Tracking Email Service
MailFlow captures recipient replies (the "Responded" status) using a Salesforce Email Service - a system-generated inbound email address wired to an Apex handler class that parses incoming messages and updates the matching Campaign Member.
3.1 Create the Email Service
- Open Email Services: In Setup, search for "Email Services" in the Quick Find box and select Email Services.
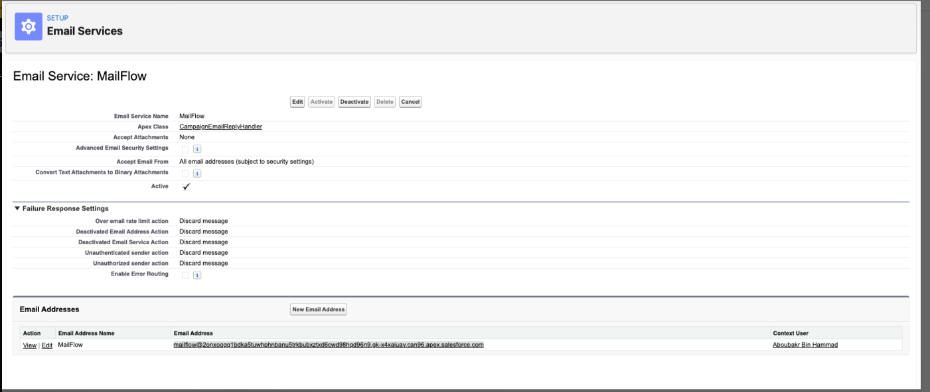
- New Email Service: Click New Email Service and set the Apex Class to
CampaignEmailReplyHandler(installed with the MailFlow package). - Configure Accept Settings: Set Accept Attachments to None (unless your process requires attachment parsing) and Accept Email From to All email addresses, subject to your org's security policies.
- Set Failure Response Behavior: Leave the default Failure Response Settings (Discard message) for rate limit, deactivated address, deactivated service, and unauthenticated/unauthorized sender scenarios, unless your org requires Error Routing.
- Activate: Check Active and click Save.
3.2 Record the Generated Email Address
Saving the Email Service auto-generates a unique inbound address (visible under Email Addresses), similar in form to mailflow@<your-domain>.
Copy this generated address in full - it must be entered as the Reply To Address in Custom Settings in Section 5 so that outbound campaign emails route replies back into this Email Service.
Section 4: Add and Verify Organization-Wide Addresses Email Address
MailFlow can send campaign emails from a single, consistent Organization-Wide Email Address instead of each sending user's own mailbox. This is recommended, not required — if left unconfigured, MailFlow falls back to sending as whichever user started the send, exactly as it does today.
4.1 Add the Organization-Wide Email Address
- Open Organization-Wide Addresses: In Setup, search for "Organization-Wide Addresses" in the Quick Find box and select it.
- Add an Address: Click New/Add.
- Display Name: Enter the name recipients will see as the sender, for example "MailFlow Campaigns."
- Email Address: Enter the mailbox campaign emails should send from.
- Set the Purpose: Choose Default No-Reply Address or Send through Salesforce depending on your org's needs, then set the profile access scope - either Allow All Profiles to Use this From Address, or restrict it to selected profiles.
- Save: Click Save. Salesforce sends a verification email to the address entered above.
4.2 Verify the Address
- Open the Mailbox: Check the inbox for the email address entered in Section 4.1.
- Click the Verification Link: Open the email from Salesforce and click the confirmation link inside it.
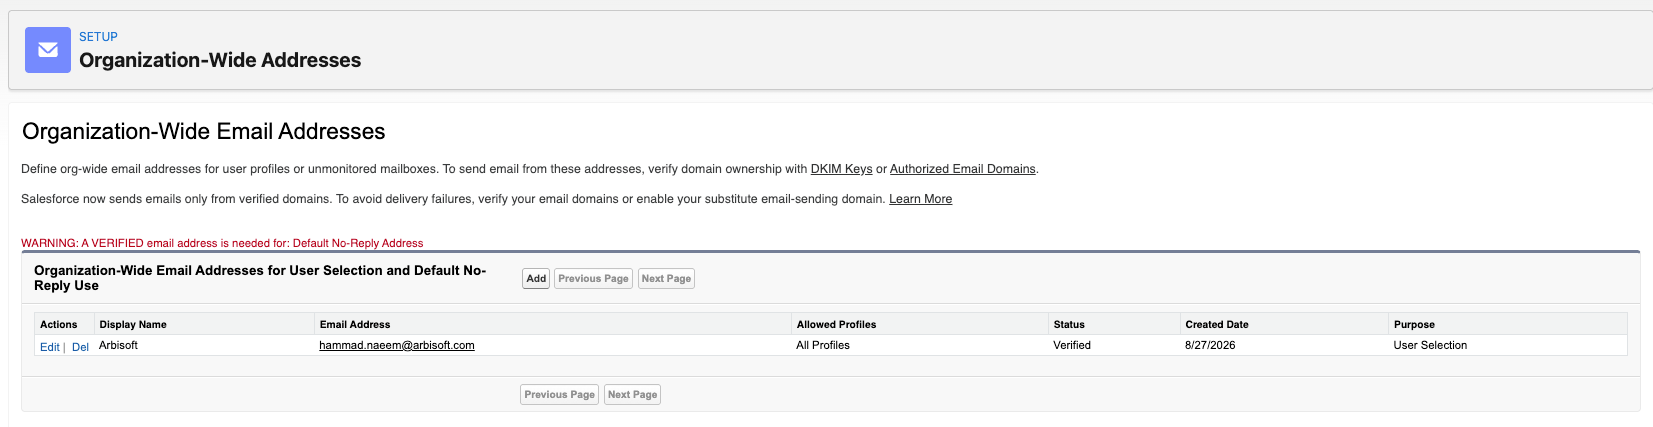
- Confirm Verified Status: Back in Setup → Organization-Wide Addresses, confirm the address now shows a verified checkmark instead of "Not Verified."
WHY VERIFICATION MATTERS
Salesforce will not send outbound email through an unverified Organization-Wide Address. If MailFlow is pointed at one that hasn't completed verification, campaign sends silently fall back to the sending user's own address instead - the same fallback behavior as leaving the setting blank, rather than producing an error.
Section 5: Custom Settings - Wiring It All Together
The final configuration step links the Digital Experience Site and Email Service you just created into MailFlow's runtime logic via a Custom Setting.
5.1 Configure the Arbisoft MailChimp Settings Custom Setting
- Open Custom Settings: In Setup, search for "Custom Settings" and select it. Locate Arbisoft MailChimp Settings and click Manage.
- Edit the Default Organization Level Value: Click New (if no value exists yet) or Edit against the existing Default Organization Level Value record.
- Reply To Address: Paste the full generated Email Service address recorded in Section 3.2.
- Site Base URL: Paste the published Digital Experience Site URL recorded in Section 2.2 (e.g.,
https://yourdomain.develop.my.site.com/mailflow). - The same custom setting also holds a Daily Send Limit field - MailFlow's own safety cap on emails sent per rolling 24 hours, on top of Salesforce's real daily allocation. Rather than typing a number directly here, use the Set Send Limit button on the Custom Campaigns tab inside the app once a user is set up (Section 6), which validates your chosen number against Salesforce's actual org-wide limit for you.
- Org Wide Email Address: Record the exact Email Address entered in Section 4.1 - it must be entered in Custom Settings exactly as it appears here, character for character, since MailFlow matches sends against this value.
- Save: Click Save to commit the settings.

VALIDATION CHECKLIST
Confirm the Reply To Address exactly matches the address shown on the Email Service record (Section 3.2), including the full domain. Confirm the Site Base URL matches the Published Status URL exactly (Section 2.2), with no trailing slash mismatch. If either value is incorrect or missing, tracked links, tracking pixels, and reply capture will silently fail to attribute engagement to the correct Campaign Member.
Section 6: Automation - Pre-Installed Tracking Flows
APPLICATION DEPLOYMENT NOTE
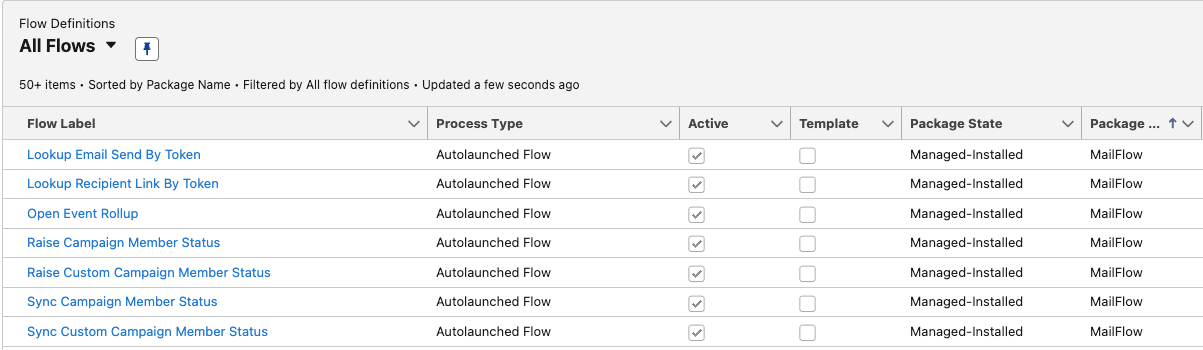
To expedite deployment, the MailFlow package installs seven pre-configured, out-of-the-box automation Flows that drive the engagement tracking engine end to end. These handle status roll-up logic across Sent, Opened, Clicked, Responded, and Bounced events, and keep Campaign and Campaign Member records synchronized in real time. Administrators do not need to build these Flows manually - they are deployed and activated automatically as part of package installation.
6.1 Reviewing the Installed Flows
- Navigate to Flows: In Setup, search for "Flows" in the Quick Find box and select Flows.
- Confirm All Seven Are Active: Filter or sort the Flow list and confirm that all seven MailFlow tracking Flows show a Status of Active. Each Flow's Label and API Name are prefixed for easy identification:
- Lookup Email Send By Token
- Lookup Recipient Link By Token
- Open Event Rollup
- Raise Campaign Member Status
- Raise Custom Campaign Member Status
- Sync Campaign Member Status
- Sync Custom Campaign Member Status
- Review Version History: Click into any Flow to review its version history and confirm the currently activated version matches the version shipped with your installed package.
IMPORTANT ADMINISTRATIVE WARNING
Do not deactivate, delete, or modify the logic inside any of the seven pre-installed tracking Flows. Doing so will silently stall status roll-ups (Sent, Opened, Clicked, Responded, Bounced) across all campaigns in the org. If a custom modification is required, clone the Flow first and route through the cloned version only after thorough testing in a sandbox.
Section 7: Permissions & Security
7.1 Assigning Permission Sets
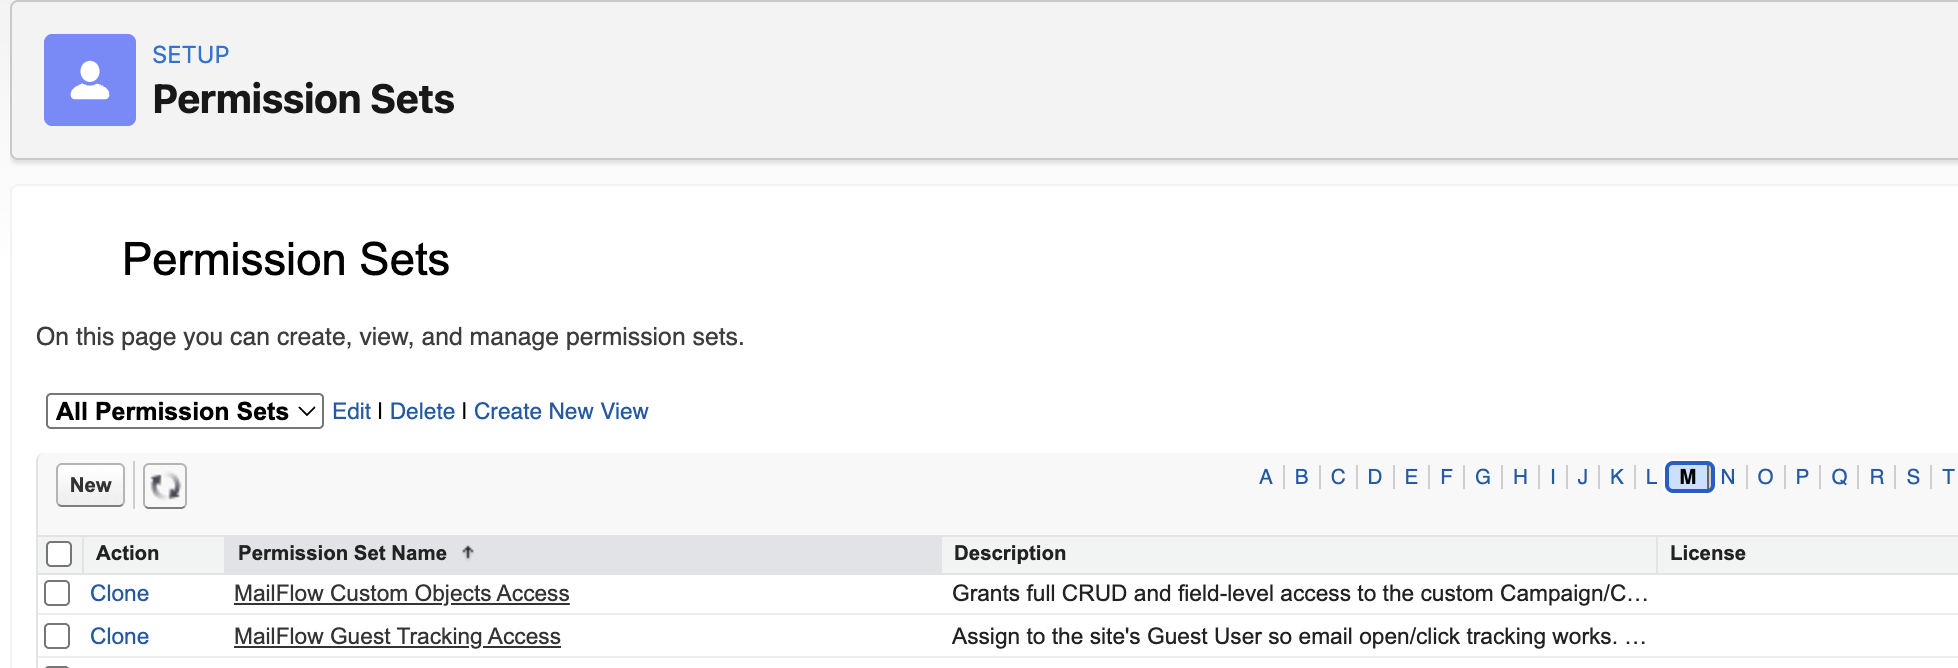
Even Salesforce admins must have MailFlow_Custom_Objects_Access & MailFlow_Scheduling_Access assigned to them.
MailFlow utilizes three distinct permission sets to ensure secure, granular access control:
- MailFlow_Custom_Objects_Access: Grants full CRUD and field-level access to all MailFlow custom objects (Campaigns, Members, Templates, and tracking objects) and app tab visibility. Assign to every marketing/sales user who is going to use this app.
- MailFlow_Scheduling_Access: Grants "Modify All Data" and necessary dependencies required for background job self-scheduling. Assign to at least one trusted admin, in addition to MailFlow_Custom_Objects_Access.
- MailFlow_Guest_Tracking_Access: Grants access exclusively to the two tracking REST endpoints. Assign to the tracking site's Guest User (Section 2.3).
By separating these responsibilities, the broad "Modify All Data" administrative grant is never bundled with standard user permissions.
IMPORTANT - ASSIGN THIS BEFORE FIRST USE
MailFlow's two background jobs - the hourly Auto Send retry job and the daily campaign-completion check - self-schedule automatically the first time they're needed, but only if the triggering user holds Modify All Data (via MailFlow_Scheduling_Access). If the very first person to create a campaign, or the first person to turn on Auto Send, doesn't have it, the job is silently skipped and no error is shown. If this happens, assign MailFlow_Scheduling_Access to that user and repeat the action (create a campaign, or toggle Auto Send off and back on) to trigger scheduling again.
Note: The first campaign should be created or imported by a person who has MailFlow_Scheduling_Access assigned. Turning on Auto Send for failed recipients should also be done by a person who has MailFlow_Scheduling_Access assigned.
7.2 Object- and Field-Level Security (FLS)
- Review Object Permissions: Confirm Create/Read/Edit/Delete access on the Custom Campaign and Custom Campaign Member objects matches your team's operating model (e.g., sales reps may need Read/Edit but not Delete).
- Review Field-Level Security: Confirm tracking fields (Status, engagement counters, email history references) are visible to end users in read-only form where appropriate, so users can see engagement without accidentally editing system-calculated values.
7.3 Guest User Profile Review
As noted in Section 2.2, the Digital Experience Site's Guest User Profile is granted access to the specific Apex classes and pages MailFlow needs to serve tracking pixels and resolve tracked links. Periodically audit this profile - especially after any org-wide sharing rule or profile permission changes - to confirm no additional object or field access has been introduced.
Section 8: Troubleshooting & Maintenance
8.1 Common Issues
| Symptom | Likely Cause | Resolution |
|---|---|---|
| Opens and clicks are not being recorded | Site not published, or the Guest User is missing grants. | Confirm the site shows Published status and re-check the Guest User Profile grants (Section 2.3). |
| Replies are not updating Campaign Member status to Responded | Inactive Email Service or a mismatch in the Reply-To Address. | Confirm the Email Service is Active (Section 3) and the address matches exactly (Section 4). |
| Tracked links redirect to an error page, or land on the wrong page | Site Base URL includes a trailing path. | Re-check Section 4.1; the Site Base URL must be the domain only. |
| "Send Email" throws an error about the tracking site not being configured | Blank Site Base URL setting. | Complete Section 4.1 - this is a hard requirement. |
| No one can send at all, even with the site configured | Daily Send Limit not set. | Use the in-app "Set Send Limit" button on the Custom Campaigns tab (Section 4.2). |
| Auto Send does nothing / failed recipients never retry | Initiating user lacks "Modify All Data" permissions. | Assign MailFlow_Scheduling_Access to an admin, then toggle Auto Send off and back on (Section 6.1). |
| Emails are stuck in a Queued state | More than five campaigns sending at once (platform concurrency limit). | Expected behavior; queued sends process automatically as capacity frees up. |
| A recipient didn't receive a resend of a previously sent campaign | Recipient already has an active status (Sent, Opened, etc.). | Expected behavior; only "Not Sent" or "Bounced" recipients remain eligible. |
8.2 Managing Salesforce Daily Email Limits
Because MailFlow sends through native Salesforce email infrastructure, all campaign sends count against your org's standard Salesforce daily single-email and mass-email limits.
- Monitor Consumption: Check the send-limit counter shown in the Send Tracked Email composer (e.g., "12/15 send limits remaining") before large sends.
- Stage Large Campaigns: Use the Schedule Email option to spread very large sends across multiple days if approaching org-wide limits.
- Review Setup > Email Limits: Cross-check current organization-wide email allocations under Setup, especially in orgs running multiple email-sending applications concurrently.
8.3 Apex Exception Monitoring
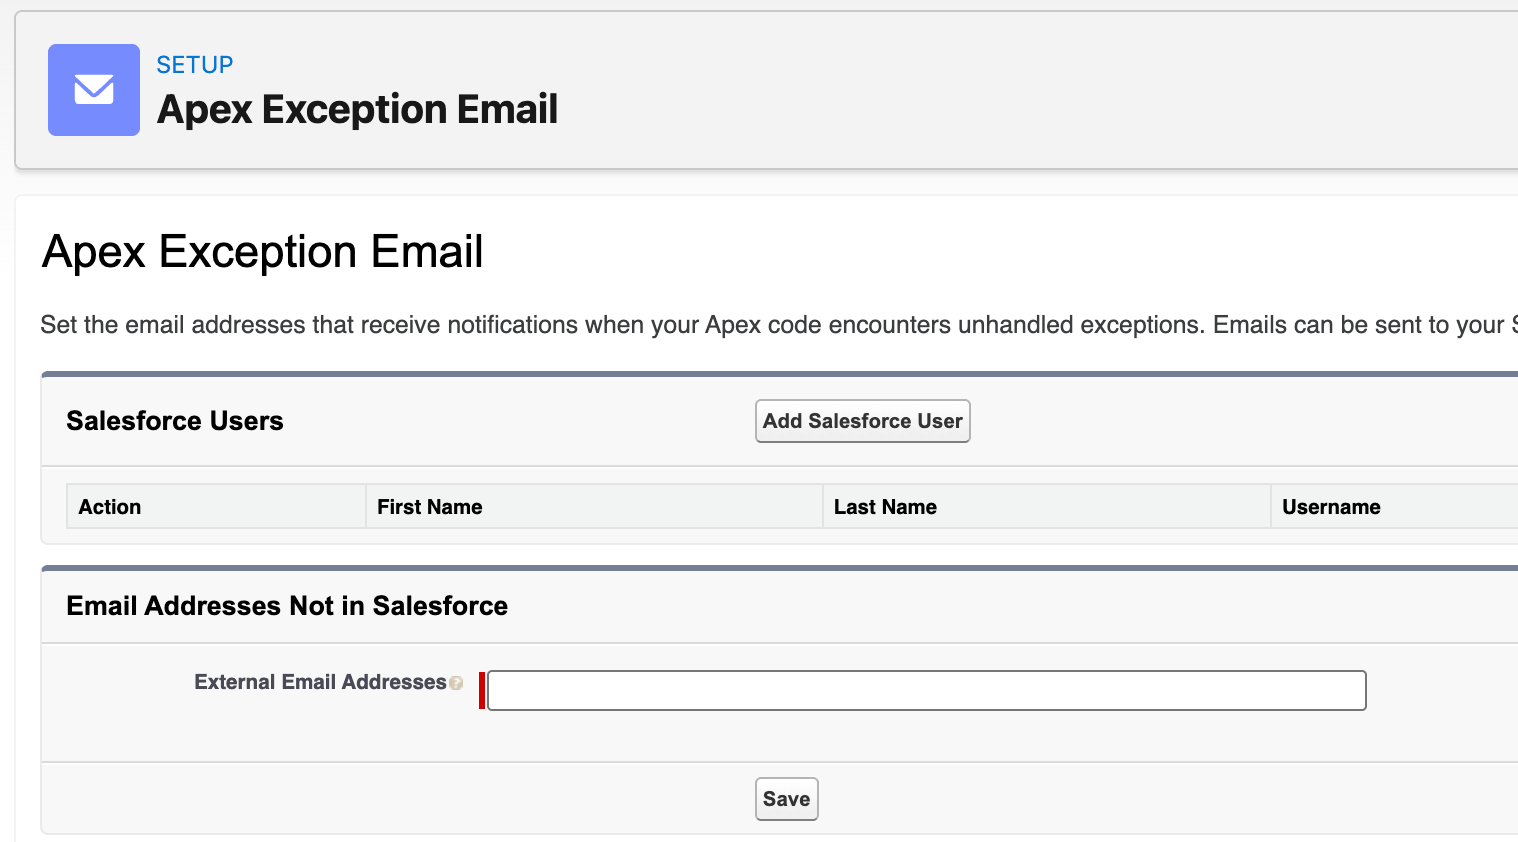
Configure Salesforce's native Apex Exception Email so that unhandled failures in MailFlow's tracking or reply-handling Apex classes are caught immediately.
- Access Setup Page: In Setup, search for "Exception" in the Quick Find box and select Apex Exception Email.
- Add Recipients: Add internal Salesforce administrators via Add Salesforce User, and any external engineering distribution lists via the External Email Addresses field.
- Save: Click Save to activate exception monitoring.
8.4 Periodic Audit Checklist
- Confirm the Digital Experience Site remains published and Guest User access remains enabled after any Digital Experience or sharing setting changes.
- Confirm the Email Service remains Active and has not been auto-deactivated after a bounce-handling threshold was exceeded.
- Confirm all seven pre-installed tracking Flows remain Active and unmodified.
- Spot-check a sample of recent campaign sends to confirm Opened, Clicked, and Responded counts are updating as expected.
PART 2: End-User Functional & Campaign Management Guide
Document Version 1
MailFlow by Arbisoft brings Mailchimp-style email campaign management natively into Salesforce. Marketing and customer-facing teams can build audiences, compose and personalize emails, send or schedule campaigns, and track engagement - opens, clicks, replies, and bounces - without ever leaving the Salesforce platform or paying for a separate third-party marketing tool.
KEY USER BENEFITS & PLATFORM ADVANTAGES
- Zero Third-Party Licensing Cost: Send, track, and personalize campaigns from inside Salesforce instead of paying for scaling Mailchimp contact tiers.
- Unified Customer Data: Every send, open, click, and reply is logged directly against your Leads, Contacts, and Campaign records - no data silos, no exports, no syncing.
- Real-Time Engagement Tracking: Opens, clicks, responses, and bounces roll up automatically to both the Campaign and the individual Campaign Member.
- Flexible Campaign Sources: Work from MailFlow's own Custom Campaigns, or import your existing standard Salesforce Campaigns at any time with no data duplicated between the two.
- Audience-Aware Templates: Build a reusable template library scoped to Leads or Contacts, so you're only ever offered templates that actually fit your audience.
Section 1: Getting Started & Navigation
1.1 Launching the Application
- Open the App Launcher: Click the nine-dot grid icon (App Launcher) in the top-left corner of Salesforce.
- Search and Select MailFlow: Type "MailFlow" into the search bar and select MailFlow by Arbisoft from the list of Apps.
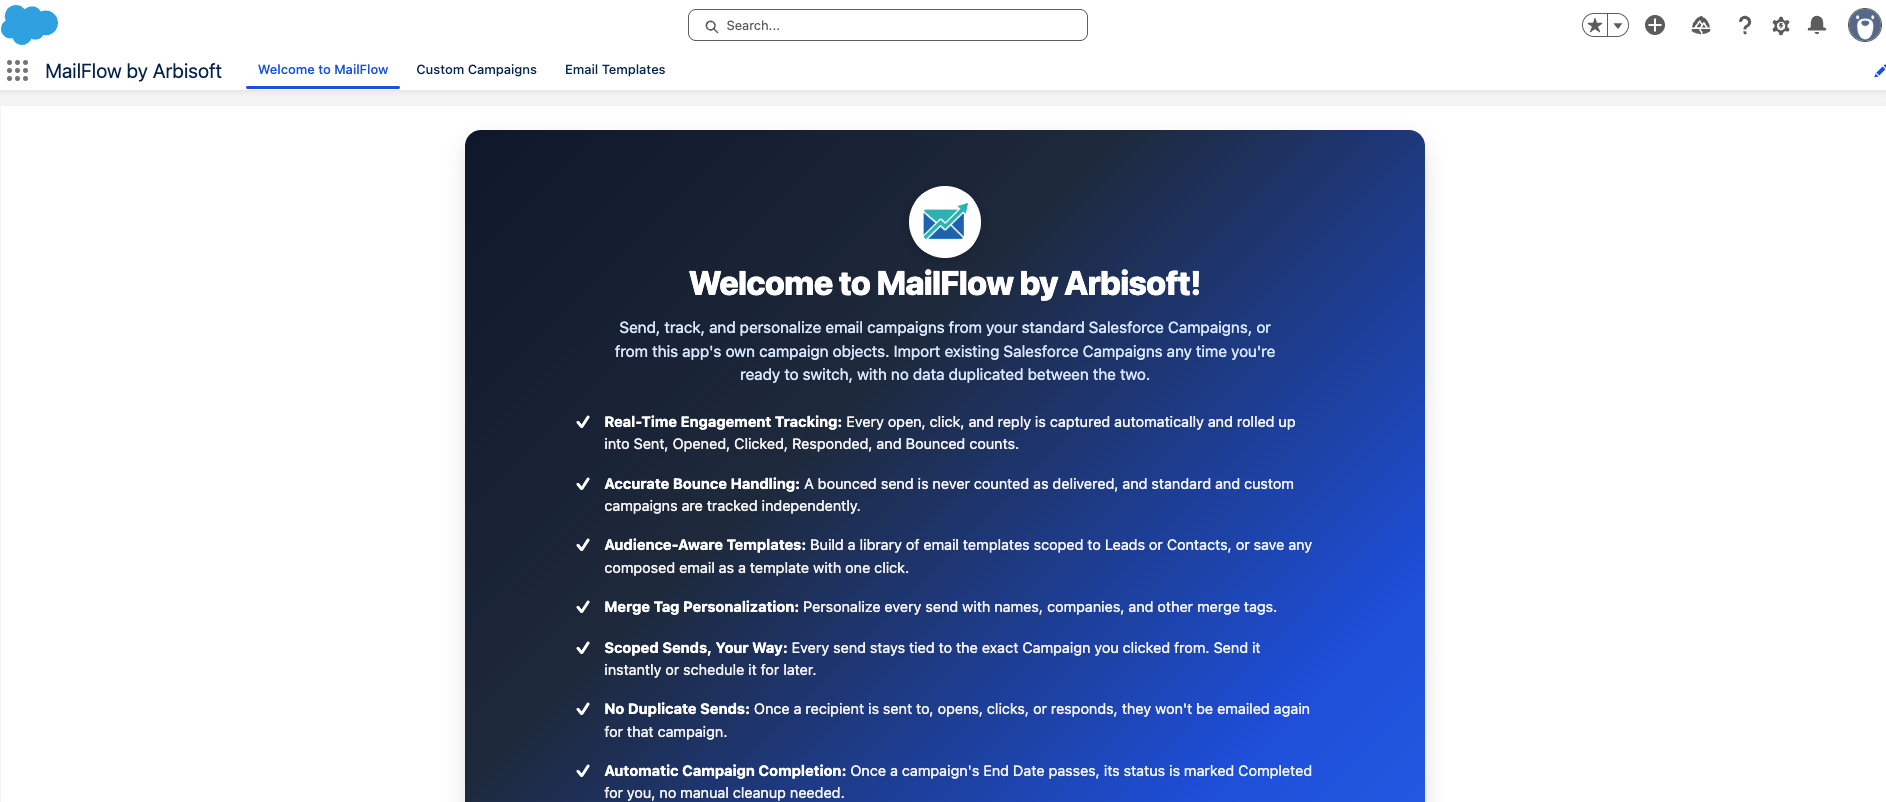
Upon opening the application, you will land on the Welcome to MailFlow home tab. This page summarizes the application's core capabilities and provides quick access to documentation.
1.2 Understanding the Navigation Tabs
- Welcome to MailFlow: The application home page and feature summary.
- Custom Campaigns: Create, view, and manage MailFlow's own campaign records used for audiences and sends that don't need to live as standard Salesforce Campaigns.
- Email Templates: Build and maintain your reusable library of Lead- and Contact-scoped email templates.
Section 2: Creating and Managing Campaigns
2.1 Creating a New Custom Campaign
- Open the Custom Campaigns Tab: Click into the Custom Campaigns tab to view your list of existing campaigns.
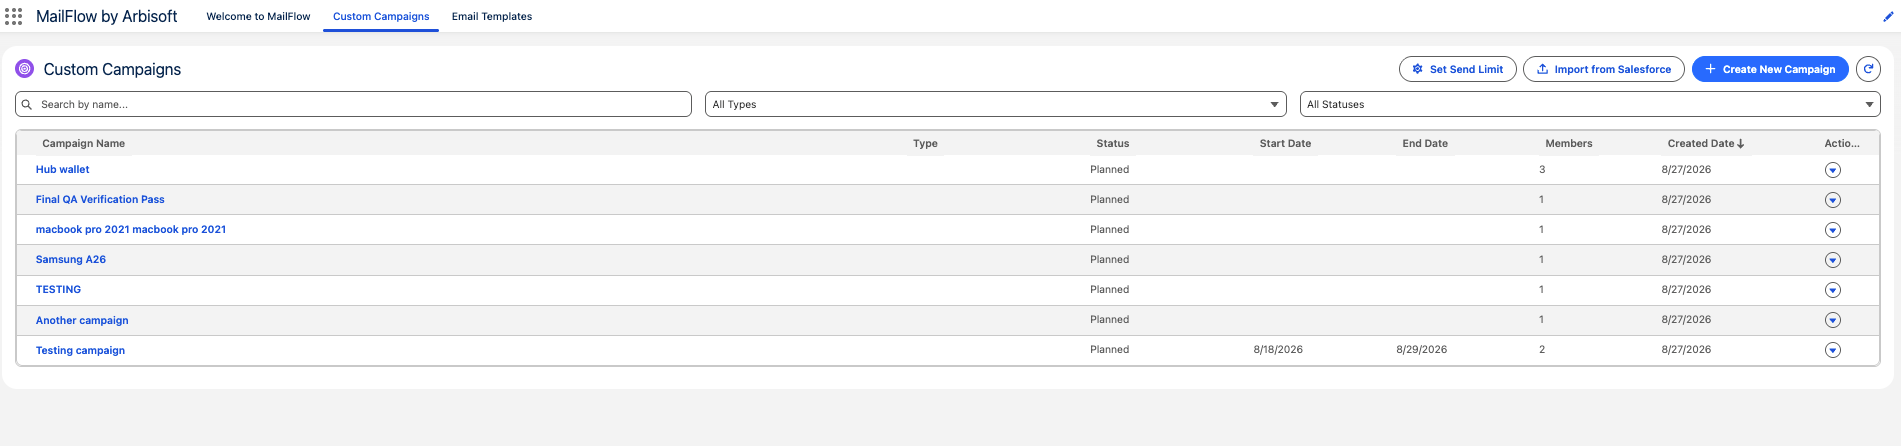
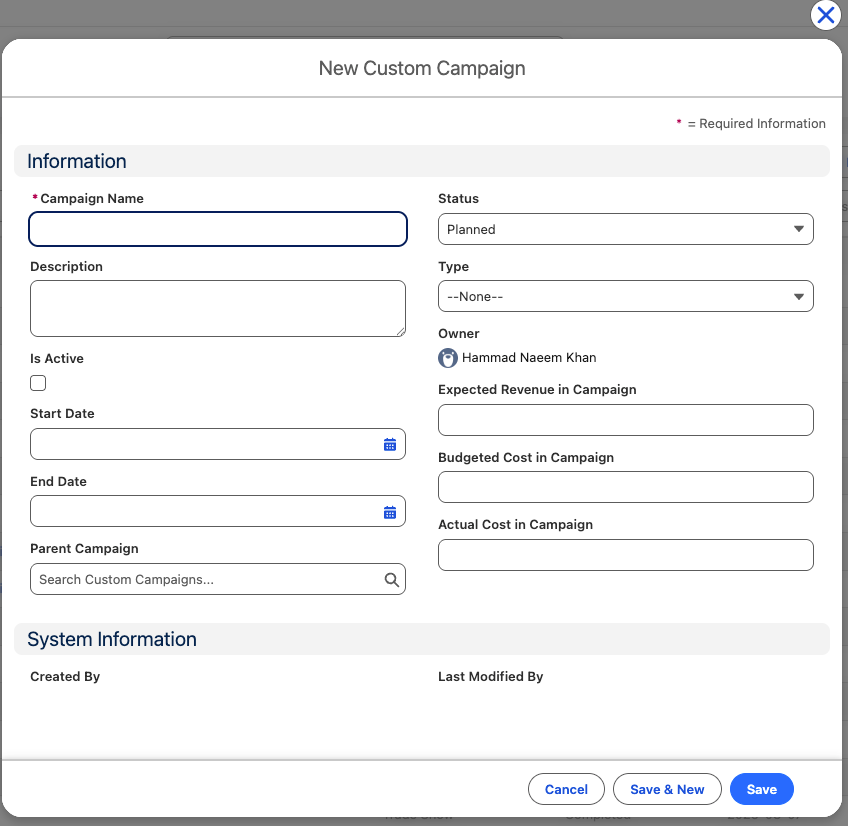
- Launch the Creation Wizard: Click the blue "Create New Campaign" button in the top-right corner.
- Populate Campaign Details: Enter the Campaign Name, Status, Type, Description, Start Date, End Date, and optional financial fields (Expected Revenue, Budgeted Cost, Actual Cost), then click Save.
2.2 Importing Existing Salesforce Campaigns
If your team already runs standard Salesforce Campaigns, click "Import from Salesforce" from the Custom Campaigns tab at any time to bring an existing Campaign into MailFlow for tracked sending. Standard Salesforce Campaigns and MailFlow's own Custom Campaigns are always tracked independently - importing does not duplicate or overwrite your existing Campaign data.
2.3 Adding Members to a Campaign
Open any Custom Campaign record and switch to the "Related" tab to manage its audience.
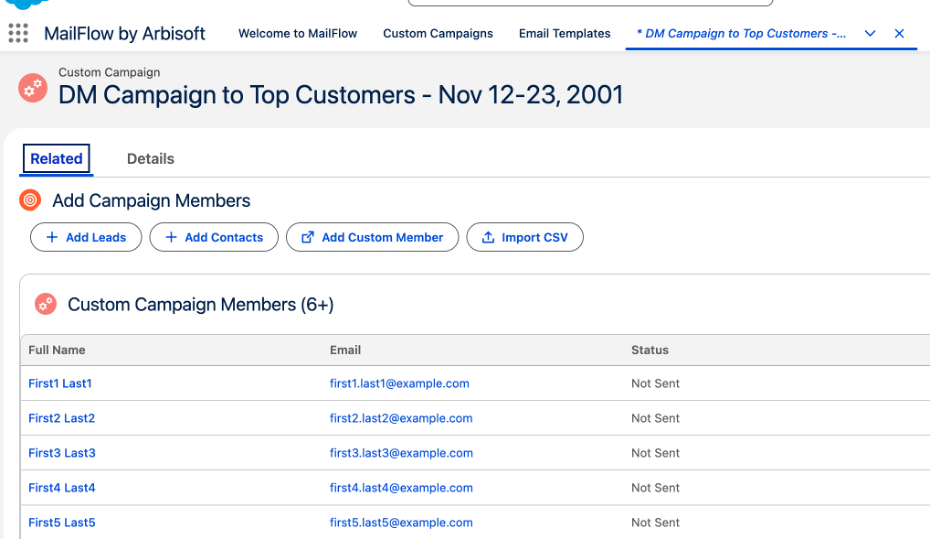
- Add Leads / Add Contacts: Search and select existing Salesforce Leads or Contacts to add as Campaign Members.
- Add Custom Member: Manually add a recipient who does not yet exist as a Lead or Contact record - useful for one-off or externally sourced addresses. These display as having "no CRM record" on the Campaign Member detail page.
- Import CSV: Bulk-upload a list of recipients from a spreadsheet file.
Each recipient becomes a Custom Campaign Member record with its own tracked Status, beginning as "Not Sent" until an email has been dispatched to it.
Section 3: Building and Managing Email Templates
3.1 Creating a New Email Template
Navigate to the "Email Templates" tab. If no templates exist yet, you will see an empty state prompting you to create your first one.

- Click "Create New Template": This opens the New Email Template composer.
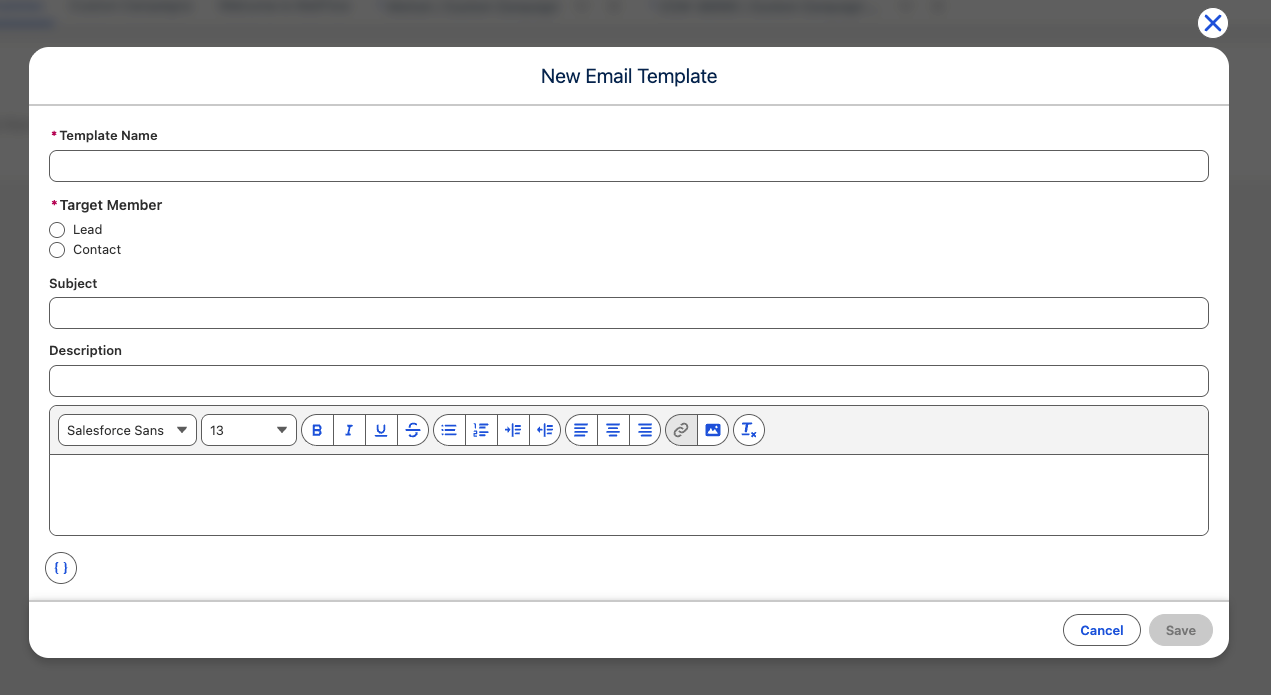
- Template Name: Give the template a clear, descriptive internal name.
- Target Member (Lead or Contact): Select whether the template is intended for Leads or Contacts. This is required and cannot be changed later.
- Subject and Description: Enter the email subject line and an optional internal description of the template's purpose.
- Compose the Body: Use the rich-text editor toolbar to format text, insert links, and build the email content.
AUDIENCE-AWARE TEMPLATE LOGIC
Because every template is explicitly scoped to Leads or Contacts, the email composer only ever surfaces templates that actually match the audience type of the campaign you are sending from - preventing accidental use of a mismatched template.
3.2 Personalizing Emails with Merge Tags
While composing an email - either a saved template or a one-time send - use the merge tag button ({}) in the toolbar to insert dynamic fields (such as First Name or Company) that personalize each message per recipient at send time.
Any email you compose directly inside the Send Tracked Email screen can also be saved as a reusable template with a single click, so proven messaging can be turned into a template without rebuilding it from scratch.
Section 4: Sending and Scheduling Campaign Emails
4.1 Opening the Send Tracked Email Screen
- Open Your Campaign Record: From the Custom Campaigns tab (or a standard Salesforce Campaign), open the target campaign and locate the "Email Send Summary" component at the top of the page.
- Click "Send Email": This launches the Send Tracked Email screen scoped strictly to this campaign.
4.2 Selecting Recipients
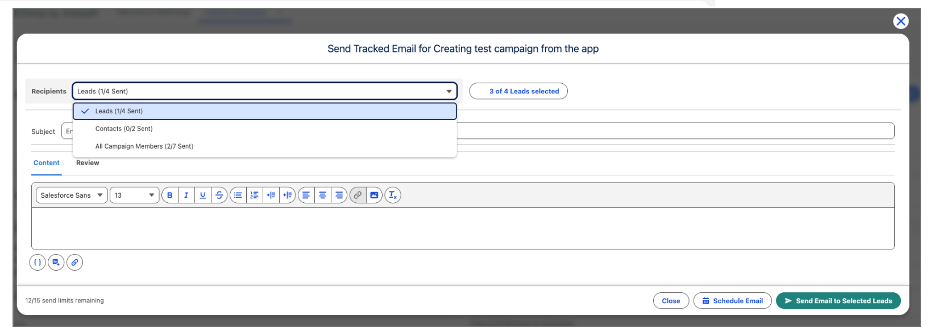
- Choose a Recipient Group: Use the Recipients dropdown to send to Leads only, Contacts only, or All Campaign Members. Each option displays a live "X of Y Sent" count so you always know how much of that group has already been emailed.
- Refine Your Selection: Click the selection summary (e.g., "3 of 4 Leads selected") to check or uncheck individual recipients before sending.
4.3 Composing and Sending
- Subject: Enter or edit the subject line for this send.
- Content: Compose your message in the rich-text editor, insert a saved template using the template icon, add merge tags with the {} icon, or attach a file with the paperclip icon.
- Send Immediately: Click "Send Email to Selected Leads" (the button label updates to reflect your chosen recipient group) to dispatch the email right away.
- Schedule for Later: Click "Schedule Email" instead to queue the send for a future date and time.
SEND LIMITS & QUEUING BEHAVIOR
Each send is metered against a rolling send-limit counter, visible in the bottom-left corner of the composer (e.g., "12/15 send limits remaining"). This protects your org from exceeding Salesforce's daily email allowances. Only five campaigns may actively send at the same time - any additional campaign sends beyond that are queued automatically and processed as capacity frees up, no manual retry is required. Once a recipient has been sent to, has opened, clicked, or responded to a campaign, they are never emailed again for that same campaign. Only recipients still marked "Not Sent," or those that previously bounced, remain eligible for a future send.
Section 5: When the Daily Send Limit Runs Out
5.1 Limit Exhausted Information
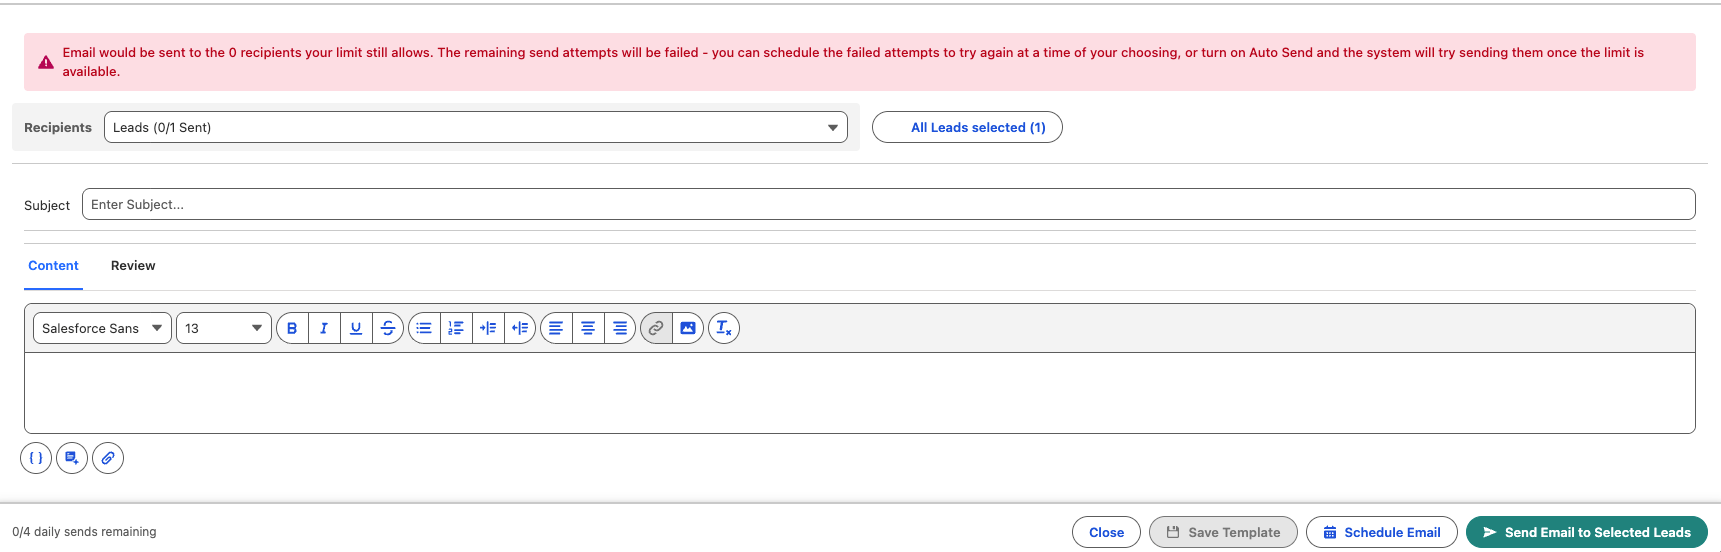
Once the limit is exhausted, the system tells you this while sending an email - the pill on the send email modal shows that the limit has already been reached.
5.2 Sending Email Even After the Limit Is Reached
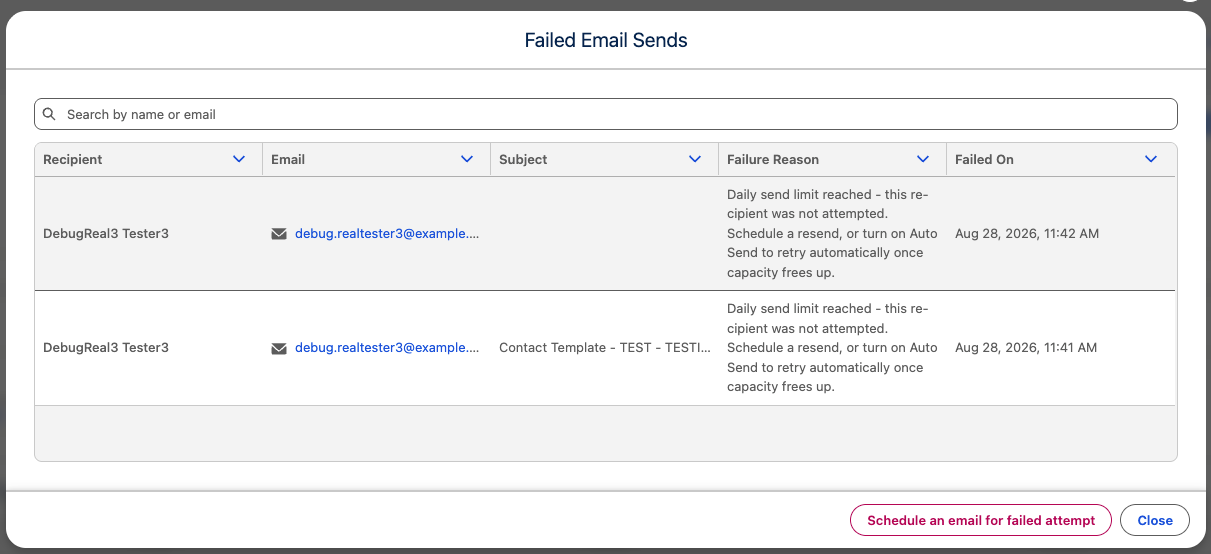
The system does not block you from sending. You can still attempt the send, but the send attempt will fail and a toast notification will alert you.

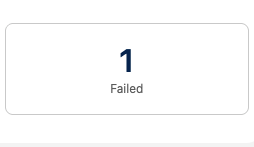
Click the failed number to see the failed send's reason and detail. From there you can either schedule the failed email for a time of your choosing, or turn on Auto Send so the email goes out automatically once the daily limit resets (or is increased).
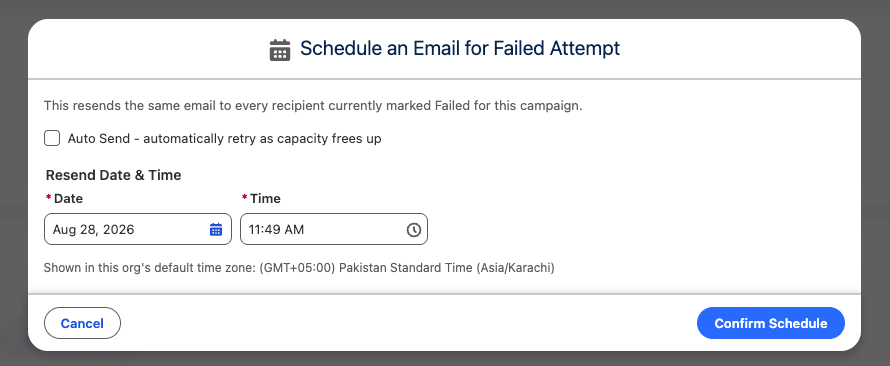
Note: Auto Send should be turned on by someone with the MailFlow_Scheduling_Access permission set assigned. Otherwise it won't schedule anything and silently skips sending.
Section 6: Tracking & Analytics
6.1 Campaign-Level Engagement Summary
Every Custom Campaign (and every standard Salesforce Campaign brought into MailFlow) displays a live Email Send Summary showing rolled-up engagement across the entire audience.

- Total Members: The full count of recipients added to the campaign.
- Sent: Recipients who have successfully received the email.
- Opened: Recipients who have opened at least one send.
- Clicked: Recipients who clicked at least one tracked link.
- Responded: Recipients who replied directly to the campaign email.
- Bounced: Delivery failed - the recipient's address rejected the message. Bounced recipients remain eligible for a future send.
- Failed: The send attempt failed for another reason (including hitting the daily send limit).
6.2 Reviewing Details from the Campaigns List
You can also jump directly to a campaign's edit screen from the Custom Campaigns list view using the row-level action menu.

6.3 Individual Campaign Member Tracking
For a granular, recipient-level view, open any individual Custom Campaign Member record. The Details tab shows the recipient's Status alongside a dedicated Email History panel.
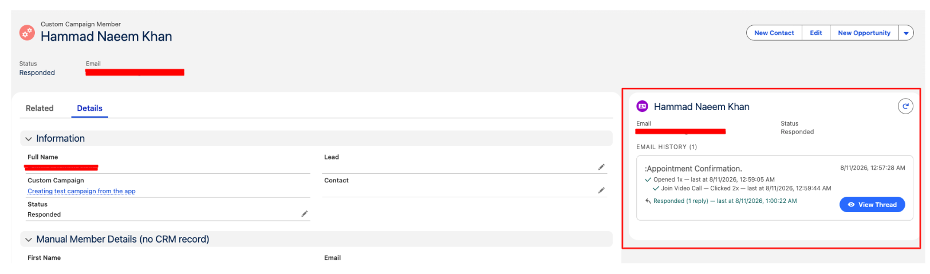
- Email History: Lists every send made to this recipient, each with its own subject line and timestamp.
- Per-Link Click Tracking: Individual tracked links within the email (e.g., "Join Video Call," "LinkedIn," "YouTube page") are each tracked separately, showing whether and how many times that specific link was clicked.
- View Thread: If the recipient replied, click View Thread to read the full reply conversation without leaving Salesforce.
6.4 Understanding Campaign Member Status Values
| Status | Meaning |
|---|---|
| Not Sent | The recipient has been added to the campaign but has not yet received an email. |
| Sent | The email was successfully delivered to the recipient. |
| Opened | The recipient has opened at least one sent email. |
| Clicked | The recipient clicked at least one tracked link inside the email. |
| Responded | The recipient replied to the email; the reply is captured and viewable via View Thread. |
| Bounced | Delivery failed. Bounced recipients remain eligible for a future send. |
Section 7: Best Practices
7.1 Audience Segmentation
- Segment by Recipient Type: Use the Leads / Contacts / All Campaign Members recipient filter to avoid sending Lead-specific messaging to existing Contacts, and vice versa.
- Match Templates to Audience: Build separate templates for Lead-facing and Contact-facing campaigns so messaging tone and calls-to-action stay relevant to each audience.
7.2 Email Hygiene
- Review Bounces Regularly: Periodically check the Bounced count on each campaign and correct invalid addresses before re-sending.
- Avoid Duplicate Sends: Rely on MailFlow's built-in re-send protection - once a recipient has been sent to, opened, clicked, or responded, they will not receive that campaign email again, to prevent over-messaging your audience.
- Stage Large Sends: For very large audiences, use Schedule Email to spread sends across off-peak hours rather than sending to the entire list at once.
7.3 Reporting & Follow-Up
- Prioritize Responders: Use the Responded status as your hottest follow-up queue - these are recipients who have already engaged in a two-way conversation.
- Use Click Data to Gauge Interest: Per-link click tracking reveals exactly which call-to-action resonated with each recipient, useful for tailoring your next outreach.