PART 1: Backend Infrastructure & Pre-Installation Guide
Document Version 1
This guide is the mandatory technical prerequisite manual for the Custom Field History Tracking application. It explains how a Salesforce System Administrator must build the required database objects, schemas, security foundations, and automation before using the front-end configuration wizard.
Section 1: Package Installation & Security Model
1.1 Pre-Installation System Prerequisites
Before starting the deployment, the executing Salesforce System Administrator must verify that the target environment meets the following conditions:
- Administrative Privileges: The executing user profile must have explicit
Download PackagesandModify All Datasystem permissions active inside the target organization. - Environment Verification: Identify conclusively whether the target Salesforce instance is a Production Org or a Sandbox Test Environment before launching package deployment links.
- Session Security: Ensure the installing administrator's user profile has
API Enabledchecked, and that the active session matches the organization's high-assurance Multi-Factor Authentication (MFA) criteria to prevent deployment blockages.
1.2 Step-by-Step Installation Procedure
Step 1: Package Access and Authentication
- AppExchange Redirection: Navigate to the Salesforce AppExchange directory, locate the Custom Field History Tracking application (listed under the asset name Histora by Arbisoft), and click the installation link.
- Credential Entry & Identity Verification: Input your environment credentials (Username and Password) on the secure Salesforce login page and complete the mandatory Multi-Factor Authentication (MFA) challenge on your registered mobile device to authorize access.
Step 2: Security Model and Access Level Assignment
Upon successful authentication, the package installation interface will load. You must explicitly select a security deployment model based on your company's internal data governance policies:
- Install for Admins Only (Default Recommended): Limits package component access exclusively to users with the System Administrator profile. Use this option to securely handle backend custom object schemas before rolling features out to business units.
- Install for All Users: Grants immediate visibility, tab access, and underlying object permissions to all internal users in the org.
- Install for Specific Profiles: Opens an interactive profile mapping matrix allowing tailored security level assignments, page layout controls, and object CRUD permission settings per profile prior to deployment.
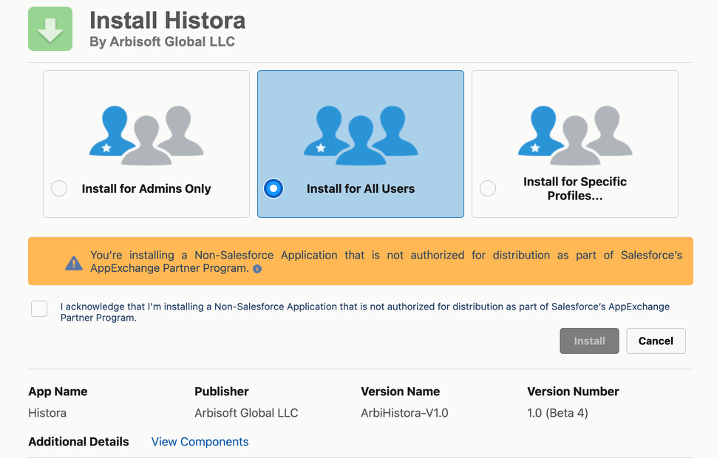
Step 3: Execution of Package Deployment
- Trigger Installation: Click the blue Install confirmation checkbox and action button within the primary frame interface.
- Execution Processing: Lightweight assets complete processing within seconds, routing directly to a green layout validation screen. In complex or large metadata enterprise environments, the platform may present a prompt: 'This app is taking a long time to install. You will receive an email notification once complete.' Click Done safely; deployment finishes asynchronously.
1.2.1 Verify Application Access After Installation
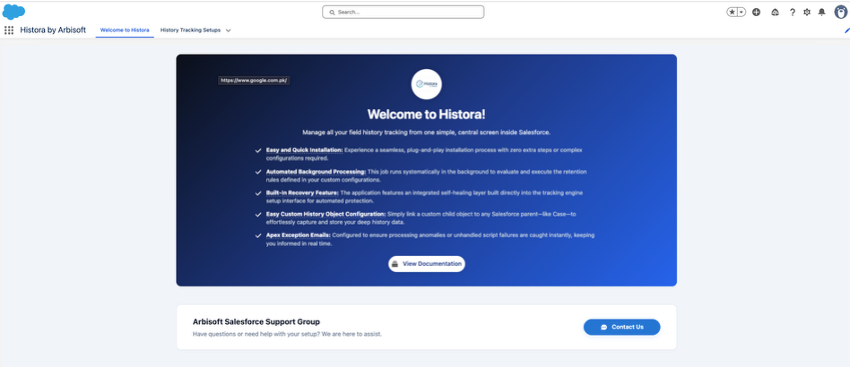
After the package installation is complete, users can access the Histora by Arbisoft application from Salesforce and verify that the installation was successful.
Lightning Experience
Open the App Launcher, search for Histora, and select the Histora by Arbisoft application.
Salesforce Classic
Open the App Menu in Salesforce Classic and select Histora by Arbisoft from the available applications.
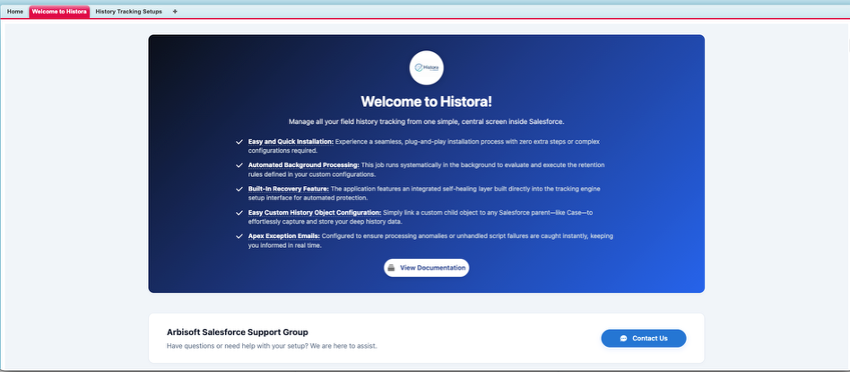
Upon opening the application, you will be greeted by the Welcome to Histora! landing page. From this dashboard, you can quickly navigate the interface using the following built-in tools:
- View Documentation: Click this button to access our detailed, step-by-step documentation guide for real-time help with configuration and usage.
- Contact Us: If you have questions or need direct help with your setup, click this button to notify our development team, and a support representative will reach out to assist you.
1.3 Automated Background Processing & Retention Management (Scheduled Job)
Upon successful installation of 'Histora by Arbisoft', an automated background job is initialized and scheduled to manage your data retention policies. This job runs systematically to evaluate and execute the retention rules defined in your custom configurations.
- Job Name in Salesforce Setup:
AppExchange Field History Retention Engine - Function: Automatically prunes, archives, or processes historical field data based on your specific object retention selections.
⚠️ IMPORTANT ADMINISTRATIVE WARNING
To ensure continuous background processing and compliance with your defined data retention schedules, do not manually delete, abort, or alter the scheduled job titled AppExchange Field History Retention Engine from the Salesforce Scheduled Jobs queue. Deactivation or deletion of this system job will stall all automated retention engines indefinitely.
1.4 Recovery Procedure: Rescheduling a Deleted Job
ADMIN NOTE
If an administrator accidentally deletes the scheduled job from the Salesforce Setup menu, there is no cause for alarm. The application features an integrated self-healing layer built directly into the tracking engine setup interface.
If the retention job has been removed, follow these simple steps to safely reschedule it:
- Navigate to the app's Field History Setup Wizard tab.
- Select any existing field history setup record from your configuration list and click Edit.
- Click Save without making any changes to your tracked fields or settings.
Automatic Re-registration: The application backend will instantly detect the missing scheduled job, automatically re-register it with the Salesforce platform scheduler, and restore normal operations without any manual Apex entry or configuration hassle.
Section 2: Database Schema & Core Infrastructure Creation
📋 CRITICAL COMPLIANCE NOTICE
Before utilizing the front-end wizard interface, the system administrator must manually create the target Custom History Object, construct its corresponding tracking fields, and activate its dedicated Record-Triggered Flow. This custom object serves as your dedicated storage repository where all audited data modifications from your chosen parent object will be structured, saved, and indexed. The accompanying Record-Triggered Flow is required to automatically capture, parse, and stream those real-time data modifications directly into the custom history repository.
2.1 Step 1: Create the Target Custom History Object
For every parent Salesforce object designated for extended field historical tracking (such as the standard Case object), a corresponding child tracking history data object must be configured manually.
- Access Setup Console: Click the Setup Gear Icon located in the top-right application header and select Setup to launch the admin console.
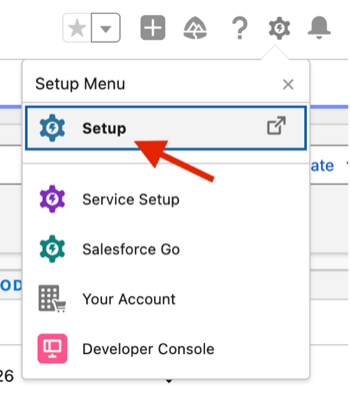
- Locate Object Manager: Navigate directly to the Object Manager tab at the top of the page.
- Initialize Object Creation: In the upper-right corner of the manager screen, expand the Create dropdown menu and select Custom Object.

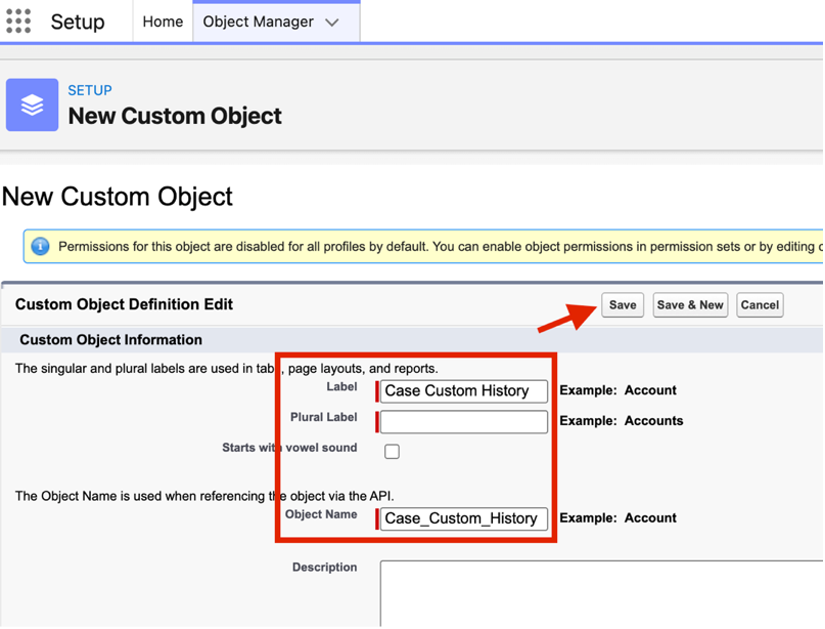
Populate Metadata Configuration Attributes exactly as detailed below:
- Label: Case Custom History
- Plural Label: Case Custom Histories
- Object Name:
Case_Custom_History - Record Name: Custom History Name (Data Type: Text or Auto-Number based on company logging policy standards).
- Commit Database Entity: Click the Save action button to write the database table structure into the organizational metadata layer.
2.2 Step 2: Build Object Schema Custom Fields
Next, you must build the structured relational, audit, text, and numerical fields necessary to capture, parse, and store individual historical transactional segment shifts.
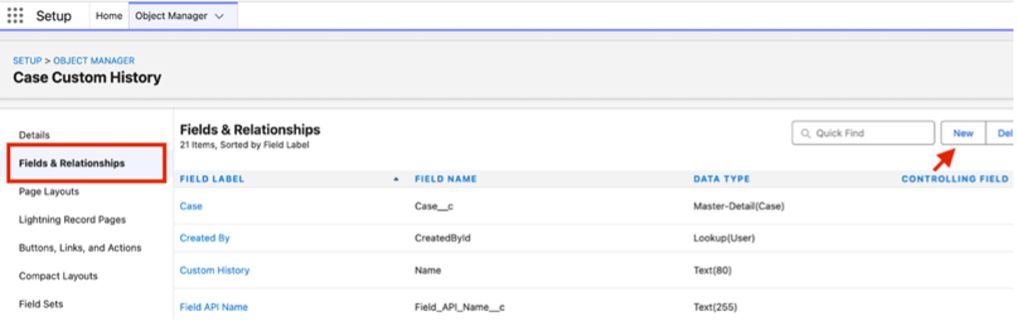
- Access Field Configuration Sidebar: From the newly built Case Custom History workspace layout screen within the Object Manager, click into Fields & Relationships via the left sidebar.
- Initialize Custom Field Wizard: Click the New button to open the custom field engine setup page.
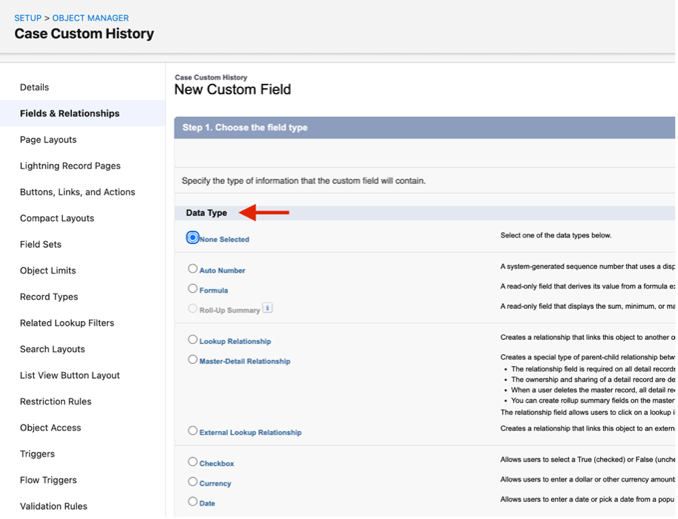
- Select Data Type: Locate the precise data classification mapping from the Child History Object Schema Reference Table below, choose the specified option, and click Next.
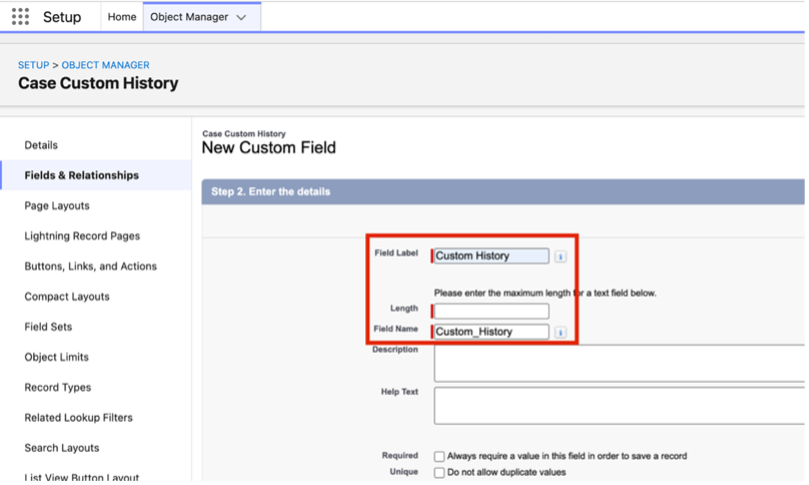
- Populate Structural Attributes: Enter the exact specified Field Label and confirm that the system auto-fills the corresponding Field API Name accurately.
- Security & Save Matrix: Define structural Field-Level Security (FLS) profiles ensuring read/write rules are locked down, advance by clicking Next, and click the Save & New action button to immediately clear the wizard canvas and proceed to the next line item.
- Complete Schema Creation Loop: Systematically repeat this creation sequence until all core tracking fields mapped below have been successfully instantiated.
Child History Object Schema Reference Table
| Field Label | Field API Name | Data Type | Functional Description / Architecture Note |
|---|---|---|---|
| Parent Object | Parent_Object__c | Master-Detail / Lookup (Parent Object) | Links historical transaction explicitly to the parent record modified. Architecture Note: For objects that do not support Master-Detail relationships, this field must be configured as a Lookup relationship. |
| Created By | CreatedById | Lookup (User) | Standard audit lookup storing identity profile of user committing change. |
| Custom History | Name | Text (80) | Unique structural name or auto-number identifier assigned to line item. |
| Last Modified By | LastModifiedById | Lookup (User) | Standard system field capturing final identity updating log segment. |
| Field API Name | Field_API_Name__c | Text (255) | Backend system API identifier name of field updated. |
| Field Data Type | Field_Data_Type__c | Picklist | Required Action: Manually populate the picklist values with: BOOLEAN, TEXT, CURRENCY, DOUBLE, DATE, DATETIME, REFERENCE. |
| Field Label Name | Field_Label_Name__c | Text (255) | Descriptive, localized, user-friendly UI label text of field modified. |
| New Value Checkbox | New_Value_Checkbox__c | Checkbox | Stores data points if audited field uses Boolean Checkbox layout. |
| New Value Date | New_Value_Date__c | Date | Stores data points if audited field uses standard Date structure. |
| New Value Date Time | New_Value_Date_Time__c | Date/Time | Stores data points if audited field uses detailed Date/Time timestamp. |
| New Value Lookup | New_Value_Lookup__c | Lookup (Parent Object) | Stores the relationship reference pointer if the updated parent field links to another Case record. |
| New Value Number | New_Value_Number__c | Number (18, 0) | Stores incoming numerical data configurations or currency amounts. |
| New Value Text Display | New_Value_Text_Display__c | Text (255) | Stores raw alpha-numeric information strings derived from updates. |
| Old Value Checkbox | Old_Value_Checkbox__c | Checkbox | Captures previous database state if targeted asset was Boolean Checkbox. |
| Old Value Date | Old_Value_Date__c | Date | Captures previous database state if targeted asset was a Date value. |
| Old Value Date Time | Old_Value_Date_Time__c | Date/Time | Captures previous database state if targeted asset was Date/Time value. |
| Old Value Lookup | Old_Value_Lookup__c | Lookup (parent object) | Captures the historical relationship reference pointer mapping prior to modification updates. |
| Old Value Number | Old_Value_Number__c | Number (18, 0) | Captures previous database numerical/currency integers before shift. |
| Old Value Text Display | Old_Value_Text_Display__c | Text (255) | Captures legacy string information details prior to modification updates. |
| New Value Display | New_Value_Display__c | Formula (Text) | Processes formulas to dynamically present current value states as text. |
| Old Value Display | Old_Value_Display__c | Formula (Text) | Processes formulas to dynamically present preceding value states as text. |
| User | User__c | Lookup (User) | Explicit custom tracking lookup determining exactly which user account committed change. |
2.3 Technical Formula Programming Logic Identifier Blocks
When structuring the formula compilation logic parameters within the platform database setup editor canvas, ensure the logic strings match the explicit nesting loops precisely as detailed below:
Formula Code 1: New Value Display Custom Target (New_Value_Display__c)
IF(
	ISPICKVAL(Field_Data_Type__c, "BOOLEAN"),
	IF(New_Value_Checkbox__c, "TRUE", "FALSE"),
	IF(
		ISPICKVAL(Field_Data_Type__c, "DATE"),
		TEXT(New_Value_Date__c),
		IF(
			ISPICKVAL(Field_Data_Type__c, "DATETIME"),
			TEXT(New_Value_Date_Time__c),
			IF(
				ISPICKVAL(Field_Data_Type__c, "TEXT"),
				New_Value_Text_Display__c,
				IF(
					ISPICKVAL(Field_Data_Type__c, "REFERENCE"),
					New_Value_Lookup__c,
					TEXT(New_Value_Number__c)
				)
			)
		)
	)
)
Formula Code 2: Old Value Display Custom Target (Old_Value_Display__c)
IF(
	ISPICKVAL(Field_Data_Type__c, "BOOLEAN"),
	IF(Old_Value_Checkbox__c, "TRUE", "FALSE"),
	IF(
		ISPICKVAL(Field_Data_Type__c, "DATE"),
		TEXT(Old_Value_Date__c),
		IF(
			ISPICKVAL(Field_Data_Type__c, "DATETIME"),
			TEXT(Old_Value_Date_Time__c),
			IF(
				ISPICKVAL(Field_Data_Type__c, "TEXT"),
				Old_Value_Text_Display__c,
				IF(
					ISPICKVAL(Field_Data_Type__c, "REFERENCE"),
					Old_Value_Lookup__c,
					TEXT(Old_Value_Number__c)
				)
			)
		)
	)
)
2.4 Step 3: Implementing the History Tracking Record-Triggered Flow
To automate the capture of modified data into your newly built custom history object repository, a Record-Triggered Flow utilizing the application’s Apex Action handler must be constructed for the parent object.
Phase A: Initialize a New Flow
- Navigate to the Flow Dashboard: From the Setup console, enter Flows inside the left sidebar Quick Find box and click on the resulting Flows configuration menu item.
- Create New: Click the New Flow button located in the top-right corner of the dashboard screen layout.
- Select Your Flow Type: Select Record-Triggered Flow so the automation runs silently in the background when a parent record is modified.
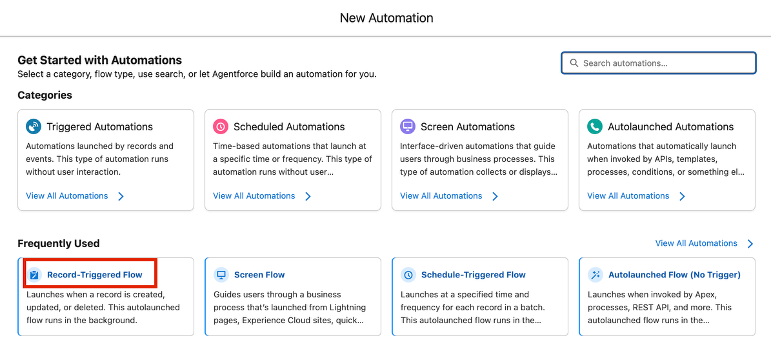
- Open Canvas: Click Create to launch the interactive Flow Builder workspace canvas.
Phase B: Configure Start Node Parameters
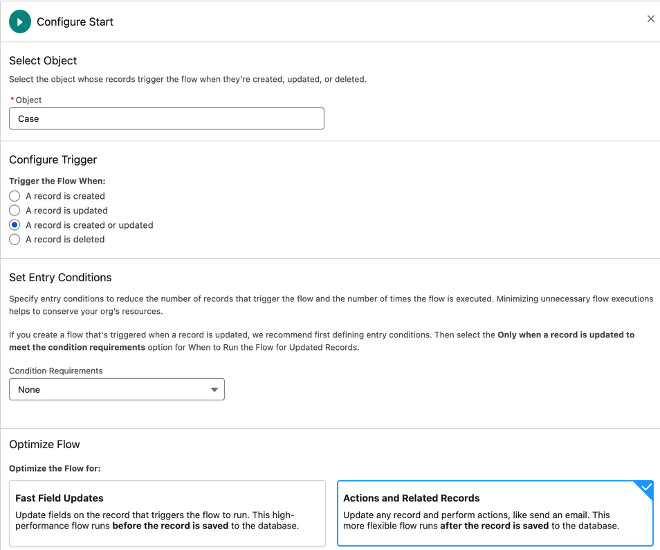
- Select Object: Set the Object parameter dropdown to point explicitly to your targeted parent object (e.g., Case, Account, or your custom parent object).
- Configure Trigger: Set the 'Trigger the Flow When:' evaluation constraint radio option strictly to 'A record is created or updated'.
- Set Entry Conditions: Set the Condition Requirements to None.
- Optimize Flow: Select the optimization mode radio button option layout for Actions and Related Records.
- Commit Start Node: Click Done at the bottom of the wizard container window panel to lock in the trigger execution parameters.
Phase C: Add Elements and Logic
- Insert a Node: Click the interactive Add Element (+) button directly underneath the Run Immediately path on the flow builder canvas workspace layout.
- Choose an Action or Logic Block: Select Action from the interactive element menu panel to open the action configuration overlay.
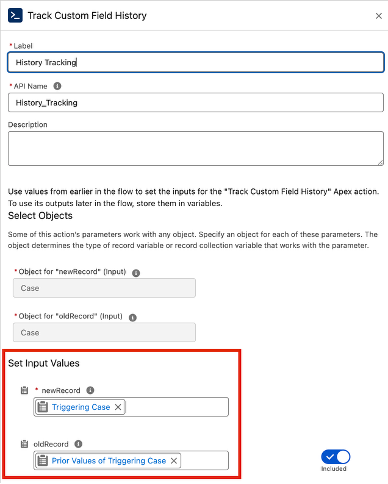
- Execute Action Lookup: In the primary action lookup search field container row, locate and choose the Track Custom Field History (History_Tracking) application core Apex class framework.
- Assign Block Node Metadata: In the right-hand element configuration properties window block panel, explicitly populate: Label: History Tracking; API Name: Confirm that the platform engine auto-fills this string strictly to History_Tracking.
- Establish Select Objects Map: Locate the explicit typing parameters dropdown criteria selectors and map them as follows: Object for "newRecord" (Input): Set to match your targeted parent object name exactly; Object for "oldRecord" (Input): Set to match your targeted parent object name exactly.
- Configure Set Input Values Matrix: Toggle the runtime variable inclusion sliders to active (Included) and bind the specific record state context values: newRecord Parameter: Bind the data context string to the global execution value state variable: {!$Record}; oldRecord Parameter: Bind the data context string to the global legacy value state variable: {!$Record__Prior}
- Commit Element Configuration: Click Done inside the bottom pane of the sidebar property panel area to safely close the canvas element setup drawer.
Phase D: Save and Activate Your Automation
- Save the Progress: Click the Save button in the global utility header row at the top-right corner of the builder screen layout.
- Define Taxonomy: Give your automation a clear, descriptive Flow Label (e.g., [Object Name] Custom Field History Tracking Flow) and confirm the API name auto-populates cleanly. Click Save.
- Test (Optional but Recommended): Click the Debug button to test your logic criteria constraints safely before pushing it live.
- Go Live: Click the Activate action button in the global header utility row area to deploy your flow and make the audit tracking streaming service active within your organization ecosystem.
APPLICATION DEPLOYMENT NOTE
To expedite your initial deployment, the package automatically includes a pre-configured, out-of-the-box custom history object named Histora, along with a pre-installed Record-Triggered Flow named Histora Custom Field History Tracking Flow. If you intend to track historical field data adjustments on the standard Lead object, you do not need to manually construct the Record-Triggered Flow elements detailed above; this pre-installed Lead tracking automation asset is automatically activated once the app is installed.
Required Post-Installation Steps for Administrators:
- Once the application is installed, assign the "History Tracking Fields Read-only" permission set to your users.
- Assign the "Histora Permission Set" to the administrators or specific users managing the records.
2.5 Step 4: Creating and Exposing Custom Navigation Tabs
To ensure corporate governance, compliance, and auditing teams can query tracking log rows smoothly, you must expose a dedicated search layout tab mechanism framework:
- Open Interface Properties: Click the Setup Gear navigation icon, enter Tabs inside the left sidebar Quick Find box, and click on the resulting Tabs configuration menu item.
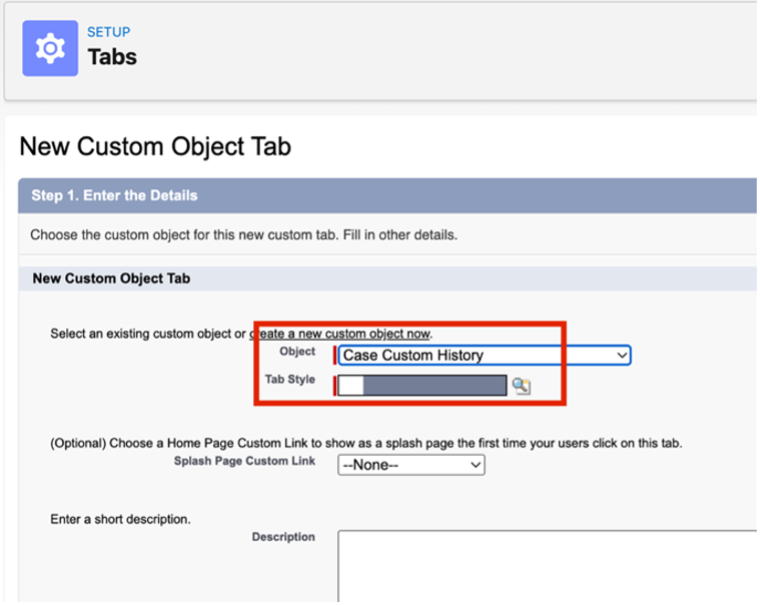
- Initialize Custom Object Tab Wizard: Locate the Custom Object Tabs section area and click the New button.
- Map Target Object: Expand the Object dropdown list, select Case Custom History, and explicitly set the Tab Label name to Case Custom Histories.
- Apply App Visual Branding Elements: Click the selector magnifying glass next to the Tab Style field to designate a distinctive visual theme layout icon color map parameter set.
- Assign Profile Security Access: Click Next, define custom visibility profiles matrix structures, map constraints, and click Next again.
- Commit Settings: Uncheck any unneeded application packaging inclusions, then click Save. The data auditing workspace tab structure will now be completely searchable, indexed, and available inside the platform App Launcher ecosystem.
2.6 Step 5: Embedding the History Related List into the Parent Object Page Layout
To drive end-user adoption and provide instant visibility, the custom audit log layout must be surfaced directly on the parent object record page via a dedicated Lightning Record Page tab.
- Expose Tab via Lightning App Builder: Open any record page for your target object in your app. Click the Setup Gear Icon in the top right corner and select Edit Page. This will bypass the setup menus and open that exact record layout directly inside the Lightning App Builder canvas.
- Open the Related Tab: In the Lightning App Builder canvas, locate the Related tab within the page layout. Click the tab to activate and preview its contents.
IMPORTANT NOTE
The History Tracking component is completely dynamic; it will only appear and function under the Related tab if you manually drag and drop it from the Lightning App Builder sidebar into this specific zone.
- Add the Record History Table Component: From the left-side component library sidebar, search for Record History Table. Drag and drop the component into the desired location directly within the active Related tab pane. Position the component precisely where users should view audit history information.
- Configure the Component: After selecting the newly added component on the canvas, configure the following structural properties in the right-hand properties panel:
- Parent Record: Select Use This Record to automatically reference the current record being viewed.
- Related List: Select your corresponding custom history tracking object name (e.g., Case Histories or Account Histories).
- Include Standard History: Check the box to enable the Include Standard History option to display Salesforce standard field history alongside custom audit history records.
- Header Label: Update the component title field to a user-friendly name such as Record History Table or Audit History.
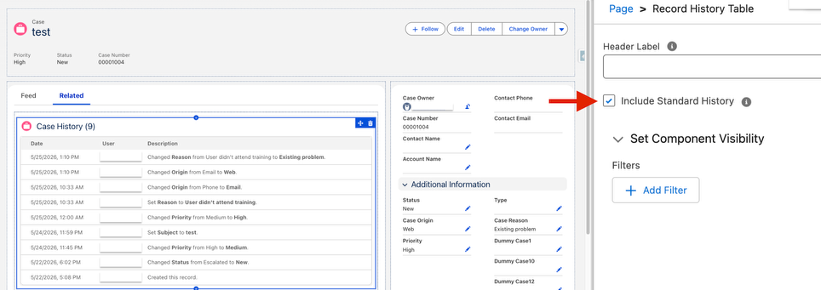
- Save and Activate: Click the Save action button in the global utility header. If prompted by the platform, click Activate and assign the page layout as the default or to the appropriate app, record type, and profile matrix. Once deployed, open an active record and navigate to the Related tab to verify that the History Table displays correctly.
2.7 Step 6: Configure Apex Exception Emails
To ensure platform processing anomalies or unhandled script failures are immediately caught, configure the Salesforce native Apex Exception Email distribution matrix.
- Access Setup Page: In Setup, search for Exception in the Quick Find box and click Apex Exception Email.
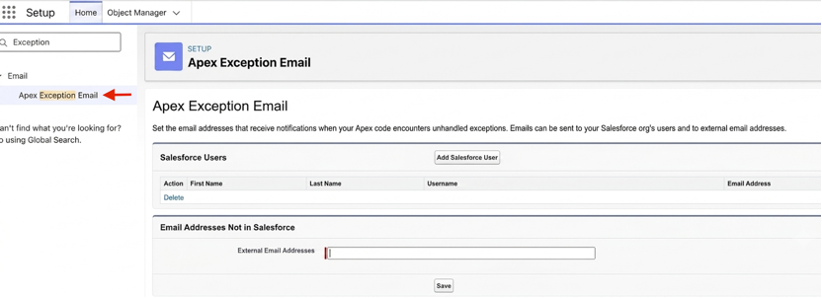
- Add Internal Salesforce Users: Click the Add Salesforce User button to select internal administrators or developers who should receive failure logs.
- Add External Recipients: In the Email Addresses Not in Salesforce section, input external engineering aliases, distribution lists, or third-party ticketing emails into the External Email Addresses text box.
- Save Changes: Click the Save button. A green banner stating, "Your changes have been saved." will confirm successful deployment.
PART 2: Administrative Wizard Setup & Operational Auditing Guide
Document Version 1
The core purpose of this application is to deliver a centralized suite of Unified Screens designed explicitly to configure extended field historical tracking (up to 30 fields per object) natively within Salesforce. By consolidating schema mappings, trigger switches, engine fine-tuning parameters, and data logs into single-point interfaces, this tool eliminates the fragmentation typical of standard platform metadata setup loops.
KEY USER BENEFITS & PLATFORM ADVANTAGES:
- Platform Standard Limitations Bypassed: Track up to 30 fields per object compared to the standard native Salesforce limit of 20.
- Cloud Resource Protection: Asynchronous Queueable Apex processing guards against execution timeout exceptions and standard Governor Limits.
- Reduced Storage Overhead: Automated lifecycle data cleanup via configurable Retention Periods mitigates data bloat.
- Forensic Audit Readiness: Clear tracking logs showing precisely who changed what data parameters, down to the exact modification timestamp.
Section 1: Operating the Application Configuration Wizard Workspace
1.1 Step 1: Parent Object Selection Interface
- Launch the App Workspace: Click the Salesforce App Launcher (the nine-dot grid icon in the top-left corner), type History Tracking Setups into the search bar, and select it to open the primary app home dashboard.
- Initialize New Configuration Setup Profile: From the object home list view dashboard, click the blue New button in the top-right toolbar to launch the configuration setup canvas.
- Target Your Base Object Entity: Locate the component input module labeled Select Parent Object.

- Select Base Asset Parameters: Type your targeted object API name or label (e.g., Case) into the searchable lookup field, click to highlight your choice, and click Next to progress to the metadata controls layer.

1.2 Step 2: Map Your History Object and Define Performance Settings
Configure your background tracking engine parameters within the primary unified screen to ensure active tracking compliance and data storage resource optimization:
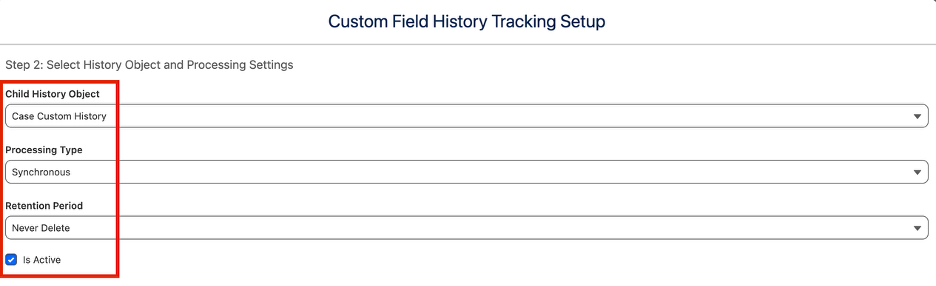
- Establish Custom Storage Repository: Click the dropdown labeled Child History Object and select your matching custom history object repository built during your infrastructure setup phase (e.g., Case Custom History). All raw record modifications will be written directly into this table structure.
- Tune the Platform Execution Engine: Navigate to the Processing Type dropdown and select the technical execution model aligned with your transaction traffic requirements:
- Synchronous: Forces immediate, real-time logging updates. Restrict this setting strictly to low-volume objects to minimize save-time latency and DML locking conflicts.
- Asynchronous (Highly Recommended): Offloads change computing logic to background Queueable Apex execution threads. Select this choice for high-volume objects or enterprise data loads to avoid platform CPU timeout limits.
- Enforce Data Lifecycle Cleanup Routines: Click the Retention Period dropdown and select an operational timeframe range (e.g., 6 Months or 12 Months). The background cleanup automation will reference this setting to automatically purge old log history records, maintaining compliance alignment without manual database pruning. Alternatively, select the Never Delete option from the Retention Period dropdown list. Choosing this setting explicitly dictates that your captured historical log data will remain stored in the repository permanently and will never be deleted by the background automation loop.
- Engage Dynamic Audit Automation Engine: Toggle the Is Active checkbox to the checked position to dynamically enable the background tracking trigger logic.
1.3 Step 3: Fields Audit Grid Selection Matrix
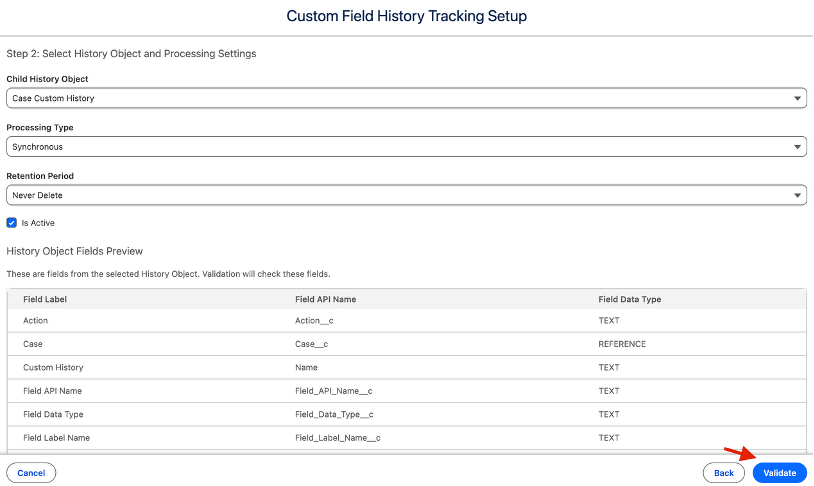
The field selection grid displays metadata derived directly from your parent schema structure within a single unified view.
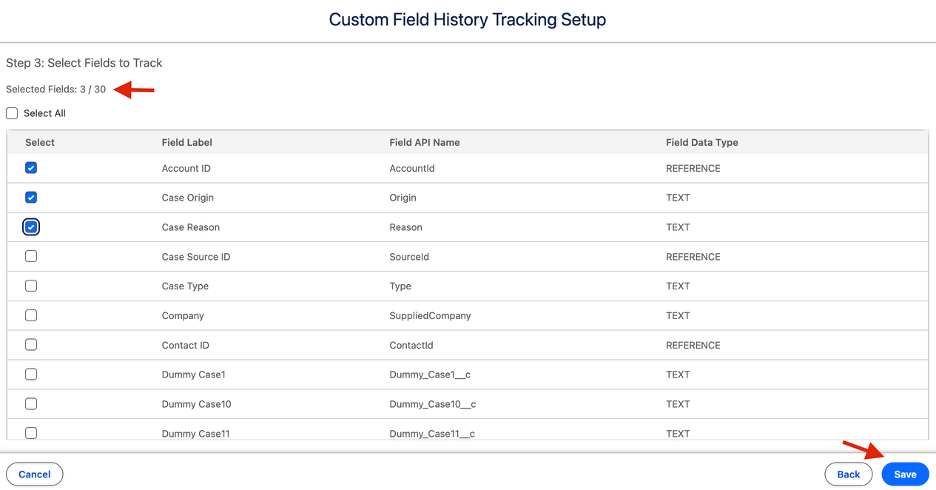
- Locate Field Parameters Mapping Grid: Scroll down the wizard workspace screen to expose the embedded History Object Fields Preview grid.
- Verify Pulled Schema Parent Metadata Properties: Analyze the metadata rows to verify that all structural attributes render correctly, displaying the explicit Field Label, Field API Name, and technical Field Data Type.
- Execute Core Architectural Verification Checking: Click the blue Validate action utility button.
- Designate Checked Audited Metadata Attributes: Select the individual inclusion checkboxes directly adjacent to each field line item you want to actively monitor.
CRITICAL PLATFORM ENFORCEMENT RULES LIMITATION:
Administrators must strictly monitor the parameter count metric checklist array summary data display parameters window. Confirm your chosen configuration settings parameters do not exceed or break the hard maximum platform architecture limitation constraint threshold of up to exactly 30 tracking field criteria map blocks per master setup layout profile.
- Commit Active Tracking Profile: Click the blue Save button to lock down your mapping setup rules array and initialize automatic log tracking auditing layers.
Section 2: Managing and Monitoring History Tracking Setups
Administrators and compliance managers can quickly adjust setting profiles, inspect operational object schemas, or review field selections using default Salesforce record layout screens.
2.1 Step 1: Reviewing Core Configuration Details
- Open Setup Overview Console Workspace: Launch the App Launcher, search for, and choose History Tracking Setups to load your list of configuration setups.
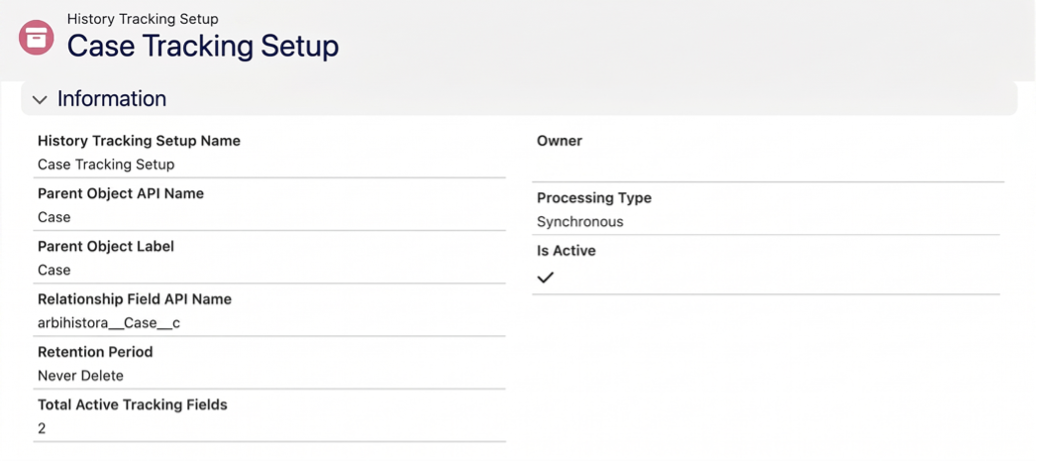
- Select Target Active Profile: Click into your target setup record row from your list view (e.g., Case Tracking Setup).
- Audit System Settings Attributes Summary: Review the primary Details tab panel to monitor overall rule health metrics. Confirm parameters match tracking compliance requirements for Parent Object API Name, Processing Type, and verify if the Is Active checkbox flag displays a true status indicator.
2.2 Step 2: Auditing Active Tracked Fields Records
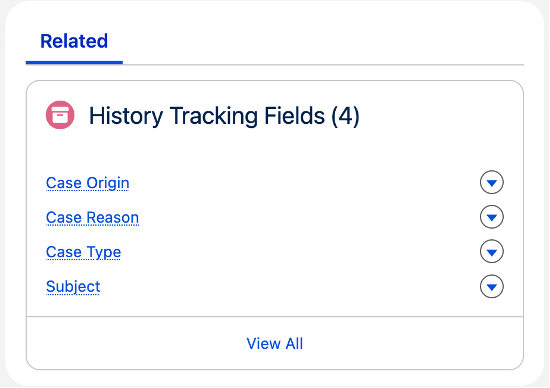
- Switch to the Related Items Tab Workspace: From your primary setup record page workspace, click into the adjacent Related tab layout container panel space.
- Locate Active History Tracking Fields List: Scroll down the related context container view panel to identify the list section labeled History Tracking Fields. This related list summarizes all parent field attributes currently undergoing change monitoring surveillance (e.g., Case Origin, Case Reason, Case Type, Subject).
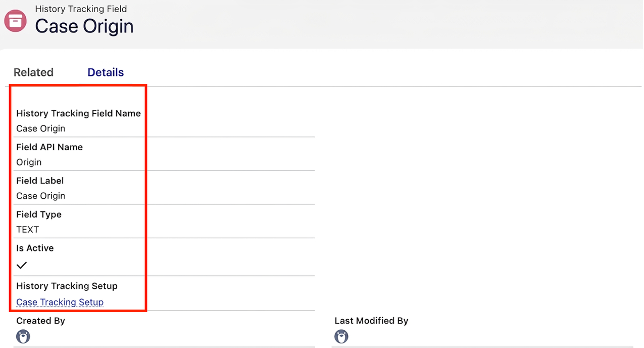
- Audit Deep Tech Field Schema Custom Context Specifications: Click directly into any individual field row element to check technical structural attributes, database classification fields tags (such as TEXT or REFERENCE options maps structures), and confirm tracking trigger health settings parameters.
Section 3: Data Governance Inspection & Verification Logs
When users update record fields inside your org, the database tracking trigger captures delta change properties and records audit logs automatically.
3.1 Step 1: Accessing Historical Log Data Repositories
- Launch Primary App Explorer View Dashboard: Click open the primary master App Launcher platform utility console launcher widget button module in the upper horizontal quadrant toolbar.
- Navigate to Targeted Compliance Data Logs: Search for and select your custom operational data layout view tab established during backend infrastructure setup procedures (e.g., select Case Custom Histories).
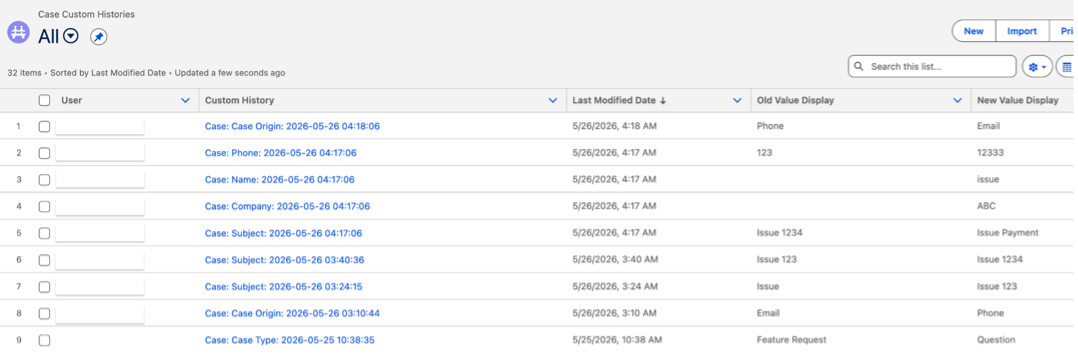
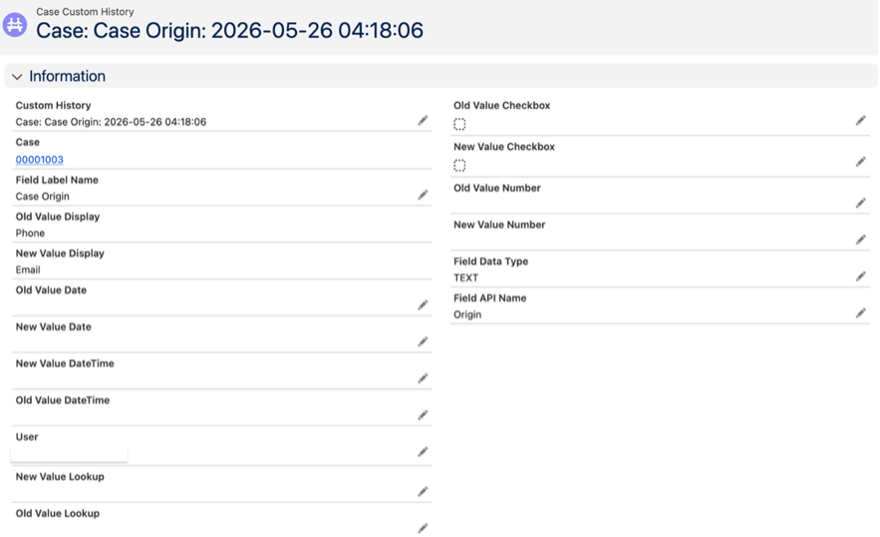
- Launch Granular Auditing Verification Workspace: Click into any specific unique auto-generated tracking code record line link item row to pull up the complete metadata breakdown dashboard summary layout screen.
3.2 Step 2: Data Accuracy Verification and Governance Inspection Checks
Internal security officers and data protection auditors should periodically evaluate log rows to ensure complete compliance trail verification metrics:
- Old Value Display Evaluation: Analyze the text display property to confirm it precisely returns the data state values exactly prior to the record change transaction event.
- New Value Display Evaluation: Confirm that the formula logic extracts, formats, and displays the updated current change tracking state text string values accurately.
- Change Identity User Attribution Traceability: Verify the platform audit User__c standard lookup row field to track down exactly which credentials initiated the modification transaction. This provides forensic verification evidence chains required to pass rigorous external regulatory security compliance audits.
3.3 Contextual Auditing via Parent Record Tabs
While audit officers can track system metrics using global standalone tab views, frontline users, support agents, and team managers can execute high-speed validation directly within individual parent records using the embedded workspace layout panel.
- Navigate to Active Target Record: Open any standard operational workspace (e.g., a live Case record profile view).
- Access Embedded Audit Dashboard Component: Locate the central operational panel tabs context bar layout area array on the record page workspace and select the Case History Tracking tab view.
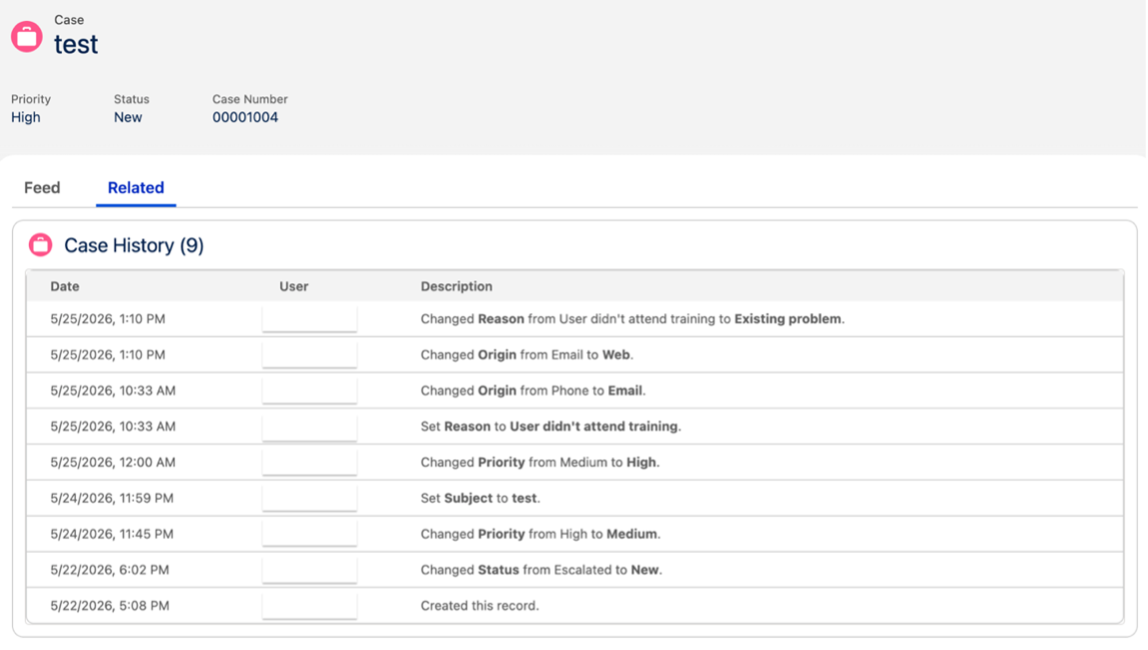
- Run Immediate Inline Auditing Sweeps: This context area displays a clean list array showing all recent modifications committed explicitly to this record profile. Users can immediately review historical field variations, old values, and user attributions without navigating away from the record or opening secondary analytics dashboards.